Device Data Sharing
Overview
The EU Data Act, fully titled the Regulation on Harmonised Rules on Fair Access to and Use of Data, was formally adopted by the European Commission in November 2023 and entered into force in January 2024. Its main provisions will become fully applicable starting in September 2025.
One of the core objectives of this regulation is to ensure that users can access and use their data fairly and securely, which is typically stored by device manufacturers. A key requirement is that users of IoT devices have the right to authorize third-party service providers to access their device data, thereby promoting data-driven innovation and service competition. For more information, visit the official website.
Tuya platform already provides device data sharing services that comply with the EU Data Act, helping OEM/ODM app users and SDK users (data holders) easily fulfill legal obligations for data sharing and enabling third-party companies to utilize device data for developing new services. This topic describes how to configure and use device data sharing.
Terms and definitions
| Term | Description |
|---|---|
End user |
The user of an app. They connect and control devices via the app and are the owners of the device data. Based on the EU Data Act, app users have the right to authorize third parties to access their device data (Hereinafter referred to as User). |
| App owner | The owner of an app. Enterprises that develop and operate apps for device pairing and control are considered data holders (Hereinafter referred to as app owner). |
| Third-party enterprise | An EU-based enterprise that wishes to get end-user device data to provide value-added services, such as data analytics, energy efficiency services, and insurance. Such enterprises might not have a direct commercial relationship with the end user and must get data access through statutory authorization processes. |
Prospect customers and regions
In accordance with the requirements of the Data Act, only users and enterprises within the EU region are permitted to share or access device data. Therefore, to use Tuya’s platform services, third-party enterprises must meet the following conditions:
- The cloud project must be deployed in the Central Europe Data Center.
- Both the developer account and user account must be registered in the Central Europe Data Center.
- Enterprise account verification must be completed on the Tuya Developer Platform.
- Your enterprise must not be included in the gatekeeper list.
After the above conditions are met, you can view project details on the page of Tuya Developer Platform > Project Management and see the service entry.
Procedure
To implement device data sharing, perform the following steps:
- The third-party enterprise configures and integrates an H5 authorization page.
- The user performs authorization on the authorization page.
- The app owner enables authorization.
- The third-party enterprise subscribes to cloud services and gets device data.
For more detailed operations, refer to the instructions below.
Configure H5 authorization page
Device data sharing is authorized through the standard OAuth 2.0 protocol. After configuring and generating an H5 authorized login page, the third-party enterprise can integrate this page into your terminals, like the app and control panel. Perform the following steps:
-
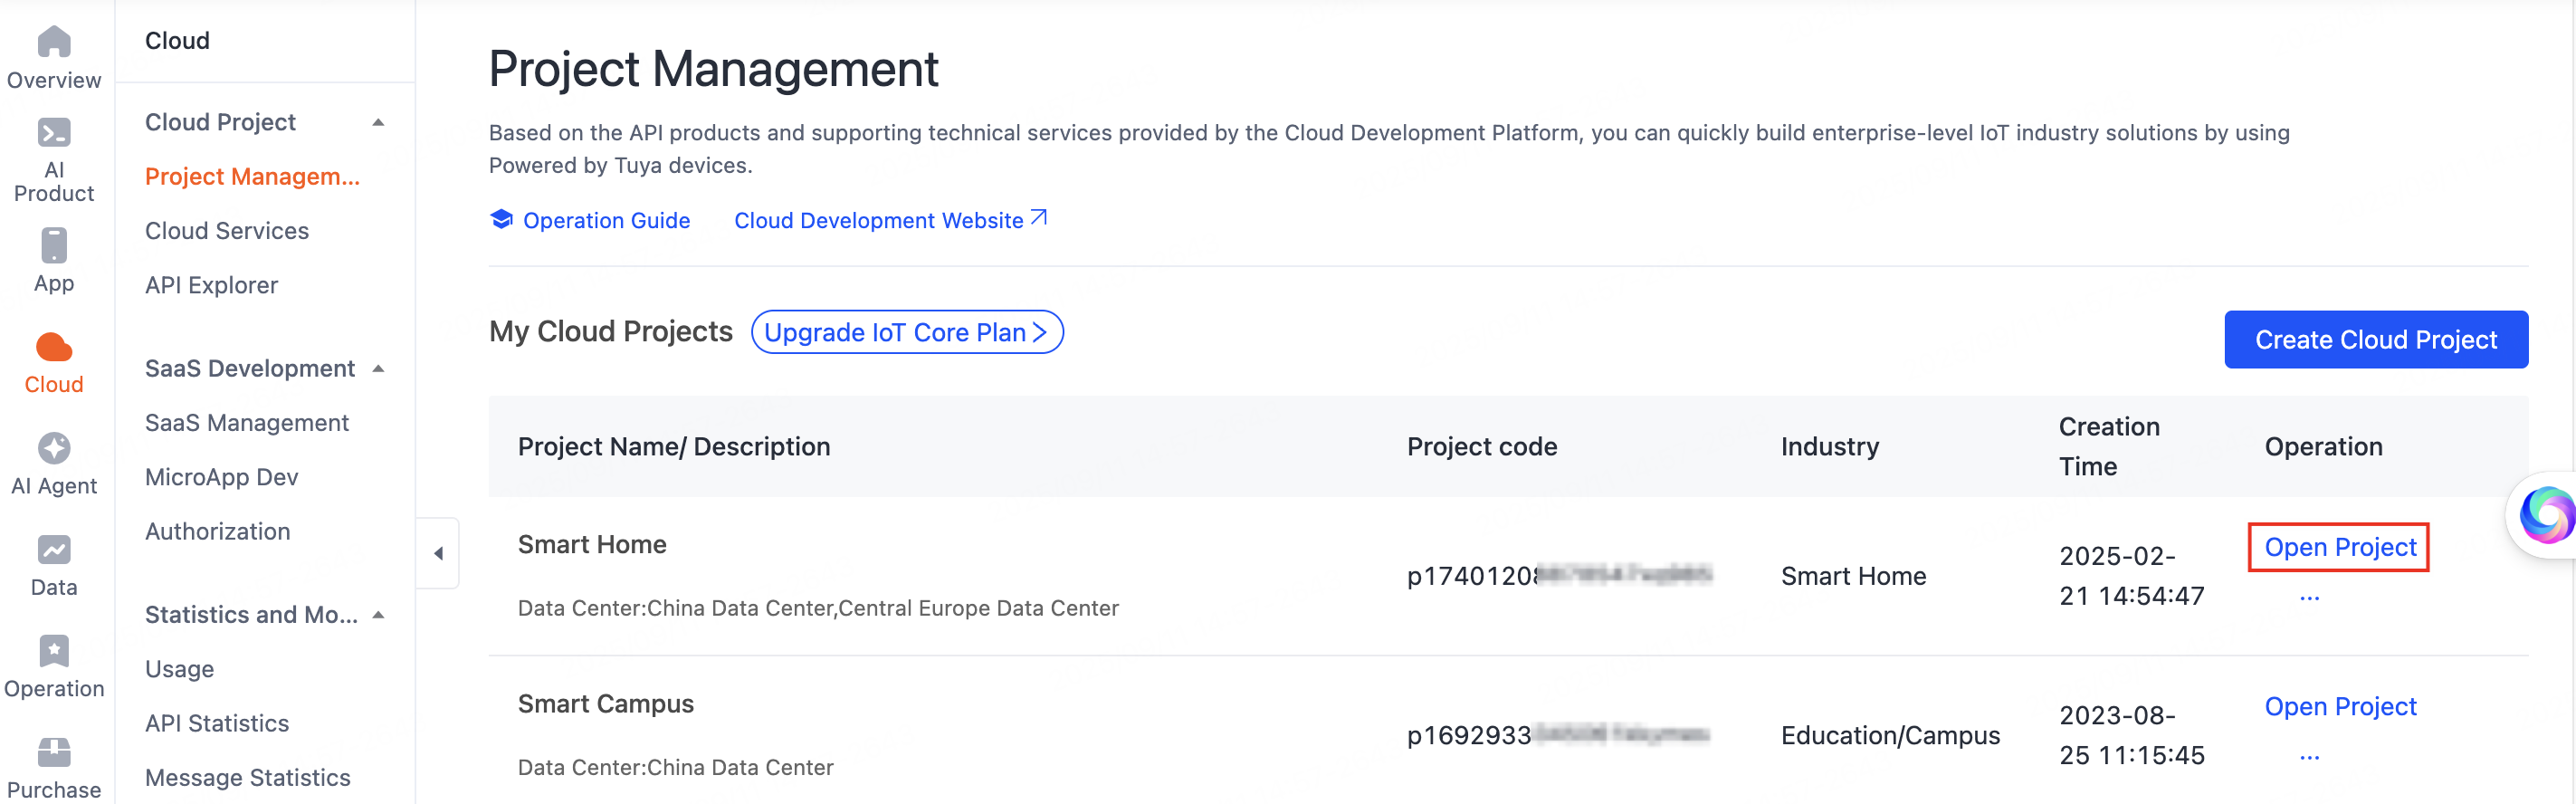
Go to the Tuya Developer Platform > Cloud > Project Management page, locate the desired project, and then click Open Project in the Operation column to go to the project details page.
-
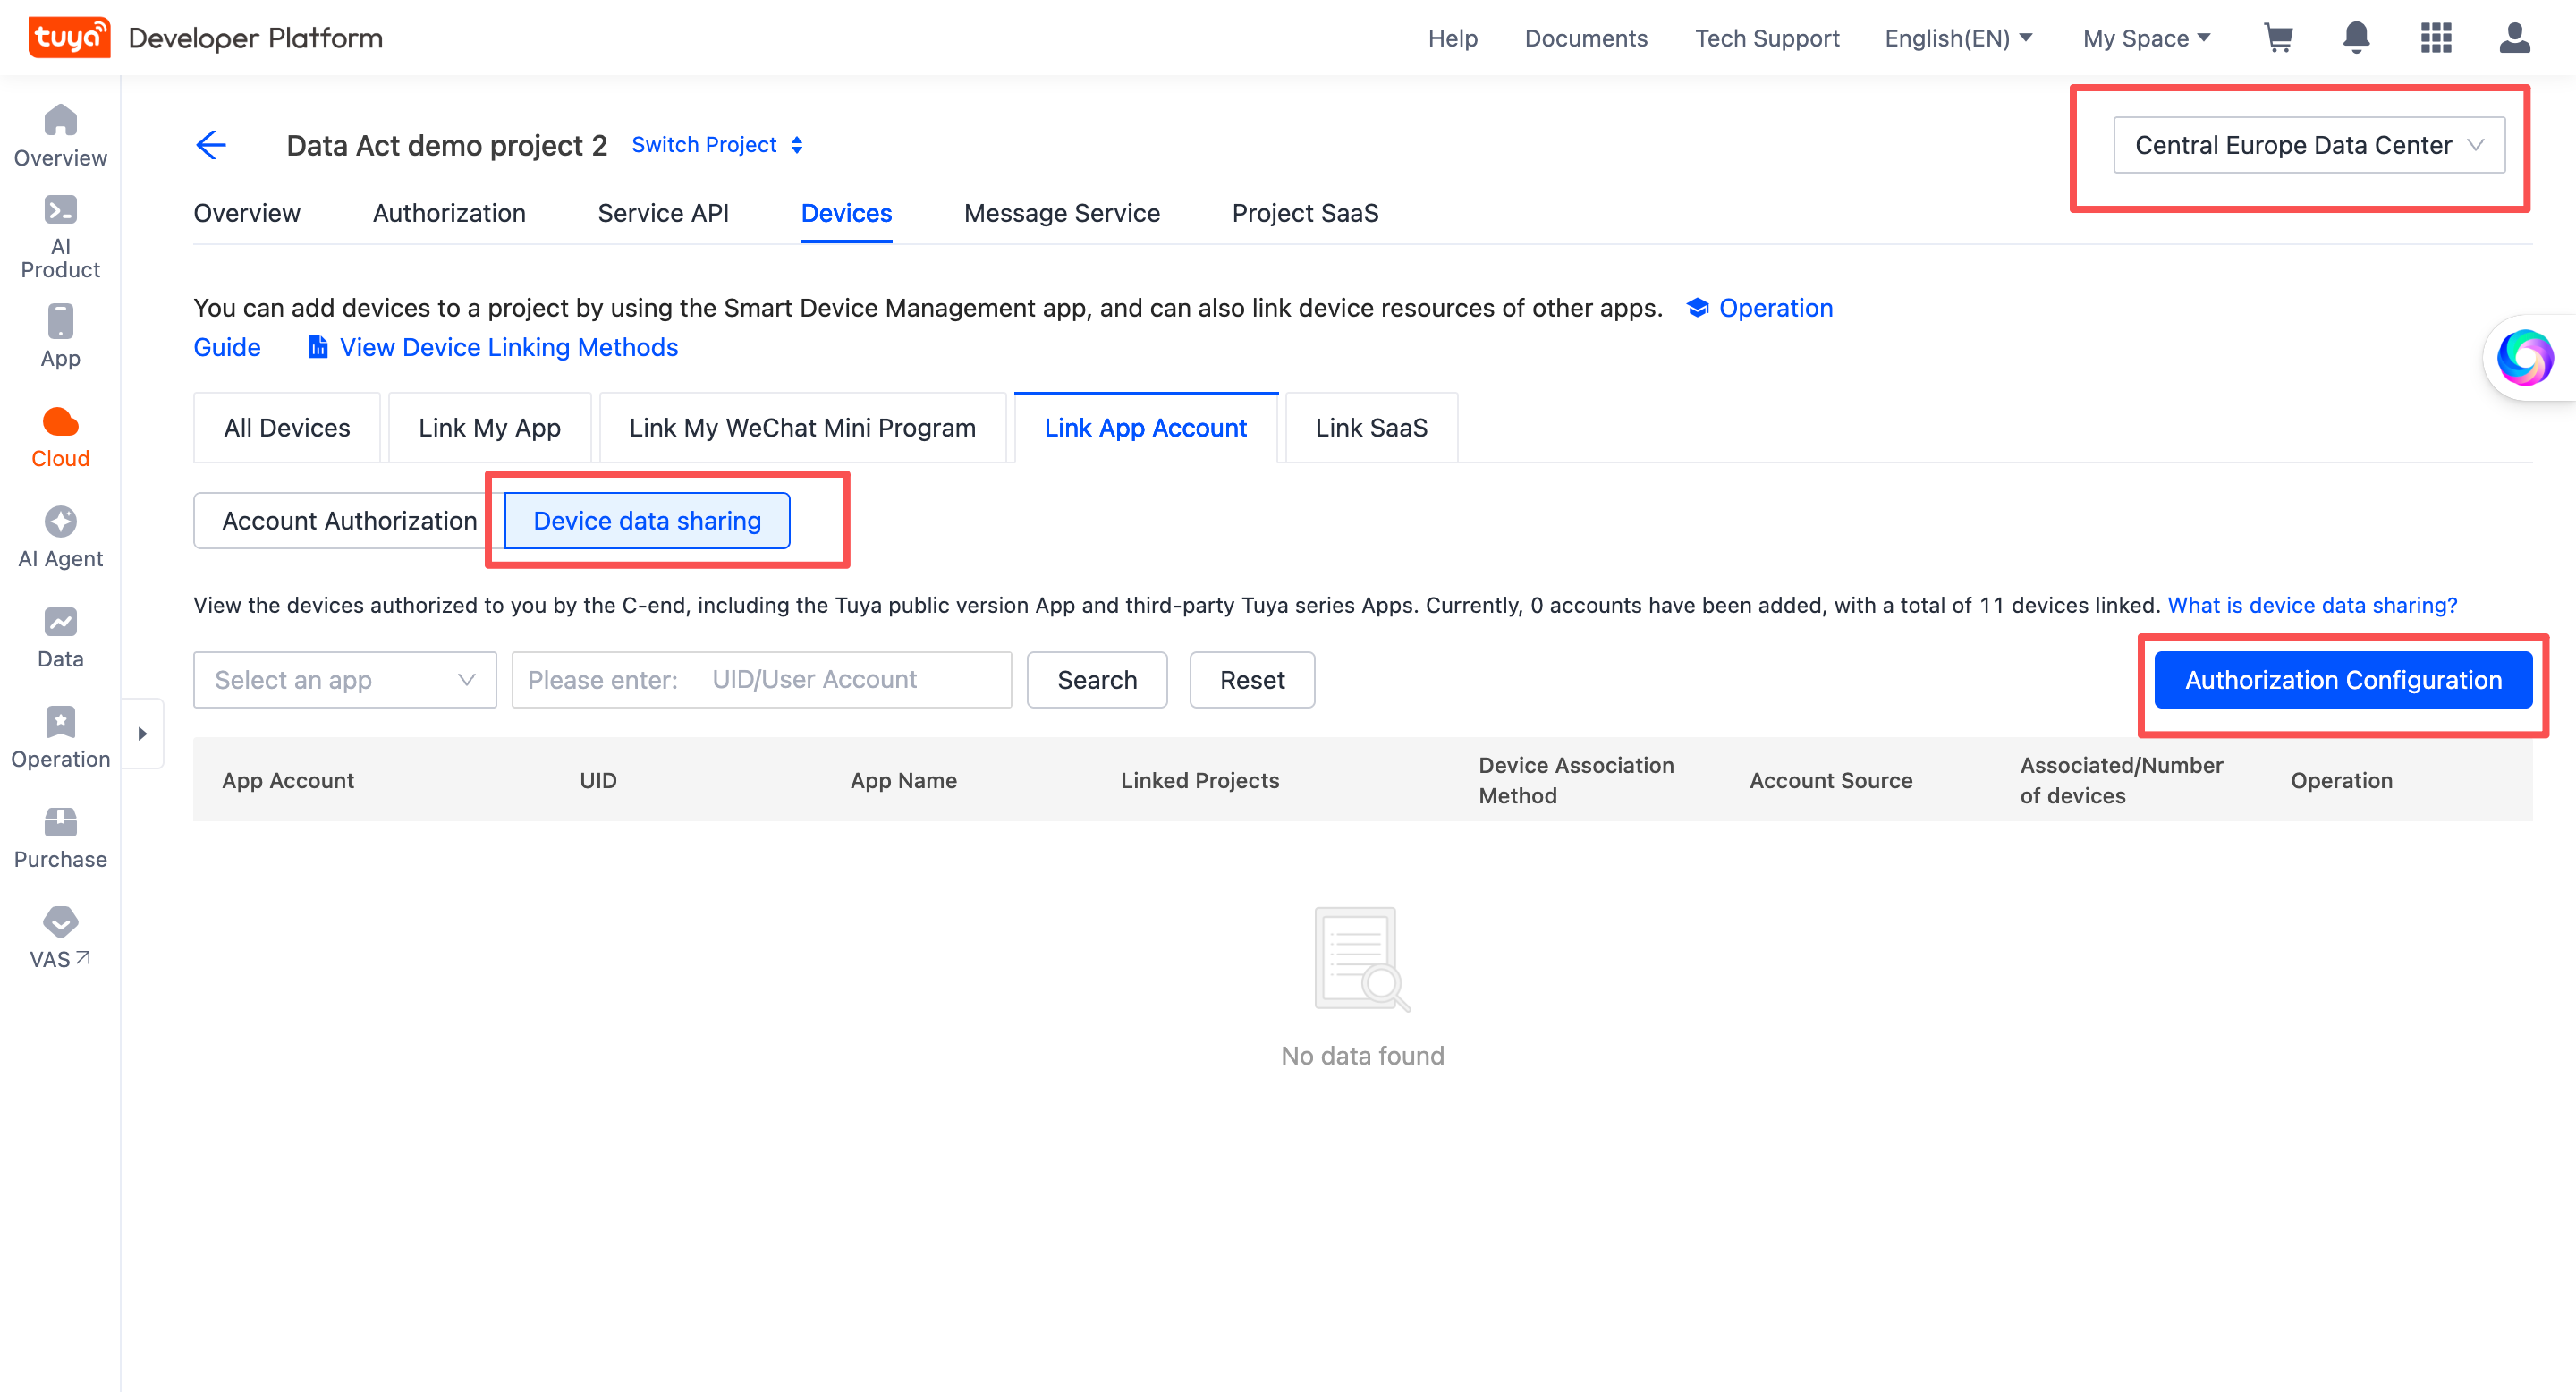
Click the Devices tab and select Central Europe Data Center in the top right corner of the page. Then, in the Link App Account tab, choose Device Data Sharing > Authorization Configuration.
-
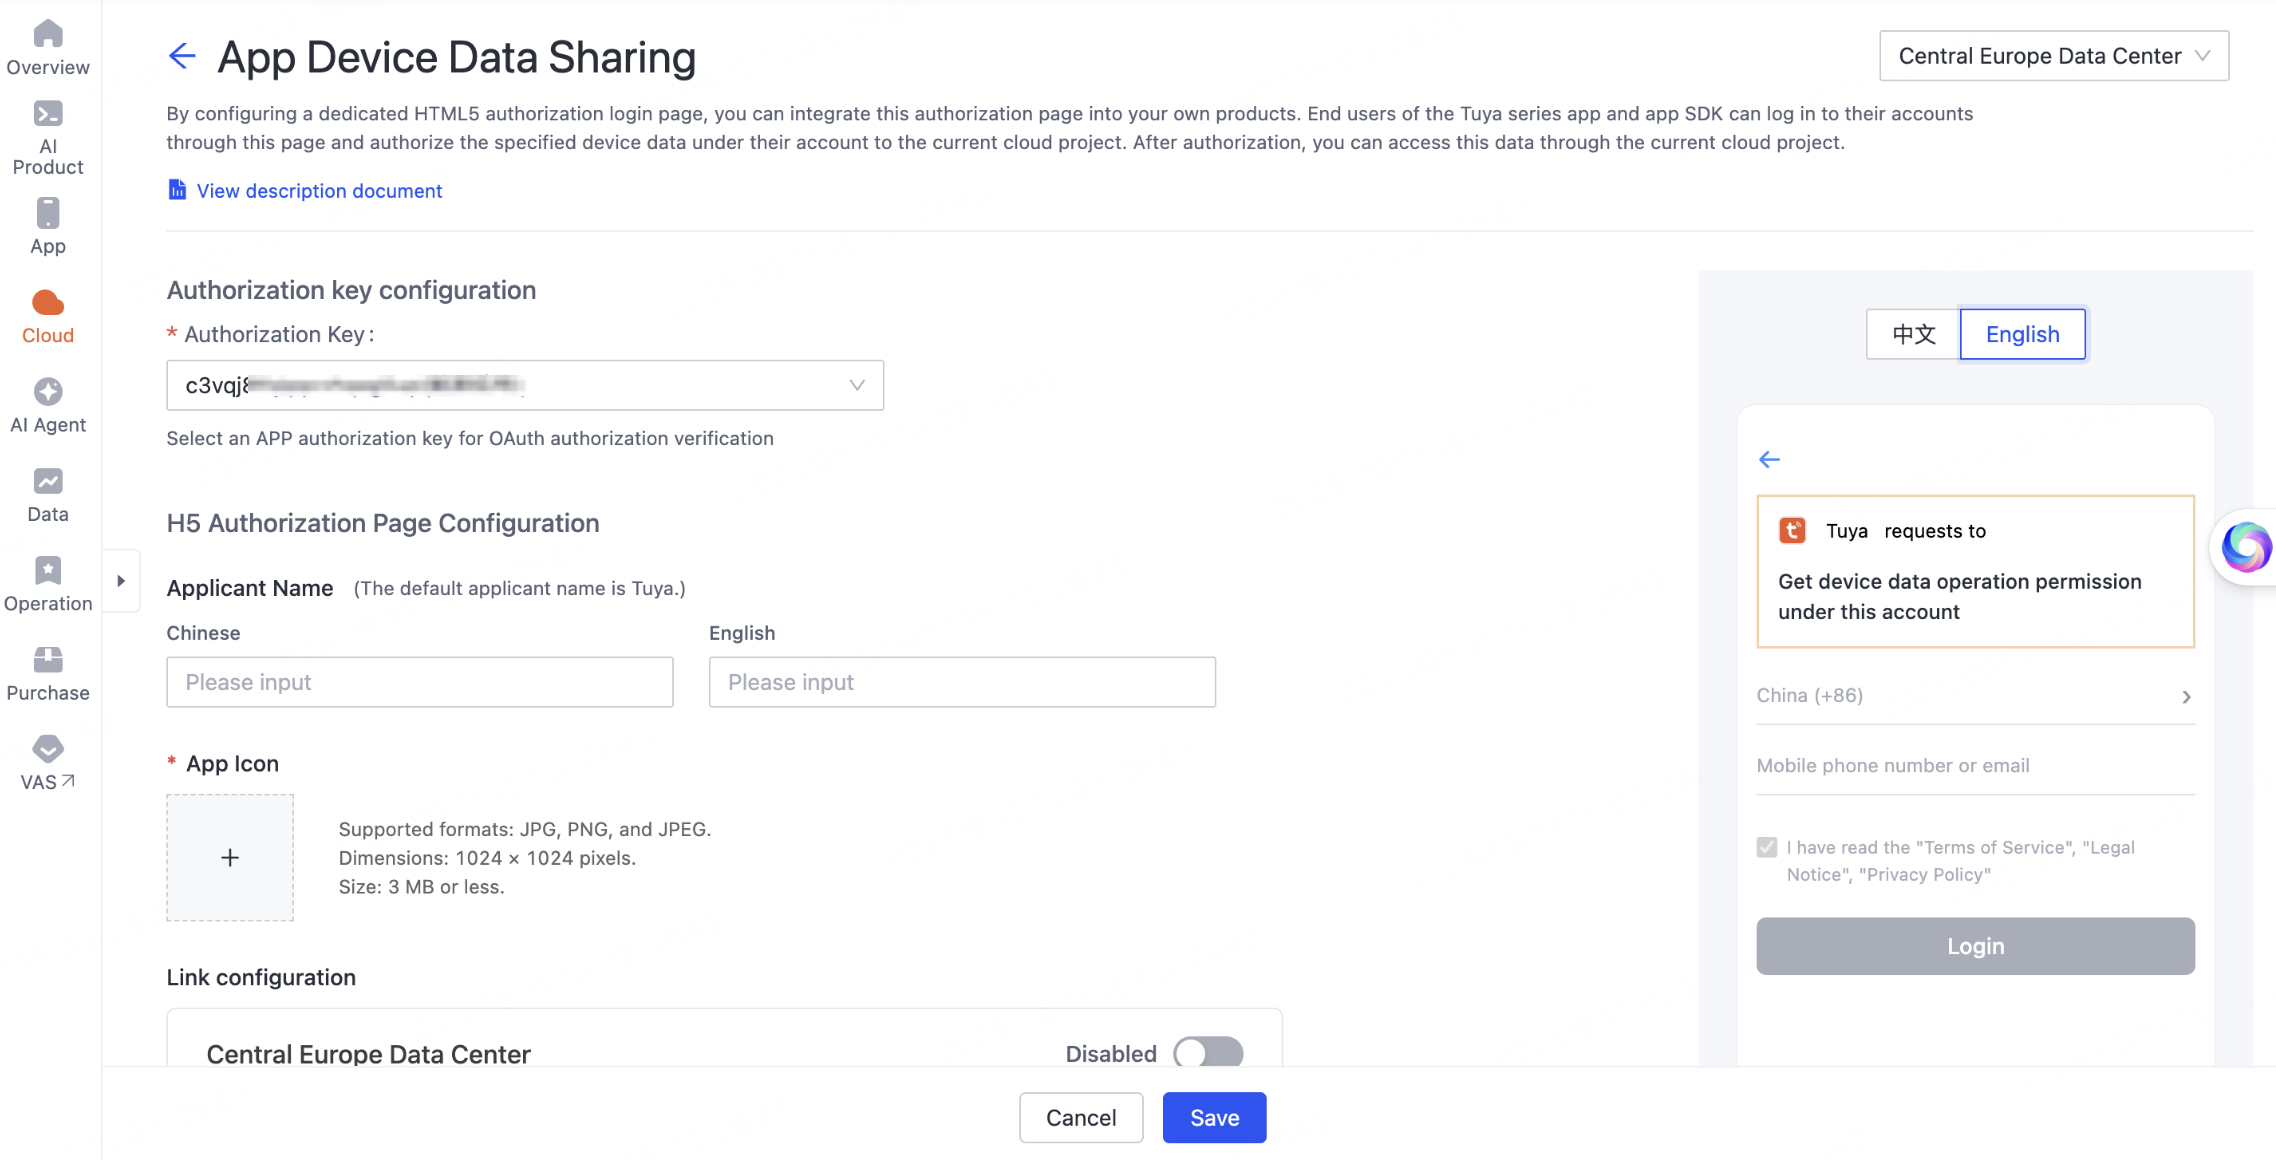
On the page of App Device Data Sharing, configure the authorization key and H5 authorization page, and click Save.
-
Configure an authorization key. The authorization key is the key information for app authorization. For more information about the app key, see App authorization.
-
Configure the authorization page and callback URL. Get the URL to the H5 authorization page.
-
-
Once the user gives consent, the OAuth 2.0 authorization code will be sent through this URL and can only be used in the user’s data center.
Authorization process
User authorization process
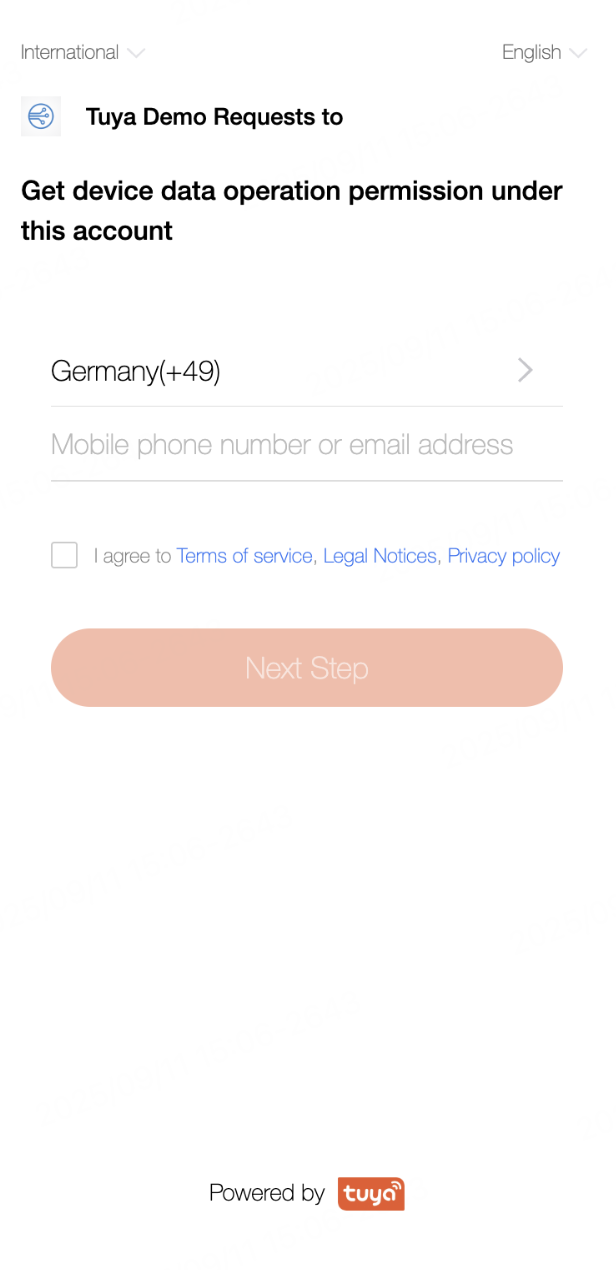
Open the app, tap + > Scan in the top right corner, and then scan the authorization QR code provided by the third-party enterprise. Perform the following steps to complete authorization.
-
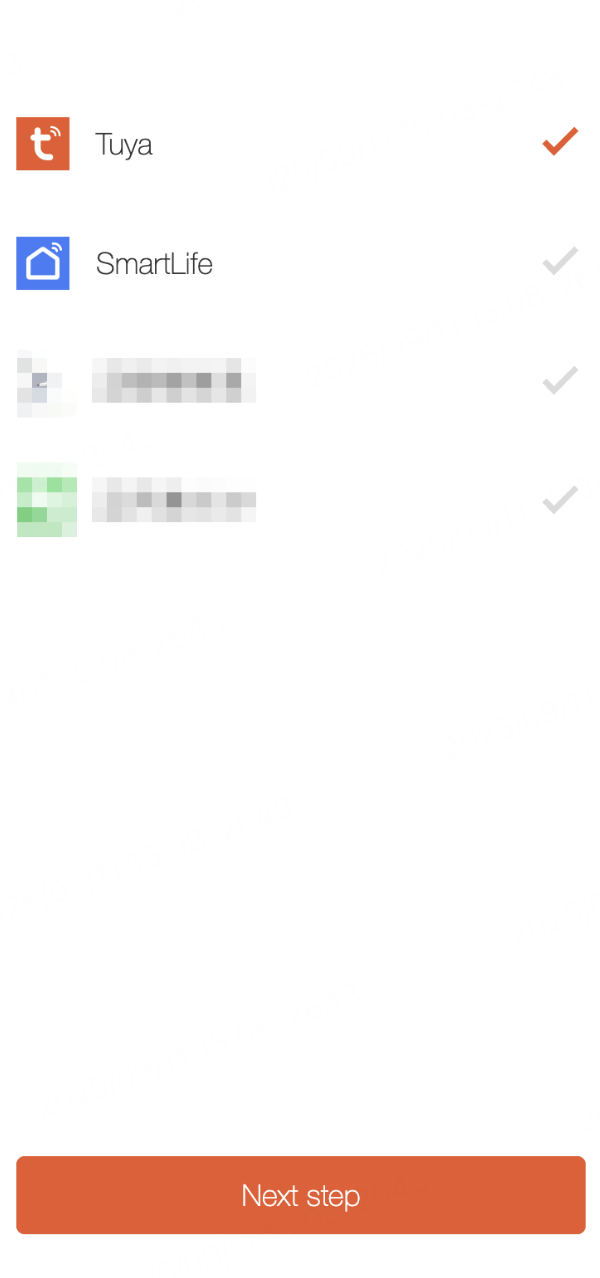
Enter a mobile phone number to get authorizable apps.
-
Select the desired app and proceed to the login page.
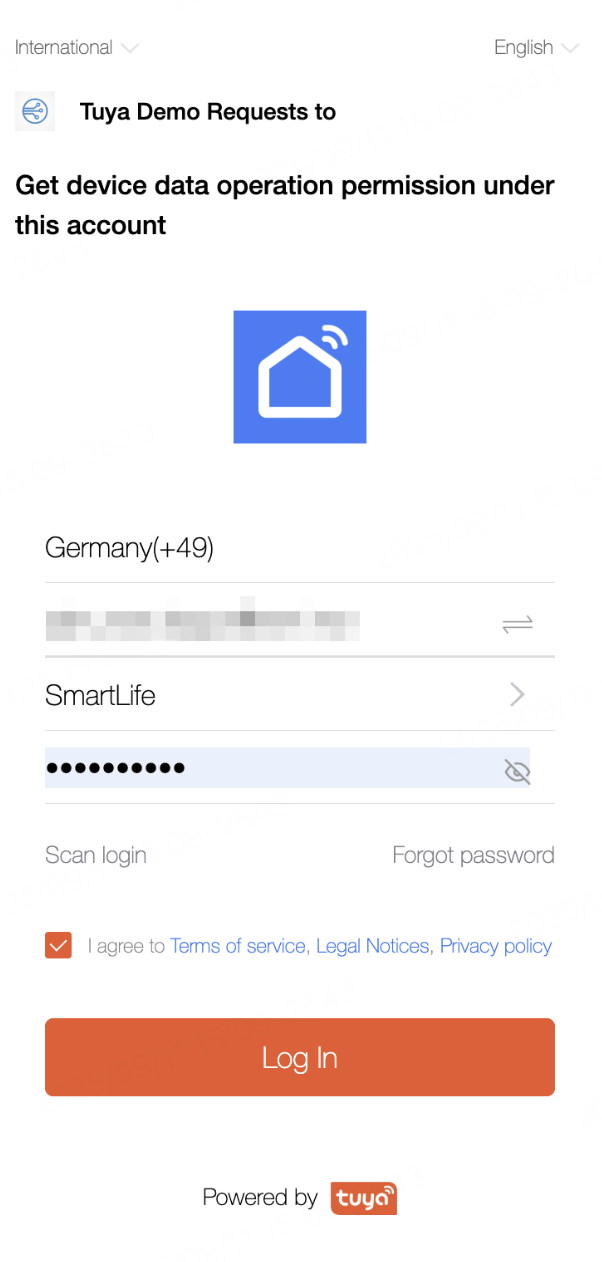
-
Enter the password to log in, or switch to QR code login.
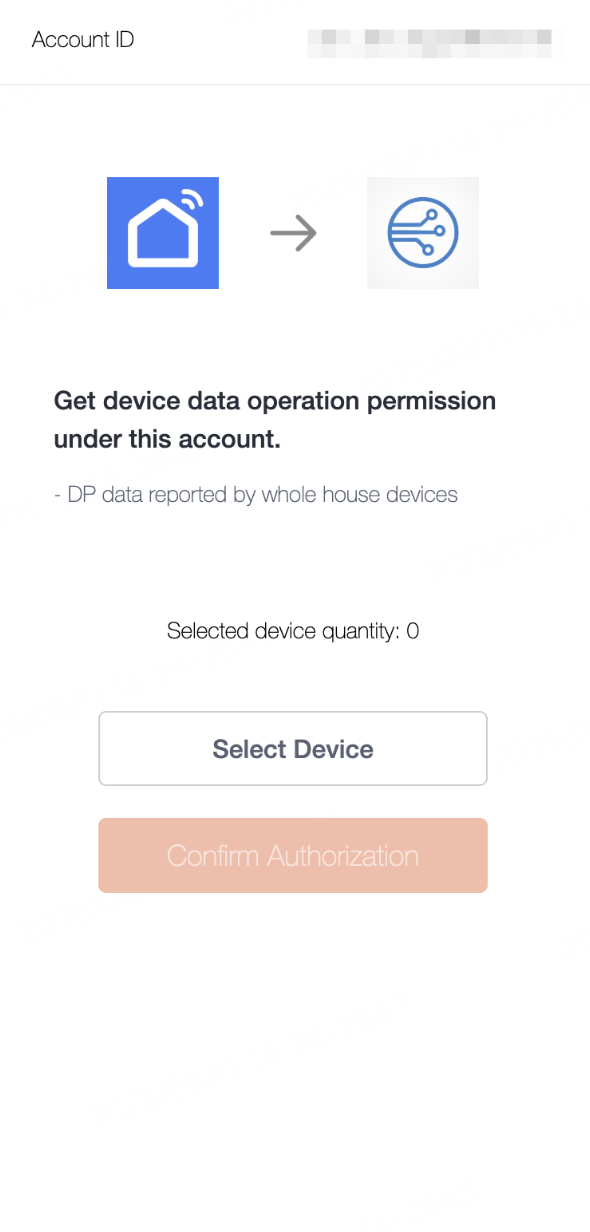
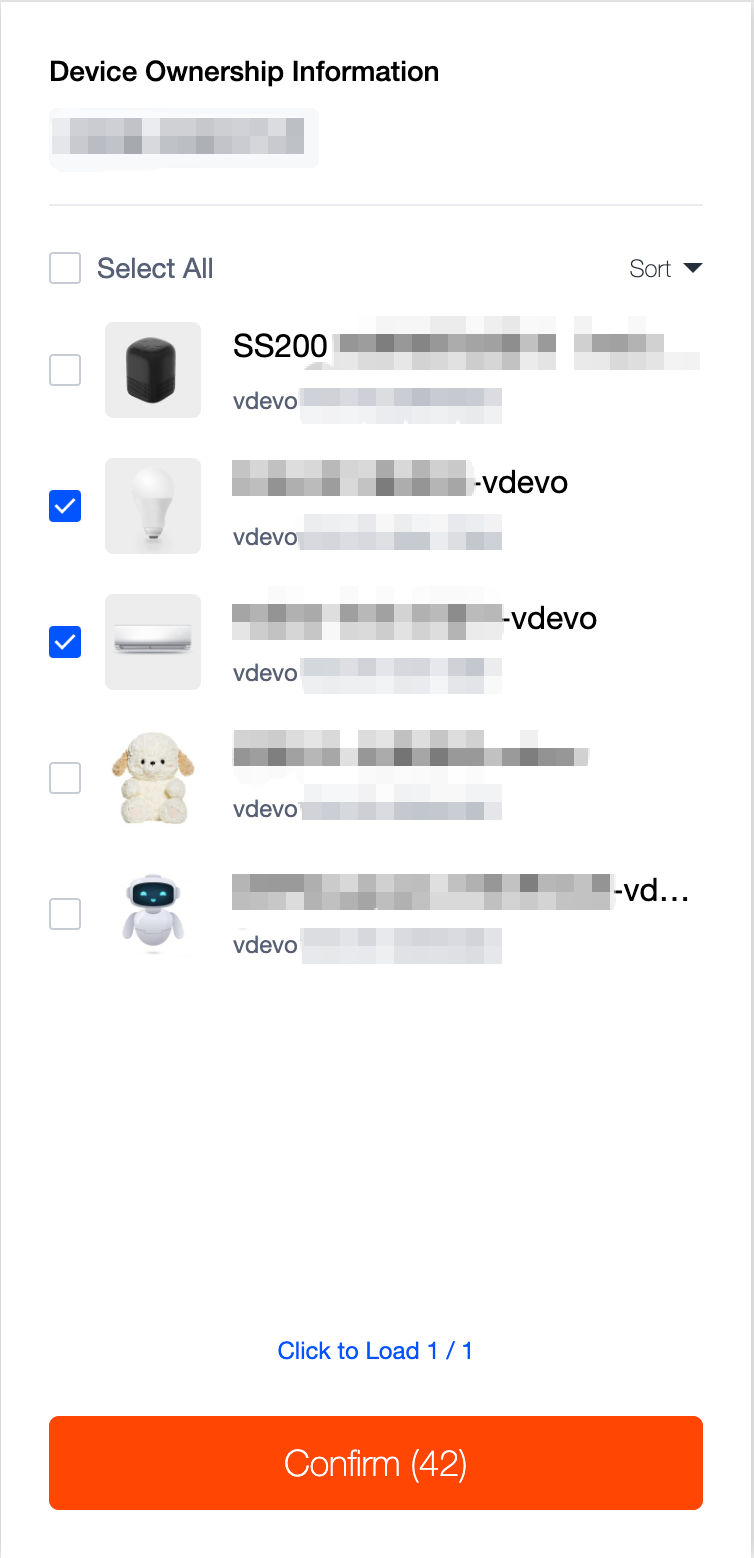
-
After successful login, navigate to the authorization page. Tap Select Device, choose the home and the devices to be shared under that home, and then tap Confirm. Upon successful authorization, the Tuya cloud sends the OAuth 2.0 authorization code to the third-party cloud through the callback URL.
Process diagram
Get an access token
Manage authorization
After user authorization is obtained, it is also necessary to obtain authorization from the app owner. Only after this authorization can third-party enterprises access the data.
The app owner goes to the Tuya Developer Platform > App User Management page. Select the Central Europe Data Center in the top right corner of the page, click EU Data Sharing Authorization, and then enable the Authorization Status in the dialog that appears. After authorization is enabled, it indicates that the app owner agrees to allow Tuya to provide user-authorized device data to third-party enterprises and to charge these enterprises platform usage fees for this service.
The app owner can also disable authorization. Once disabled, authorization for all apps under the owner will be terminated, and users will no longer be able to authorize devices under these apps to third-party enterprises.
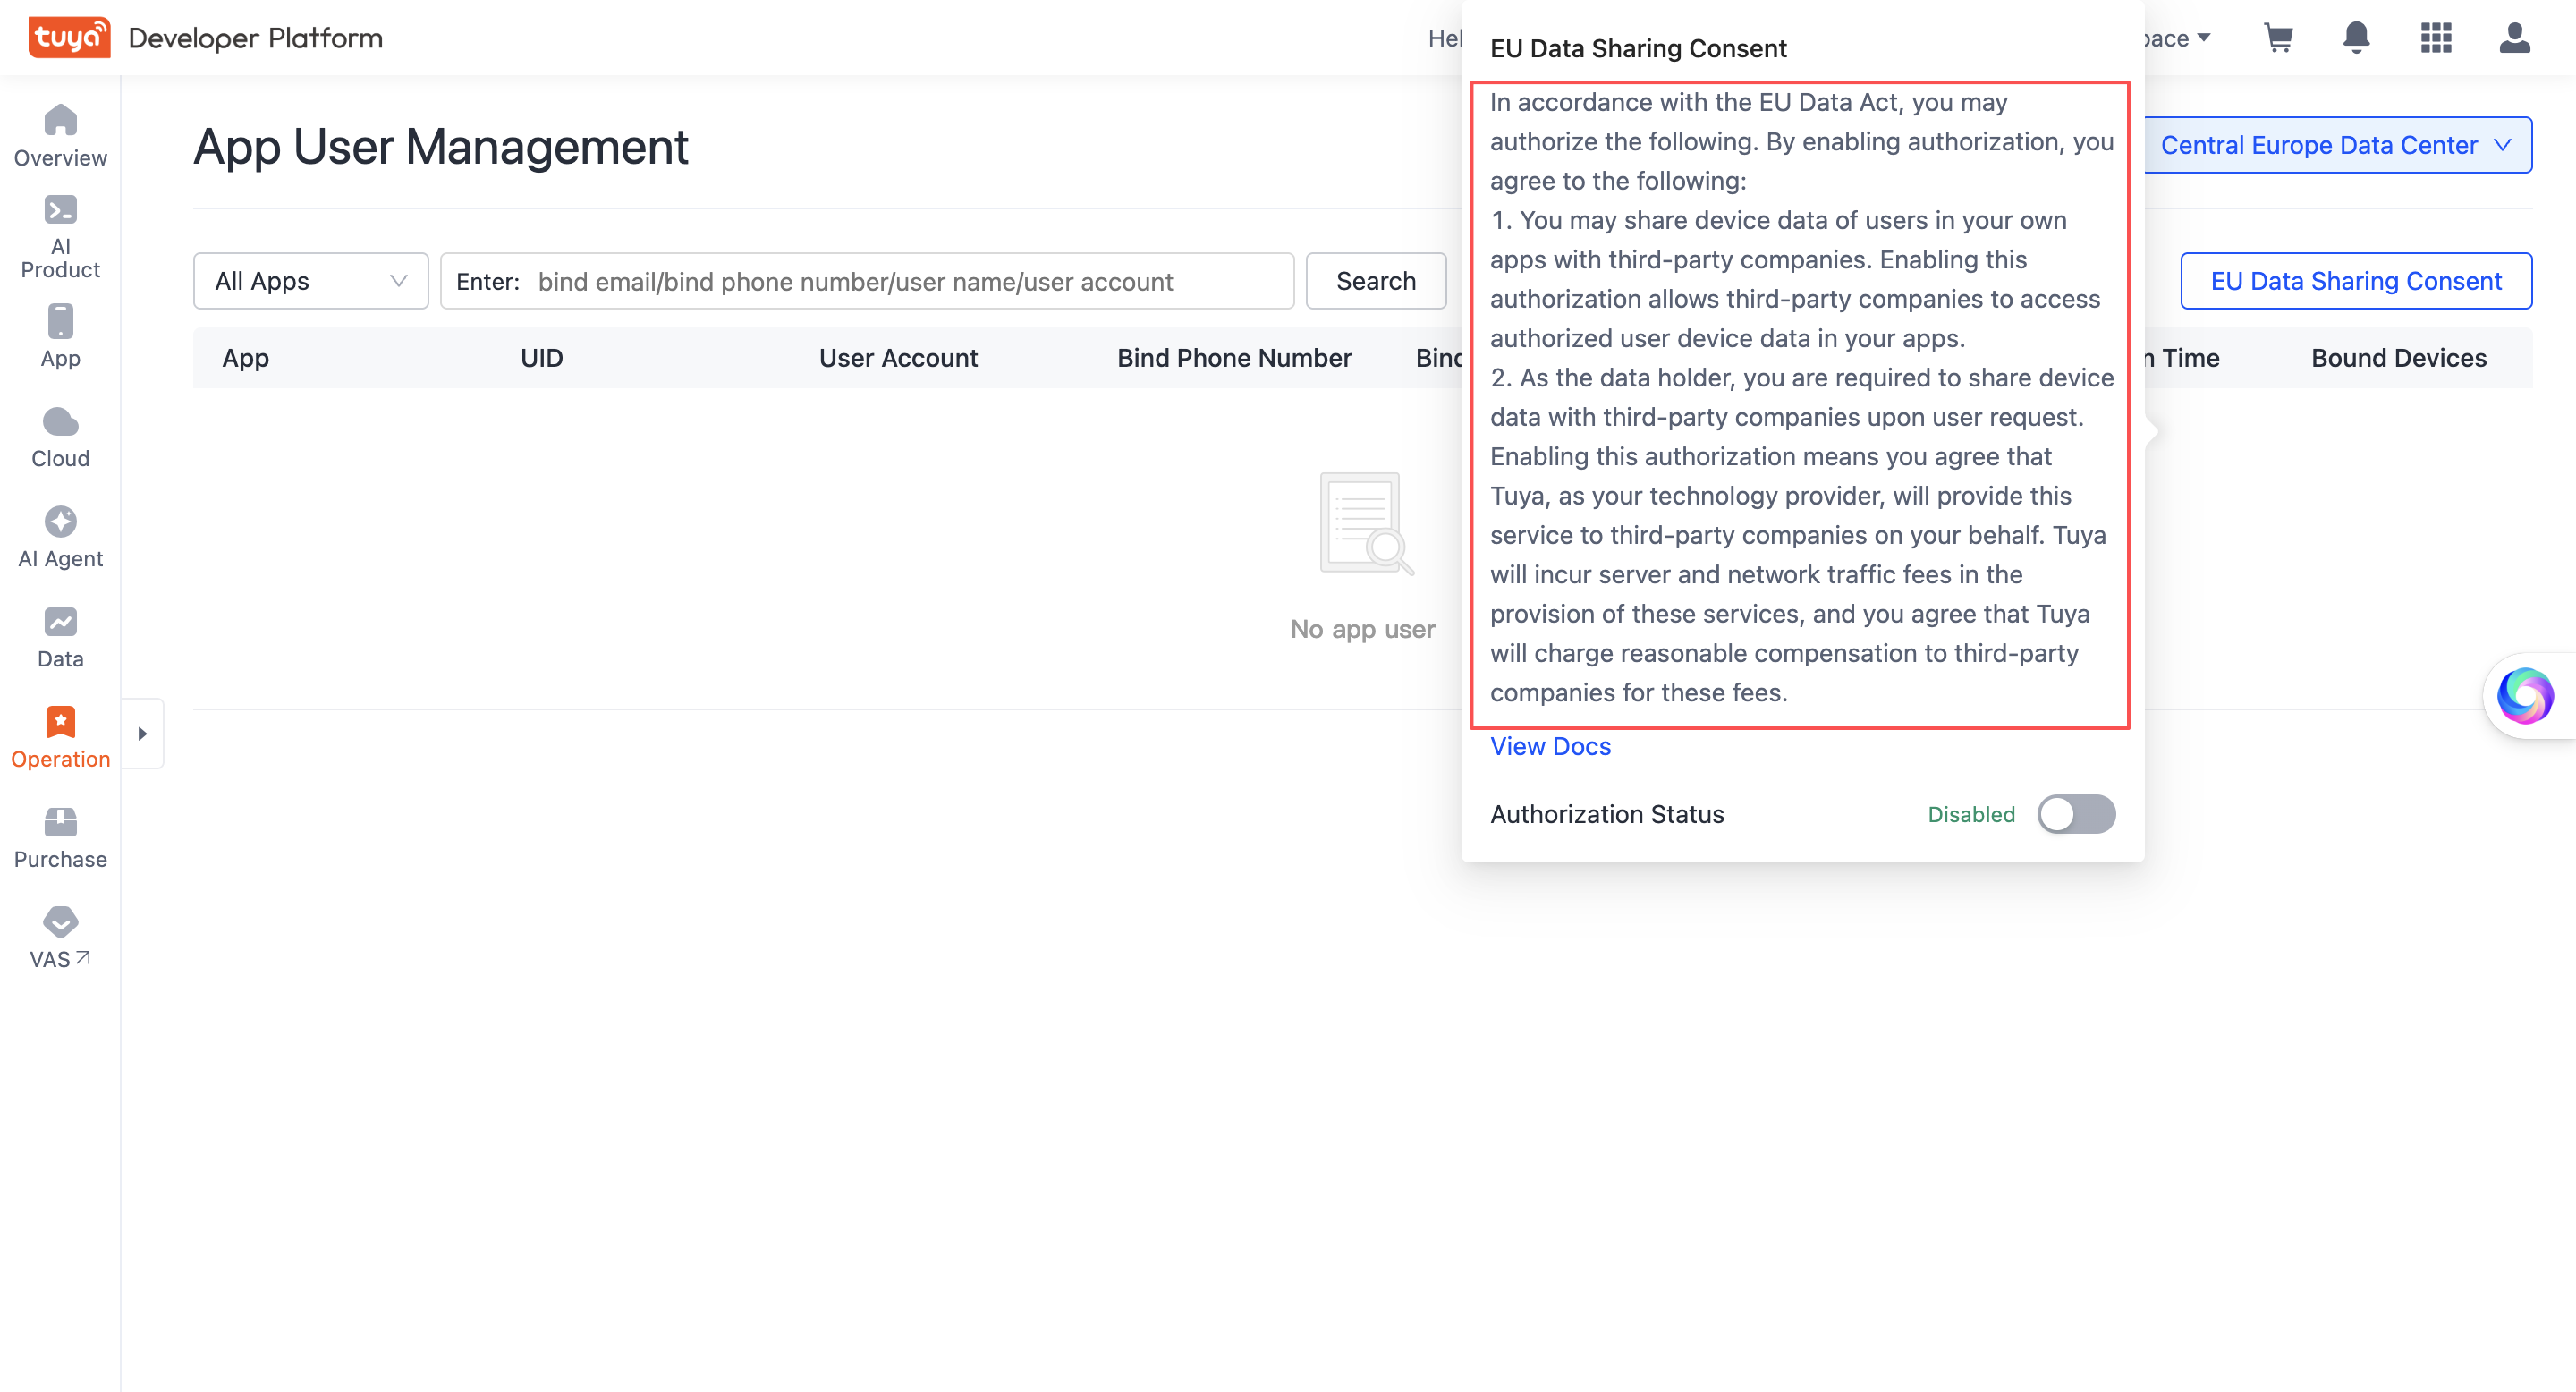
The Tuya app and SmartLife app have enabled authorization by default. As long as a user visits the third-party authorization page and grants access to devices under the Tuya and SmartLife apps, the third-party enterprise can obtain data from these devices.
Subscribe to cloud services
Tuya offers a packaged message subscription cloud service for device data sharing in the EU region. Third-party enterprises can subscribe to the cloud service to obtain real-time messages reported by authorized devices.
-
Subscribe to the cloud service.
- Go to the Tuya Developer Platform > Cloud Services page.
- In the section of My Service, search for Device Data Sharing and click Subscribe to Resource Pack in the Operation column to subscribe to the service.
-
Configure the message service.
- Go to the Tuya Developer Platform > Project Management page, locate the desired project, and then click Open Project in the Operation column to go to the project details page.
- In the tab of the Message Service, enable the Message Service. For more information, see Manage Message Service.
- After the settings are completed, the user will start receiving messages reported by authorized devices. For more information, see Standard Instruction Set.
Manage authorization
End users can manage authorizations on the app v7.0.5 or later. Perform the following steps:
-
On the app, go to the Me tab, tap the Settings icon in the top right corner, and then find Account and Security.
-
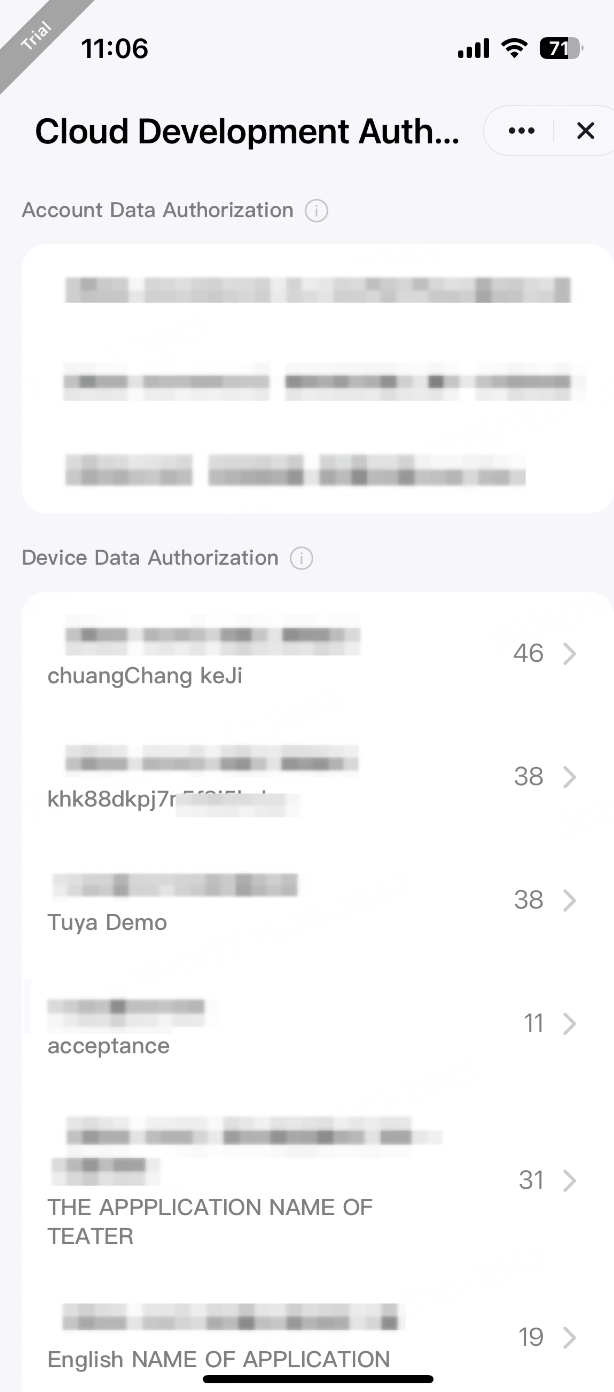
Navigate to Authorization Management > Cloud Development Authorization and tap to enter the details page.
-
The details page lists all types of cloud projects currently authorized by your user account. Locate the Device Data Authorization type to view the cloud projects (under the current user account) that have been authorized to third-party enterprises via device data sharing, along with the number of accessible devices under each project.
-
You can swipe left to revoke your account’s authorization for that cloud project. After authorization is revoked, the cloud project will no longer be able to access information from the historically authorized devices under your account.
-
-
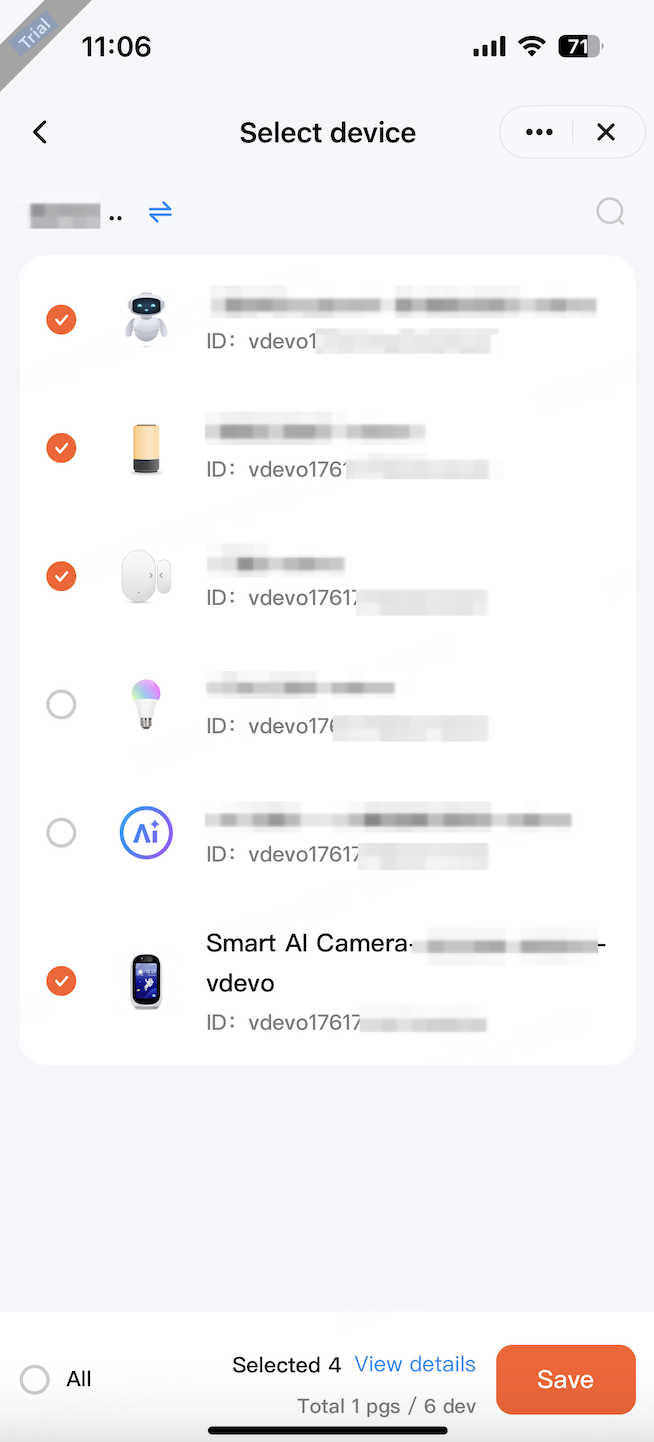
Select the desired cloud project to enter the device list page. You can switch between homes in the top left corner of the page, and then authorize/revoke authorization for device data sharing by selecting/deselecting devices under the respective home.
Is this page helpful?
YesFeedbackIs this page helpful?
YesFeedback


