Quick Start
This topic describes the directory structure of the development kit, with an explanation of folders and their content.
Directory
The directory of the development kit:
├── hardware                  # Hardware documentation.
├── pc
│    └── tools                # Development tools.
├── software
│    ├── packages             # SDK package.
│    ├── SDKInformation.json  # SDK information file.
│    └── TuyaOS               # SDK directory.
│        ├── apps             # The sample applications, which can be modified as needed.
│        ├── build
│        ├── build_app.sh     # The build script.
│        ├── CHANGELOG.md
│        ├── doc              # API reference.
│        ├── include          # SDK header files.
│        ├── libs             # SDK libraries. You can link them as needed.
│        ├── LICENSE          # Tuya MIT License
│        ├── Makefile
│        ├── output           # The build output.
│        ├── README.md
│        ├── scripts
│        └── vendor           # The toolchain. When you build a project, the toolchain is automatically downloaded to this directory.
└── tuya.json
The directory of TuyaOS > apps > demo:
├── application_components       # The open source gateway components.
├── application_drivers          # The open source gateway drivers.
├── app.mk
├── audio                        # The audio file.
├── build                        # The resources that should be included in the gateway project.
├── build.conf
├── build.sh                     # The build script.
├── doc                          # Documentation.
├── include                      # The header file.
├── key                          # The source code for buttons.
├── led                          # The source code for LEDs.
├── Makefile                     # The Makefiles used to build projects.
├── package.json
├── README.md                    # README
└── src                          # The source code.
The directory of TuyaOS > apps > demo > build:
├── board
│   ├── keyname.txt                     # The firmware key records, used for production testing. After you change the name of the firmware key, be sure to document the change in this file. Note that the firmware name is not the project name.
│   ├── startup.sh                      # The startup script. After startup, the system runs this script first. Do not edit this script unless necessary.
│   ├── ty_gw_env.sh                    # Global environment variables. Do not edit this script unless necessary.
│   ├── unpack                          # The program to unpack the update package.
├──  image
│   ├── app_upgrade.sh                  # The script to invoke when an OTA firmware update is initiated.
│   ├── async_run.sh
│   ├── config.json                     # Gateway information configuration.
│   ├── cpcd_srv                        # The co-processor daemon (CPCd) startup script.
│   ├── json_parser.sh
│   ├── mdnsd_srv                       # The mdnsd startup script.
│   ├── otbr_firewall                   # The OpenThread Border Router (OTBR) firewall startup script.
│   ├── otbr_srv                        # The OTBR startup script.
│   ├── prod_upgrade.sh                 # The script to invoke when a bulk update is initiated.
│   ├── show_net_stat.sh                # Prints network status.
│   ├── start_record.sh
│   ├── syslogd_srv                     # The system logging startup script. The default output directory is `/tmp/messages`.
│   ├── tuya_start.sh                   # Start the gateway project.
│   ├── tuya_user1
│   │   ├── app_detect.sh               # Monitor program running.
│   │   ├── app_stop.sh                 # Stop the gateway program.
│   │   ├── change_pw.sh
│   │   ├── debugtool                   # Debug the Zigbee network. For example, you can get the Zigbee network information.
│   │   ├── log_detect.sh               # Monitor logging to archive logs.
│   │   ├── process_monitor.sh          # Software watchdog to monitor the process.
│   │   └── tuya_start_children.sh  # Start the main program.
│   ├── udhcpc.script                   # The DHCP script for wired connections.
│   ├── udhcpd.conf                     # The DHCP configuration for wired connections.
│   ├── wlan0_udhcpc.script             # The DHCP configuration for wlan0, which is not applicable to THP10-Z-X.
│   ├── zigbeed-socat_srv               # The socat startup script. It allows a Zigbee host application to communicate with Zigbeed through a serial interface.
│   └── zigbeed_srv                     # The Zigbeed startup script.
├── image_create.sh                     # Package the QIO and OTA files, which will invoke the BSP packaging tool.
├── pack.sh                             # Package the project.
├── rcp_image
│  └── si_rcp_uart_mg21_OTA_1.4.3.bin  # RCP OTA firmware.
└── third_image                         # Third-party open source packages.
The following tables list the description of important configurations for some scripts.
-
app_upgrade.shandprod_upgrade.shField Description rcp_ver_flag=
"/tmp/rcp_ver_3_4_0_flag"Change this field according to the version of the radio co-processor (RCP), which must match the RCP version specified in the rcp_imagefolder. Suppose that the RCP version is changed to 5.6.7. You should change this field to/tmp/rcp_ver_5_6_7_flagaccordingly.
The Zigbee host automatically generates arcp_ver_3_4_0_flagfile in the/tmpdirectory based on the RCP version. When the script fails to match thercp_ver_3_4_0_flagfield, it triggers an RCP update.ug_tool=/bin/unpack The unpack program. It does not validate signatures by default. To enable signature validation, set it to -sand use it with the board support package (BSP) build parameterBUILD_ARG. -
tuya_start.shField Description TY_ENV_USER_TMP_DIR="/tmp" The temporary directory, which can be changed as required. DEFULT_APP_RUN_DIR="/tmp/tuya/" The working directory, which can be changed as required. -
tuya_start_children.shField Description TY_ENV_USER_LOG_DIR="/tuya/data/log_dir" The directory where logs are stored, which can be changed as required. TY_ENV_USER_STORAGE_DIR="/tuya/data/user_data" The directory where user information is stored, which can be changed as required. TY_ENV_USER_TMP_DIR="/tmp" The temporary directory, which can be changed as required, but should be consistent with that set in tuya_start.sh.TY_ENV_USER_BIN_DIR="/tmp/tuya" The working directory, which can be changed as required, but should be consistent with that set in tuya_start.sh. -
process_monitors.shField Description PRO_MONITOR_MAX_NUM=6 The software watchdog timer for gateway process. When the timer expires, the application is restarted every 20 seconds. -
image_create.shField Description BUILD_ARG= The BSP build parameters. This field is empty by default, meaning signing is not performed. -a: Cloud service-signed.-al: Local self-signed.
Configurations
Before building your project, modify the configuration and replace the value of pid with the one assigned to the gateway product you create on the Tuya Developer Platform. The configuration file is stored in TuyaOS > apps > demo > build > image > config.json.
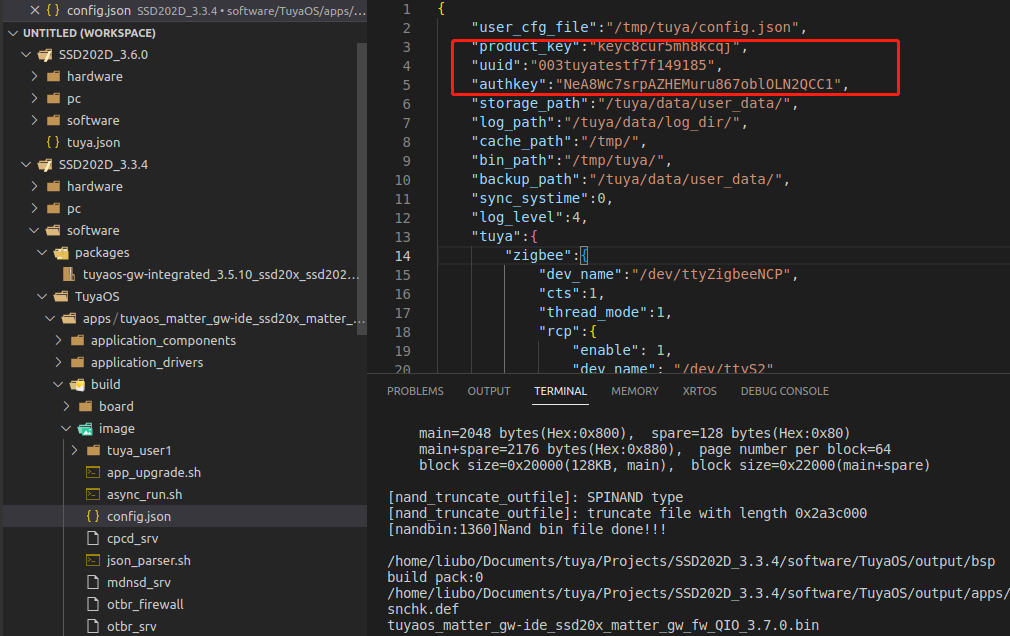
The following table describes the fields in config.json. Format
{
     "pid": <xxx>,
     "uuid": <...>,
     "authkey_key": <...>,
     "ap_ssid": <... optional>,
     "ap_password": <... optional>,
     "log_level": <level>,
     "storage_path": <...>,
     "start_mode": <xxxx>,
     "tuya": {
         "zigbee": {
                       "storage_path": <xxx, string>,
                       "cache_path": <xxx, string>,
                       "dev_name": <xxx, string>,
                       "cts": <xxx, number>,
                       "thread_mode": <xxx, number>
         },
         "matter": {}
     },
     "user": {
         [ { "tp": <DEV_ATTACH_MOD_X, number>, "sw_ver": <version, string> }, ... ]
     },
 }
Common configurations
| Field | Required | Description |
|---|---|---|
| pid | Yes | The SDK runs in non-OEM mode. pid specifies the PID of the current device. |
| uuid | No | The universally unique identifier. The system reads UUID from the NVRAM first. If no UUID is found, the UUID specified here is used. For more information about NVRAM, see Flash Full Firmware. |
| authkey_key | No | The authorization key. The system reads the authorization key from the NVRAM first. If no authorization key is found, the authorization key specified here is used. For more information about NVRAM, see Flash Full Firmware. |
| ap_ssid | No | The SSID of the access point (AP) used for pairing in Wi-Fi AP mode. If not specified, the default value is SmartLife-<the last four characters of the WLAN MAC>. |
| ap_password | No | The password of the Wi-Fi AP, defaulting to empty. |
| log_level | No | The log level, defaulting to debug level (level 4). |
| storage_path | Yes | The file storage path. The file system must be read/write. |
| start_mode | No | The supported Wi-Fi pairing modes:
|
Zigbee configuration
| Field | Required | Description |
|---|---|---|
| storage_path | Yes | The file storage path. The file system must be read/write. |
| cache_path | Yes | A temporary directory to store cache files, such as OTA update files. |
| dev_name | Yes | The name of the serial port. |
| cts | Yes | Specifies whether to enable flow control. Tuya’s NCP has flow control enabled. |
| thread_mode | Yes |
|
Matter configuration
| Field | Required | Description |
|---|---|---|
| thread | No | You can manually set the otbr network interface by modifying netif_name. It defaults to wpan0. |
Build
You need to install some system tools to build the BSP. For example, run the following command on Ubuntu.
sudo apt-get install whois patchelf meson bison flex libssl-dev
This section describes how to build THP10-Z-X firmware with Visual Studio Code (VS Code).
-
Expand TuyaOS > apps. Right-click on the demo directory and choose Build Project. Enter a version number and press the
Enterkey.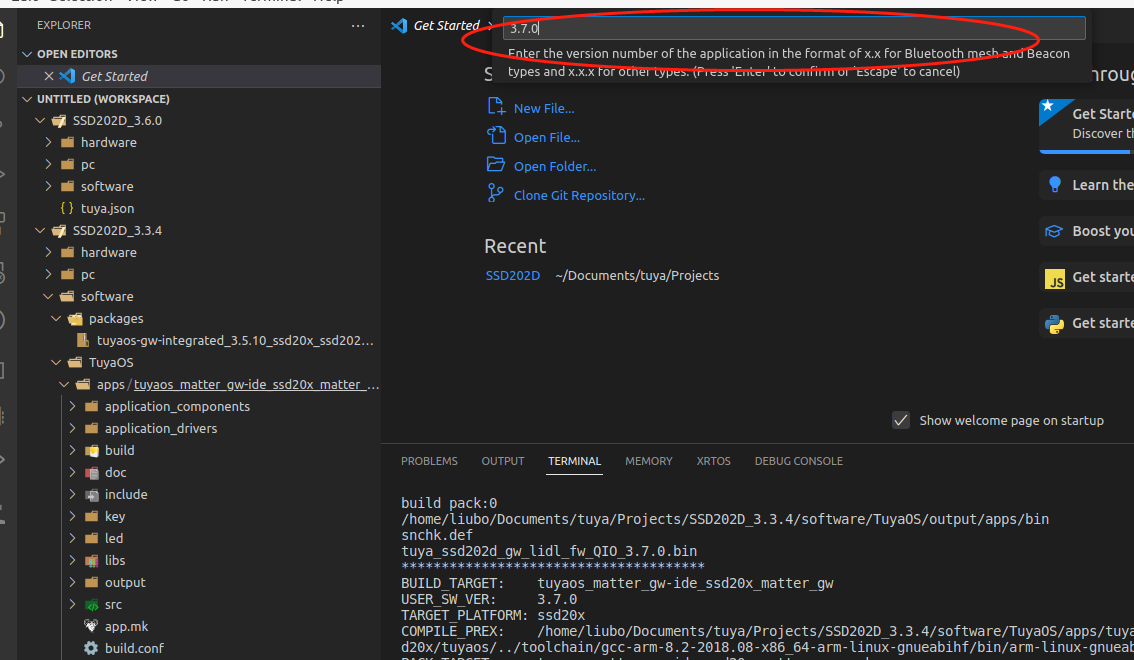
-
You can see the output in the TERMINAL window. When the TERMINAL displays a message as shown below, it means the build is successful. The build output is stored in the output directory.
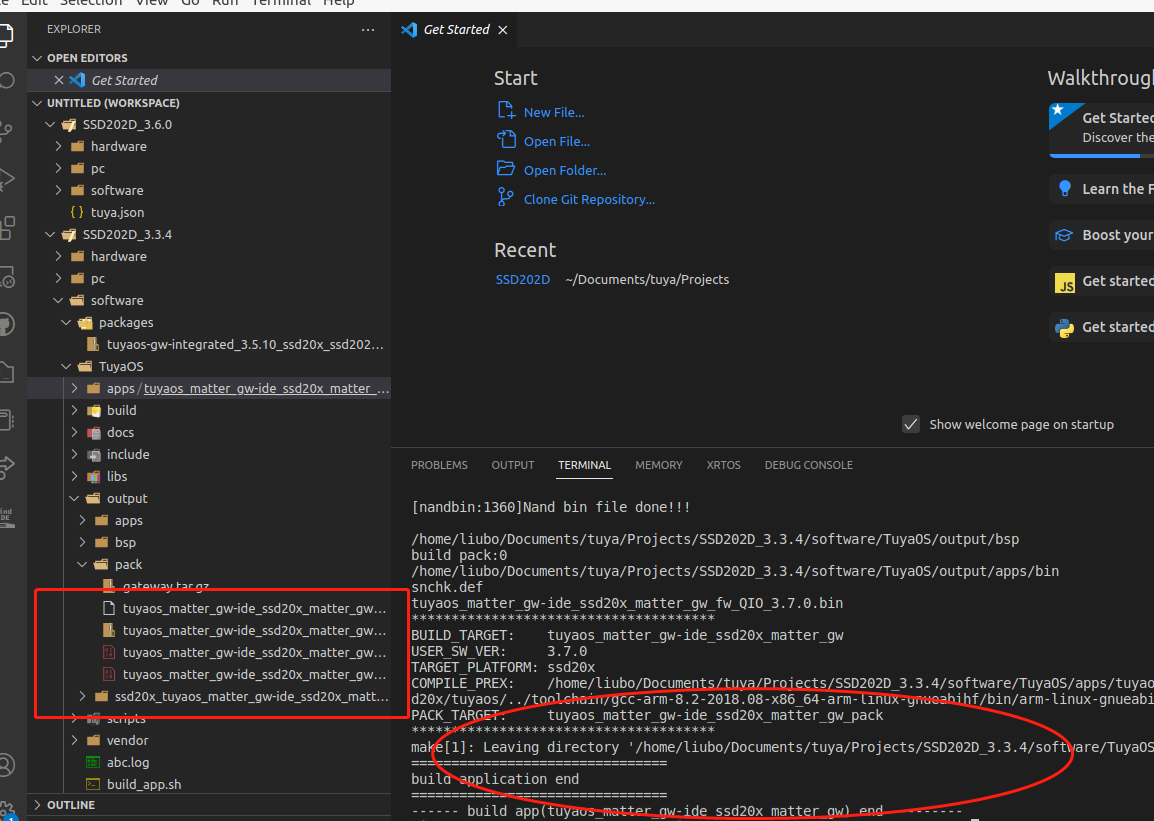
Firmware description:
tuyaos_matter_gw-ide_ssd20x_matter_gw_fw_QIO_<version number>.bin: The production firmware that should be flashed to the entire flash memory with U-Boot.tuyaos_matter_gw-ide_ssd20x_matter_gw_fw_UG_<version number>.bin: The OTA firmware update. You can upload this binary to the Tuya Developer Platform and deploy an OTA update to end devices.tuyaos_matter_gw-ide_ssd20x_matter_gw_<version number>_debug: The main program that has the symbol table retained, which can be used for debugging with GDB.gateway.tar.gz: The compressed archive of packages. You can use it for quick debugging. For more information, see Simple Debugging.
Run
Run the sample application to see how it behaves.
You can flash the THP10-Z-X board with the OTA firmware update. For more information, see Flash OTA firmware update. After flashing, restart the device.
THP10-Z-X supports pairing over wired connection. You can use the SmartLife app to activate the gateway. For more information about the app, see User Guide.
Update firmware
For more information, see Update Firmware.
Is this page helpful?
YesFeedbackIs this page helpful?
YesFeedback


