Configuration Guide for Studio
After you define the product functions on the Tuya Developer Platform, you can drag and drop the visual functional components on the Panel Studio to quickly create your own app panel. You can design a product panel with your brand style within five minutes.
Note: Only certain product categories support the Panel Studio. For more information, see Product Categories.
Scenario
If you have custom requirements or the official templates do not meet your needs, you can choose an existing template, click Edit, and then go to the Panel Studio for more configuration. All the official templates can be configured and customized. You can change the styles, colors, icons, texts, and sequences as you like in the Panel Studio.
Note: If you do not have specific requirements on the UI panel, you can directly use our existing templates without additional adjustment and configuration. For more information, see Configure All-in-one Panels.
Use the Panel Studio
Configure your panel as needed. For more information, see the following documents:
- Common Function Components
- Function Rules
- Timer
- Icon Styles
- Background Colors
- Text Style
- Navigation Links
- Style Linking Rules
- Multilingual Text
Step 1: Log in to Panel Studio
-
Log in to the Tuya Developer Platform and click Product in the left-side navigation bar to enter My Products.
-
In the product list, select and click a target product whose status is Developing. For example, select the air purifier.
Note: For more information about how to create a product, see Create Products.
-
Click Continue to Develop in the Operation column and click Next: Device Panel at the bottom of the page.
-
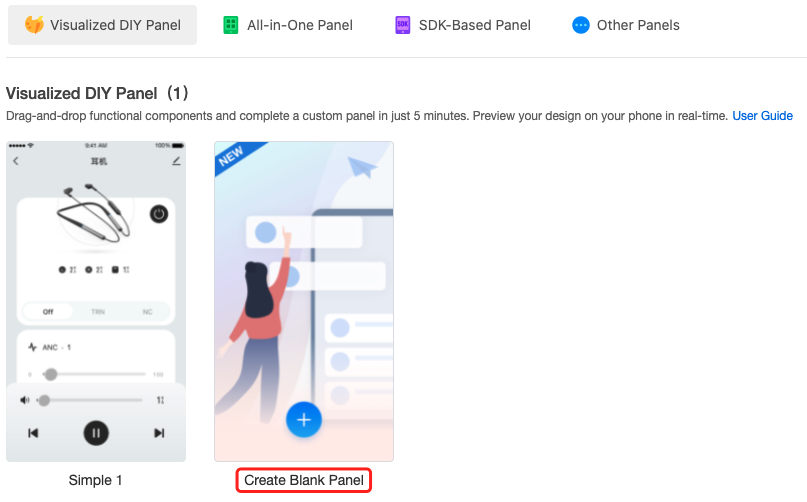
In the Visualized DIY Panel section, click Create Blank Panel to go to the Panel Studio.
-
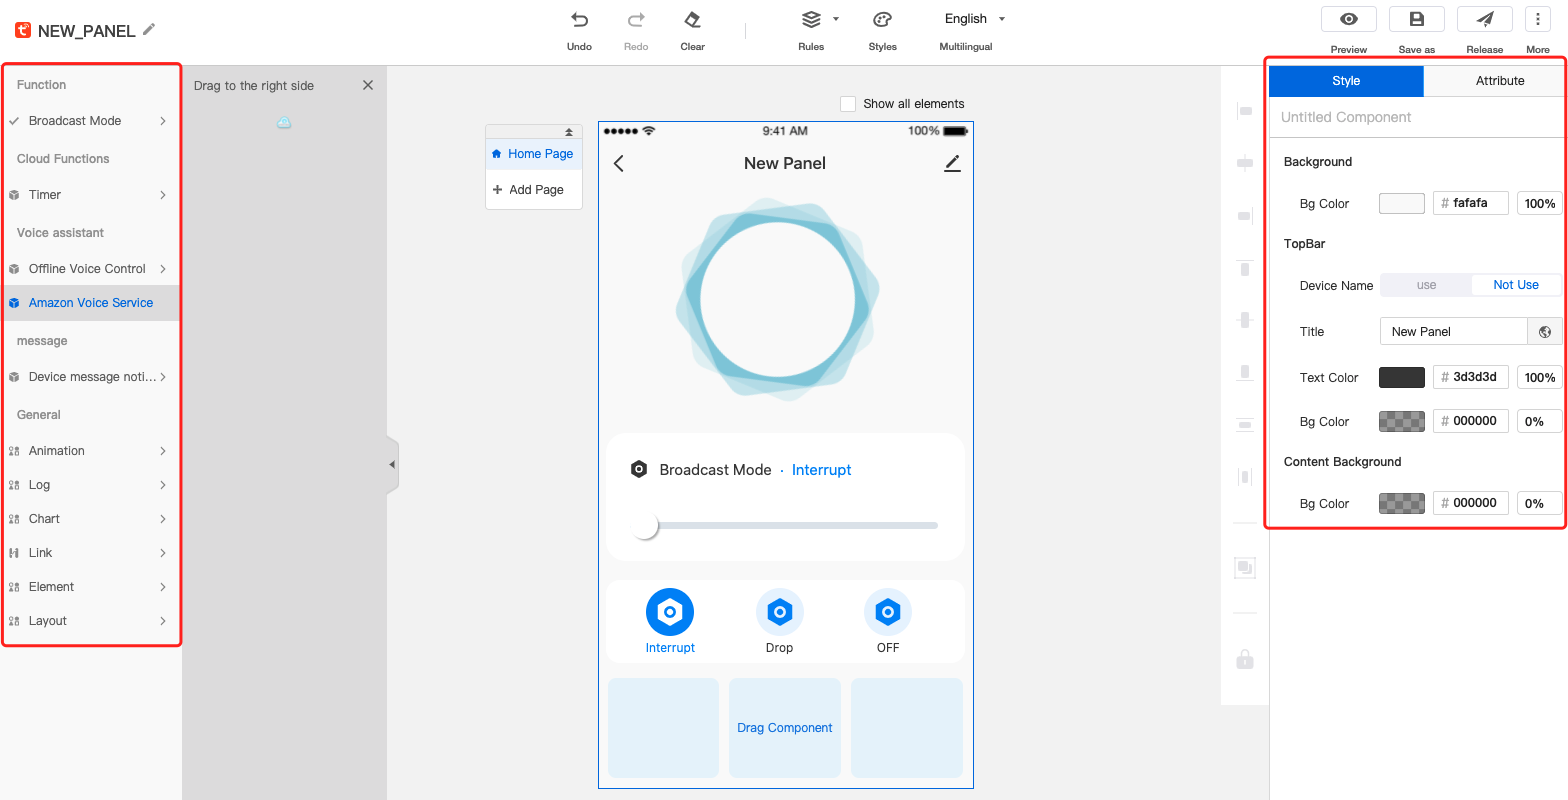
On this page, you can use all the capabilities that the studio offers to customize your panel.
-
For example, drag the visual components on the left side to the panel canvas.
-
Select one component on the panel canvas, and select Style and Attribute to configure as you like. The functions on the left side correspond to the data points (DPs) of this product ID (PID).
-
Step 2: Create a panel
Configure your panel as needed. For more information, see the following documents:
- Common Function Components: https://developer.tuya.com/en/docs/iot/functional-components?id=Kaamutkp2ed73
- Function Rules: https://developer.tuya.com/en/docs/iot/function-rule?id=Kaampidoe249i
- Timer: https://developer.tuya.com/en/docs/iot/timer?id=Kaamk3u1lbz7t
- Icon Styles: https://developer.tuya.com/en/docs/iot/icons?id=Kaclxjx8mo75z
- Background Colors: https://developer.tuya.com/en/docs/iot/background-color?id=Kaclmjk589i6c
- Text Styles: https://developer.tuya.com/en/docs/iot/text?id=Kacmgbgovllph
- Navigation Links: https://developer.tuya.com/en/docs/iot/route?id=Kahkmn3q3rf32
- Style Linking Rules: https://developer.tuya.com/en/docs/iot/link-styles?id=Kaamrp7trkq45
- Multilingual Text: https://developer.tuya.com/en/docs/iot/multilingual?id=Kafhfqm6cjak3
Step 3: Preview and adjust the panel
After the panel is configured, you can click Preview in the top right corner of the page, scan the QR code with your mobile phone, and preview it. Also, you can change the panel on the web, and the changes are synchronized to the mobile app in real time. Switch to a real device for preview, and you can directly control the real device.
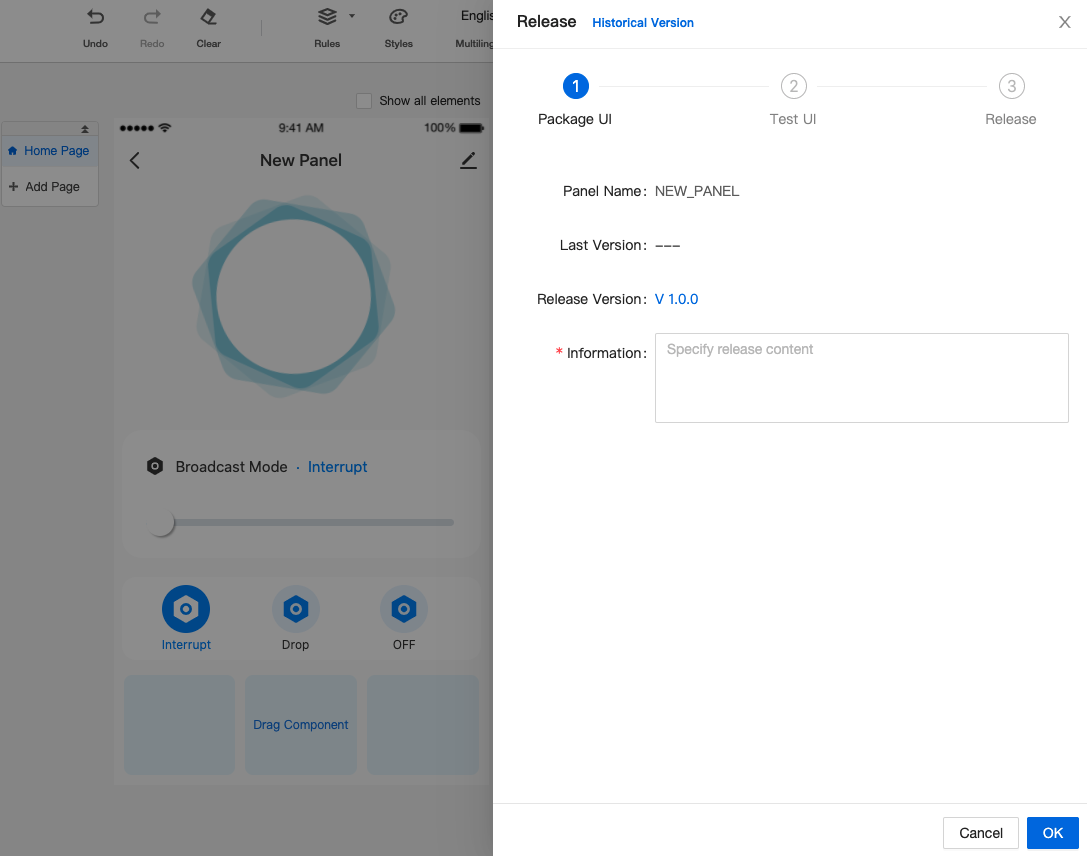
Release the panel
To release the panel, perform the following steps: Package UI > Test UI > Release.
Usage notes
- The Package UI step is followed by the Test UI step. The latter step is used to confirm that the panel updates do not affect existing panel users.
- If the product is still in the development and debugging step, you can skip the Test UI step and release the panel.
- When you release the panel, you can choose whether to immediately apply the panel.
- After you design and configure the panel, you can implement a canary release. In this case, only limited members can test this panel. The user experience of the official version is not affected.
Is this page helpful?
YesFeedbackIs this page helpful?
YesFeedback


