Install the Homebridge Plugin of Tuya
With the Homebridge plugin of Tuya, you can easily control smart devices connected to Tuya Developer Platform using HomeKit. This tutorial demonstrates how to install the official Homebridge plugin of Tuya and how to control smart devices using HomeKit.
Create a cloud project and grant it access to specific cloud services
-
Create a cloud project. For more information, see Create a project.
Use a cloud project created on or after May 25, 2021. If your project was created before this date, create a new one.
-
Grant the cloud project access to the following cloud services. For more information, see Grant a project access to API calls
Access to the following cloud services is required:
- Authorization token management
- Smart home basic service
- Device status notification
Link your app account with the cloud project
-
Sign up for a Tuya app account, or use an existing one.
Tuya apps refer to the Tuya app and the SmartLife app.
-
Pair and activate devices using the Tuya app, and make sure that at least one device is under your account.
-
Link the app account with the cloud project. For more information, see Link a Tuya app account.
Install Homebridge
-
Read the official Homebridge document, and install Homebridge on your operating system. Tutorials on installing Homebridge on different operating systems are as follows:
-
Here we use macOS as an example:
-
Install Node.js.
-
Download and install Node.js, or run the following brew command:
brew install node -
After the installation is completed, check the version for verification.
node -v
npm -v
-
-
Install Homebridge and Homebridge UI.
sudo npm install -g --unsafe-perm homebridge homebridge-config-ui-x -
Run the following command to set up Homebridge as a service. For start and stop commands, see the official documentation.
sudo hb-service install
-
Install the Homebridge plugin of Tuya
-
Open Terminal on your Mac.
-
Install the Homebridge plugin of Tuya.
In the event of any issues during installation, add
sudobefore the command to run the command as an administrator.-
Install the plugin.
npm install homebridge-tuya-platform -
After the installation is completed, check whether the plugin is installed successfully. For more information, watch the plugin installation video.
-
Edit the configuration file
Before using the Homebridge plugin, edit its config.json file.
-
Go to the
homebridge-tuya-platform/configfolder.cd ./node_modules/homebridge-tuya-platform/config -
Edit the
config.jsonfile.vim config.json -
Set values for parameters in
options.As shown in the following figure, set values for the nine parameters. If
endPointdoes not exist, add it manually.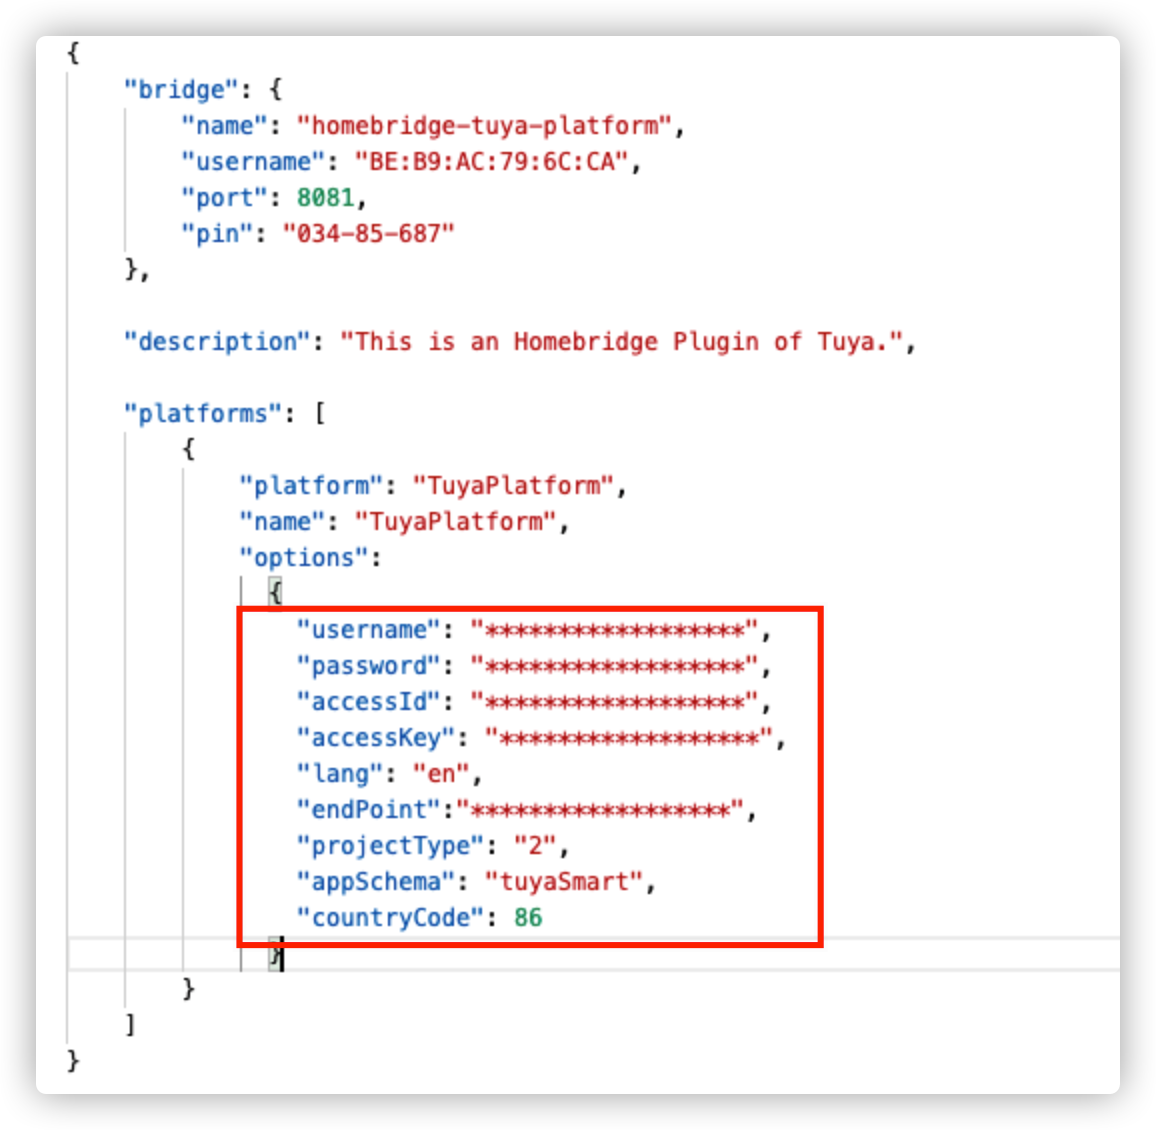
-
usernameandpassword: Enter the username and password of your Tuya app account. -
accessIdandaccessKey: Enter the Access ID and Access Secret of your project. To view the Access ID and Access Secret, go to Tuya Developer Platform, click the target project, and find Authorization Key on the Overview page.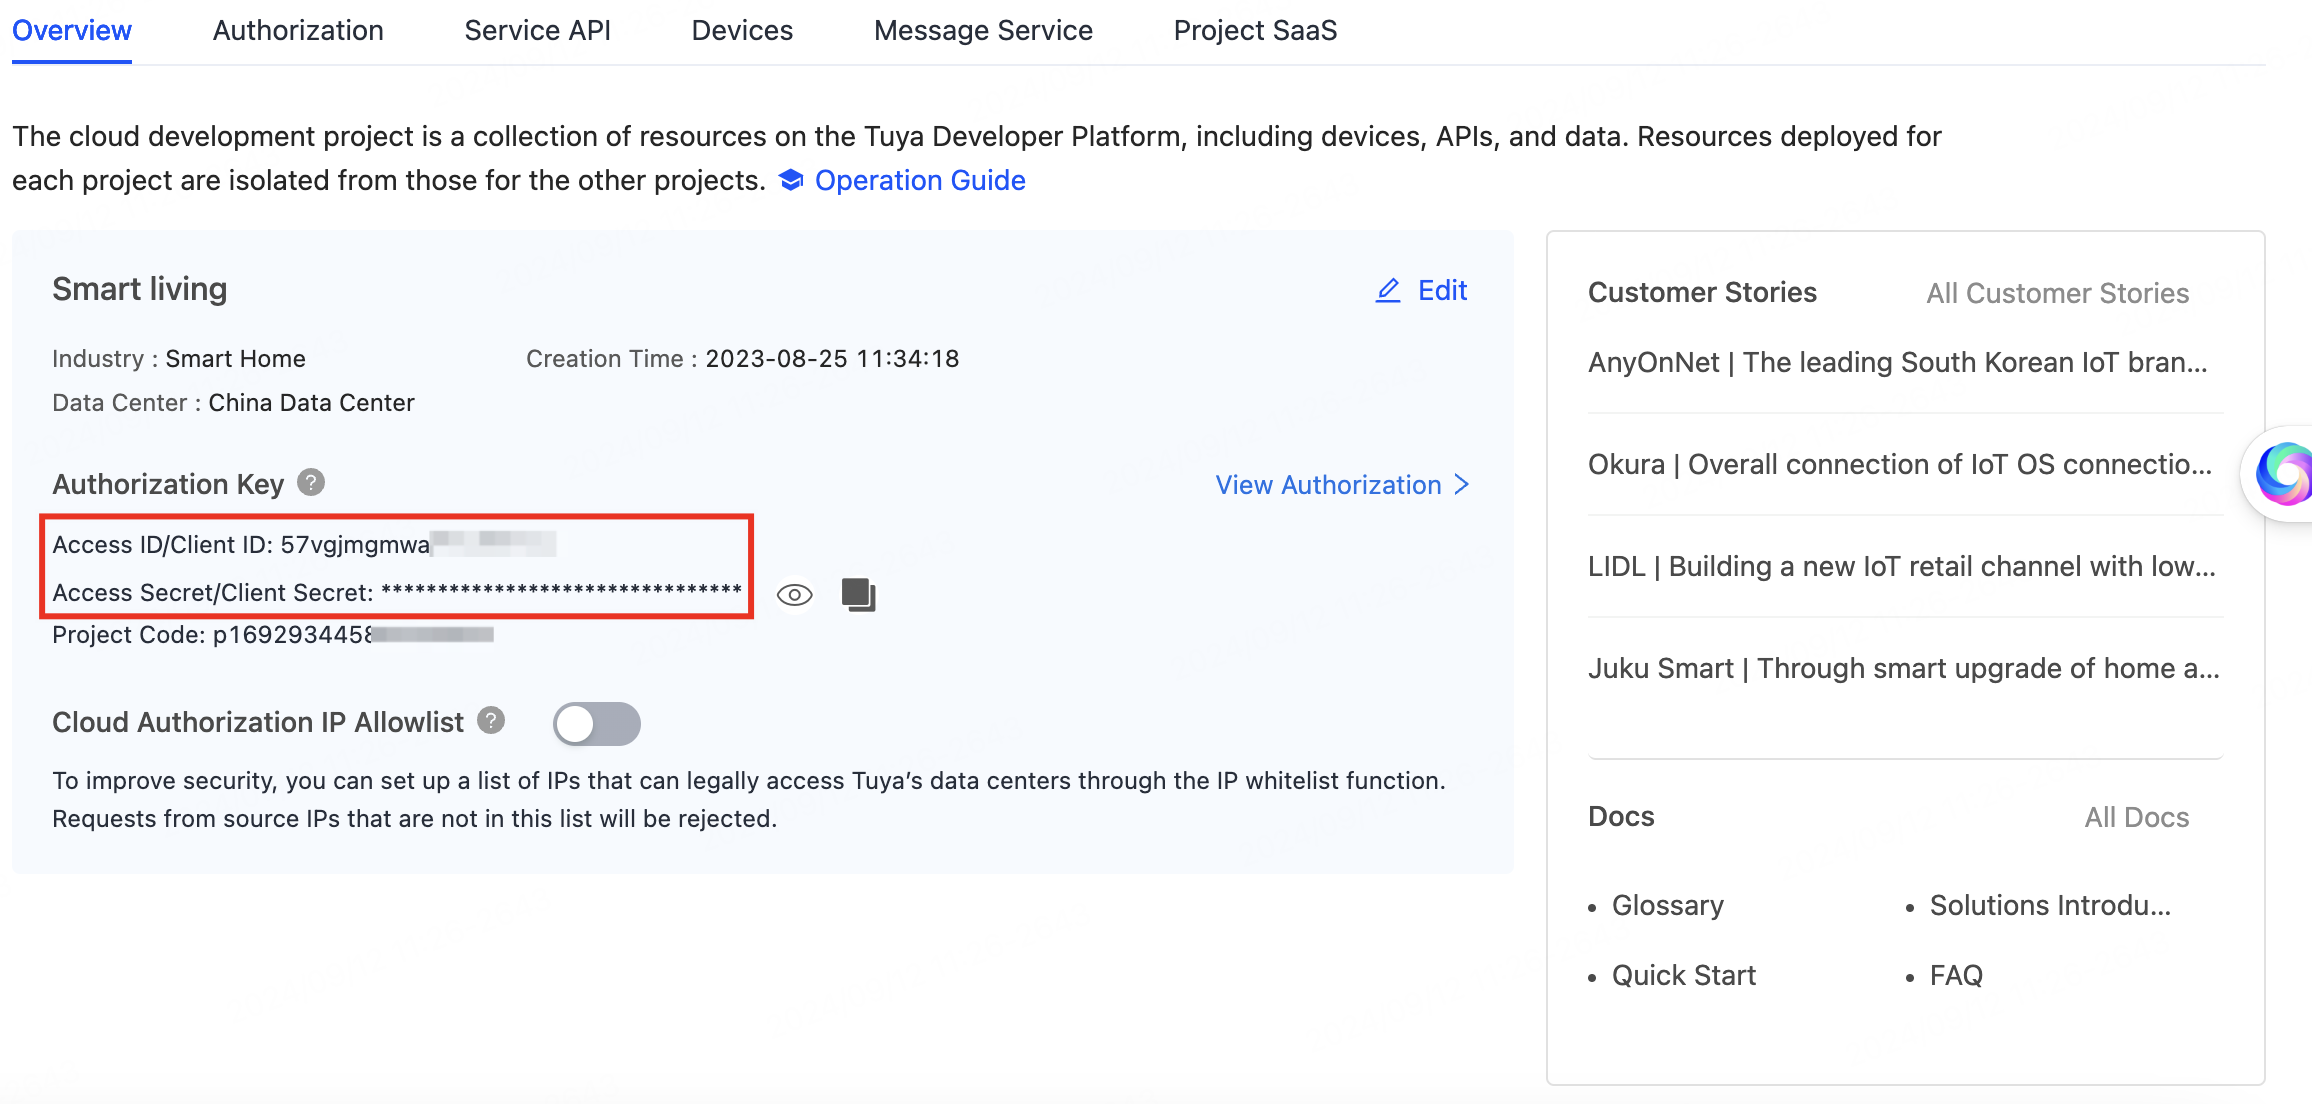
-
lang: Keep the default valueen. -
endPoint: Enter the cloud server address of the data center where the cloud project under your Tuya app account resides. For more information, see Mappings Between OEM App Accounts and Data Centers.Region Endpoint United States https://openapi.tuyaus.com China https://openapi.tuyacn.com Europe https://openapi.tuyaeu.com India https://openapi.tuyain.com Eastern America https://openapi-ueaz.tuyaus.com Western Europe https://openapi-weaz.tuyaeu.com -
projectType: Enter the development mode that you selected when creating the project. For more information, see Cloud Integration Solutions.1: custom development2: smart home PaaS
-
appSchema: Enter the name of the app that you use to connect devices on Tuya Developer Platform.tuyaSmart: Tuya SmartsmartLife: Smart Life
-
countryCode: Enter the code of the country or region that you selected when logging in to the app. For more information, see Country or region codes.
-
-
Save and exit the file.
Input
:wqto save and exit the file.
Run the plugin
-
Go back to the
homebridge-tuya-platformdirectory.cd .. -
Run the plugin.
homebridge -D -U ./config/ -P ./For more information, watch the plugin running video.
Connect to HomeKit
Make sure that Homebridge is connected to the same local area network (LAN) as the Wi-Fi network of your mobile phone. Cross-VLAN connection is not supported.
-
Open Home on your Apple device.
-
Scan the QR code or enter the 8-digit PIN code printed after you run the plugin to pair Homebridge. You can also find the PIN code in the
config.jsonfile.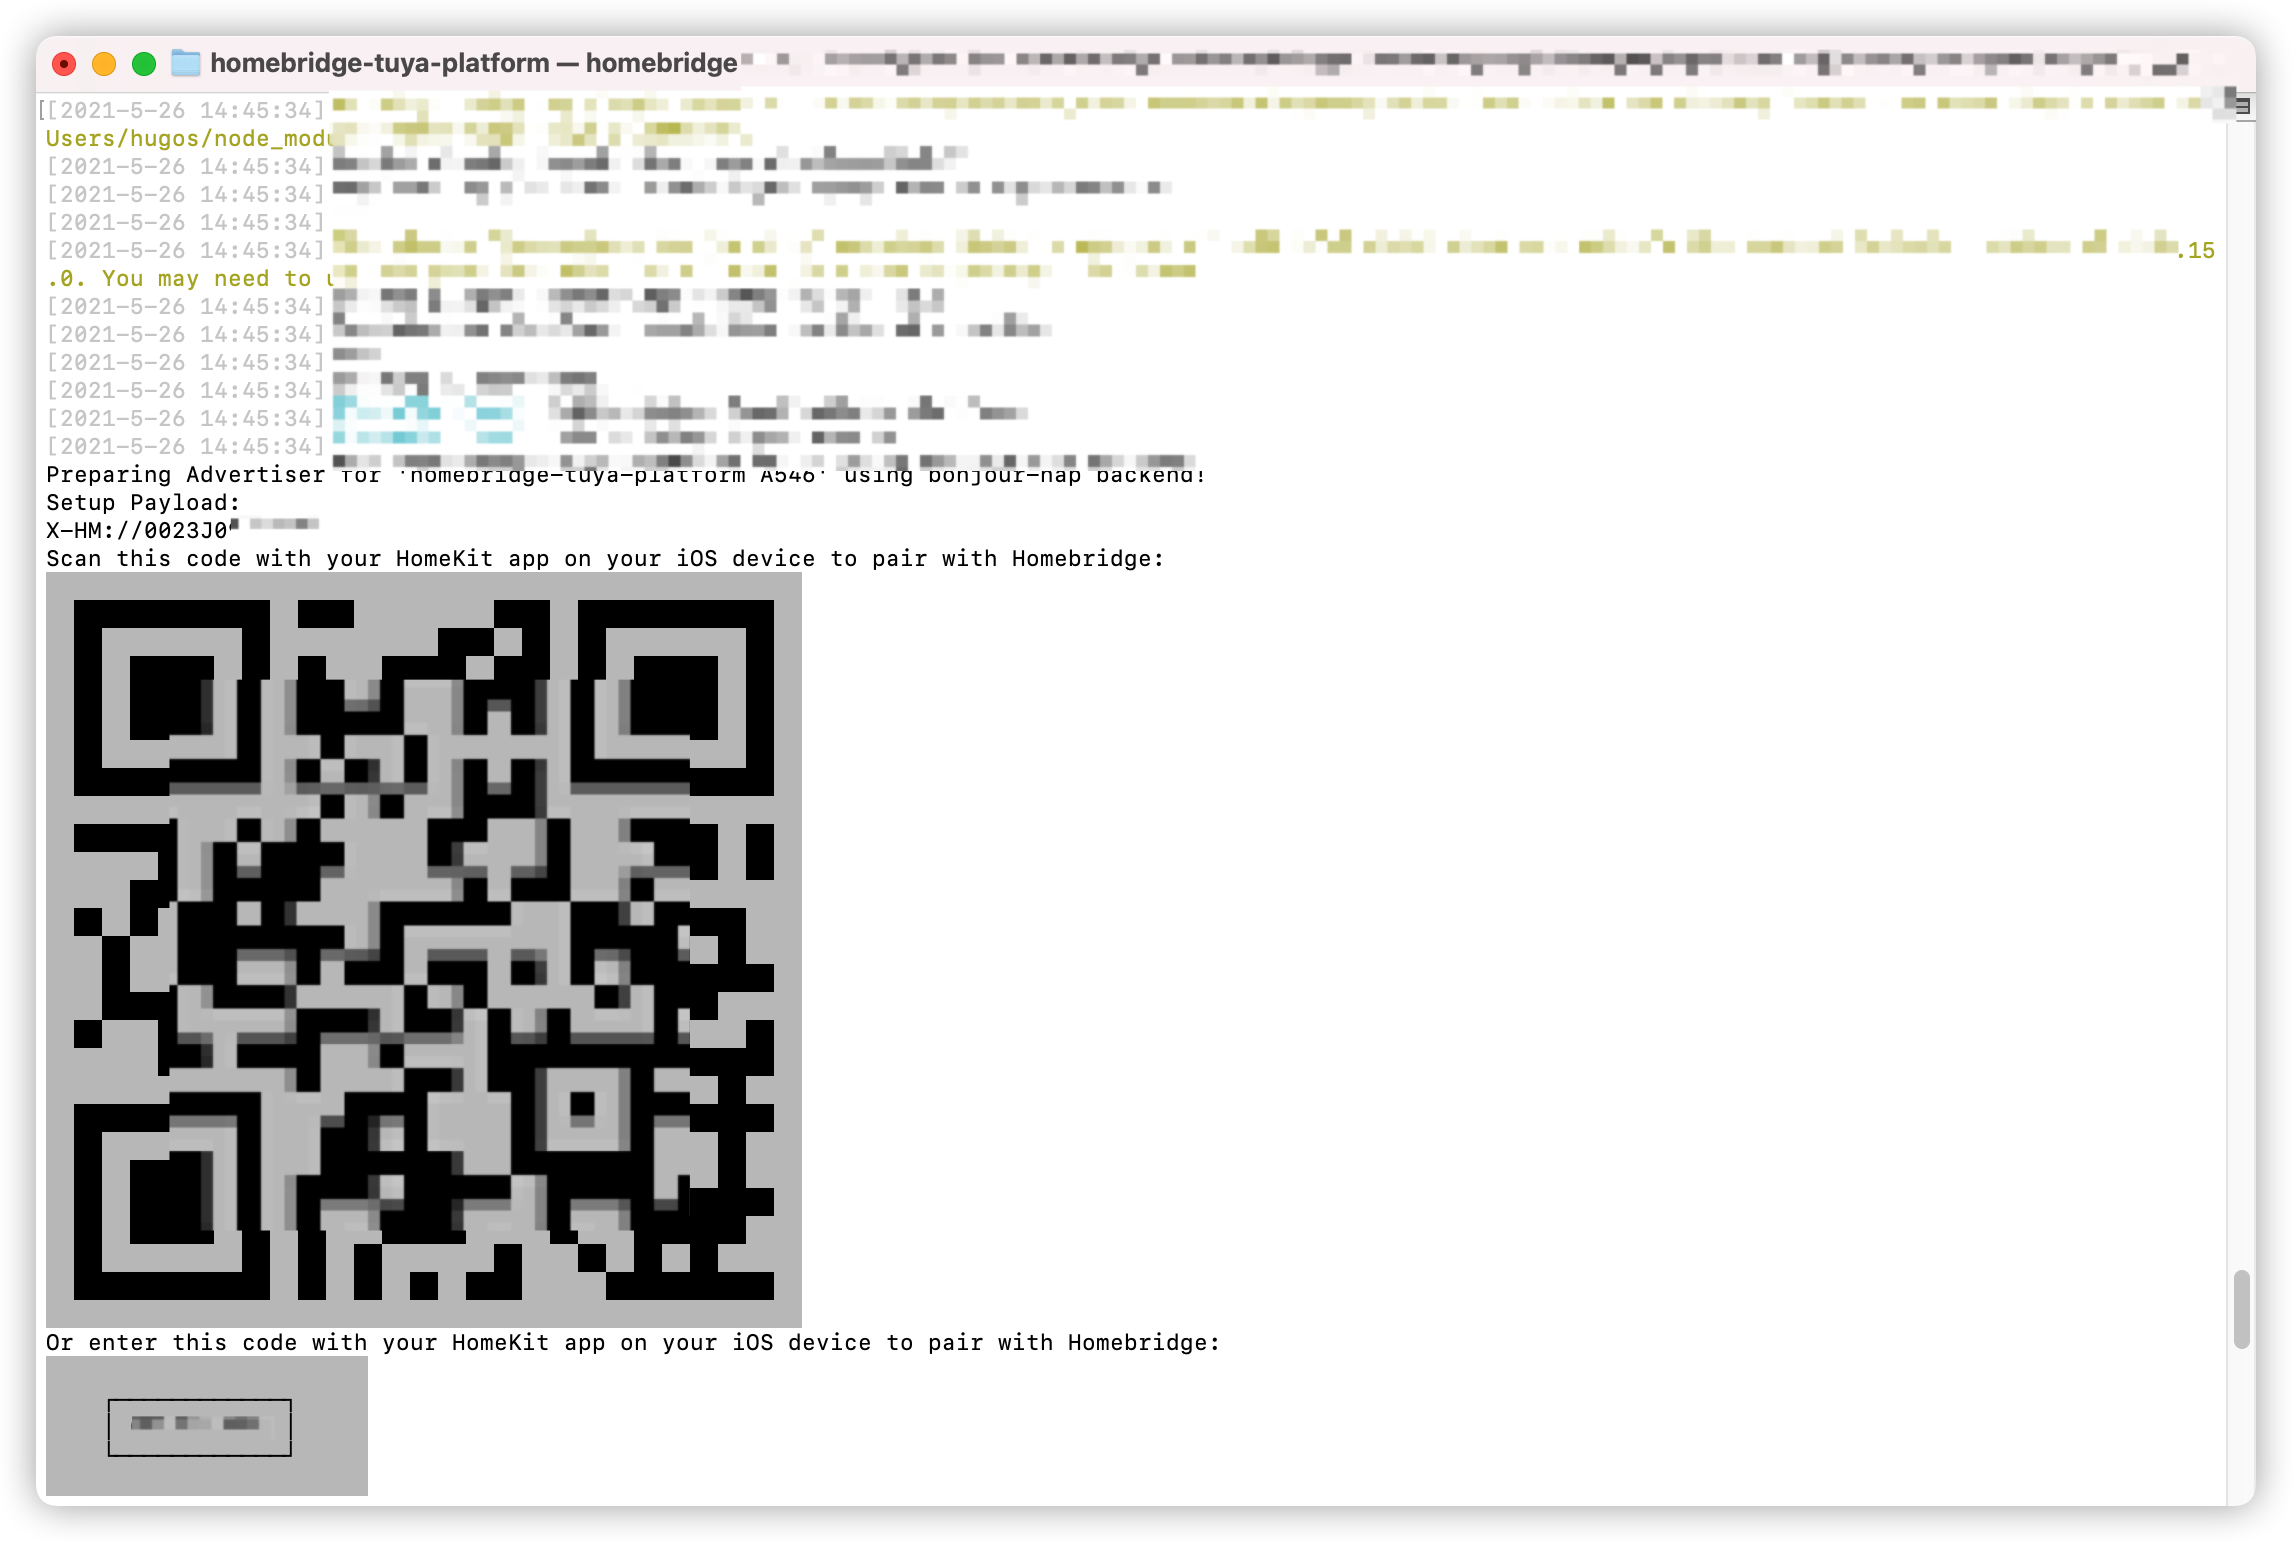
Control devices on HomeKit
Now, you can view and control all smart devices connected to the Tuya app on the HomeKit dashboard.
Common error codes and corresponding solutions
| Error code | Error message | Solution |
|---|---|---|
| 1004 | sign invalid | The access ID or access key is incorrect. Enter the correct access ID or access key. For more information, see Set values for parameters in options. |
| 1106 | permission deny |
|
| 1100 | param is empty | The username or appSchema parameter is empty. Set a correct value for it. For more information, see Set values for parameters in options. |
| 2017 | schema does not exist | The appSchema parameter in the config.json file is incorrect. Set a correct value for it. For more information, see Set values for parameters in options. |
| 2406 | skill id invalid |
|
| 28841105 | No permissions. This project is not authorized to call this API | The cloud project does not have access to some of the required APIs. Subscribe to the APIs and authorize the cloud project. For more information, see Subscribe to APIs and Grant a project access to API calls. For this tutorial, access to the following APIs is required:
|
Is this page helpful?
YesFeedbackIs this page helpful?
YesFeedback


