Develop with Java SDK
This topic describes how to use the Java SDK based on cloud development. You can call device APIs to control smart devices and listen for device status. Thanks to the strict uniformity of the Tuya-enabled device system, you can extend this control method to all devices. You can quickly develop SaaS applications specific to smart devices without worrying about device differences.
Prerequisites
- You have created a cloud project.
- You have added at least one device to the project.
- You have installed the IntelliJ IDEA development environment.
Preparations
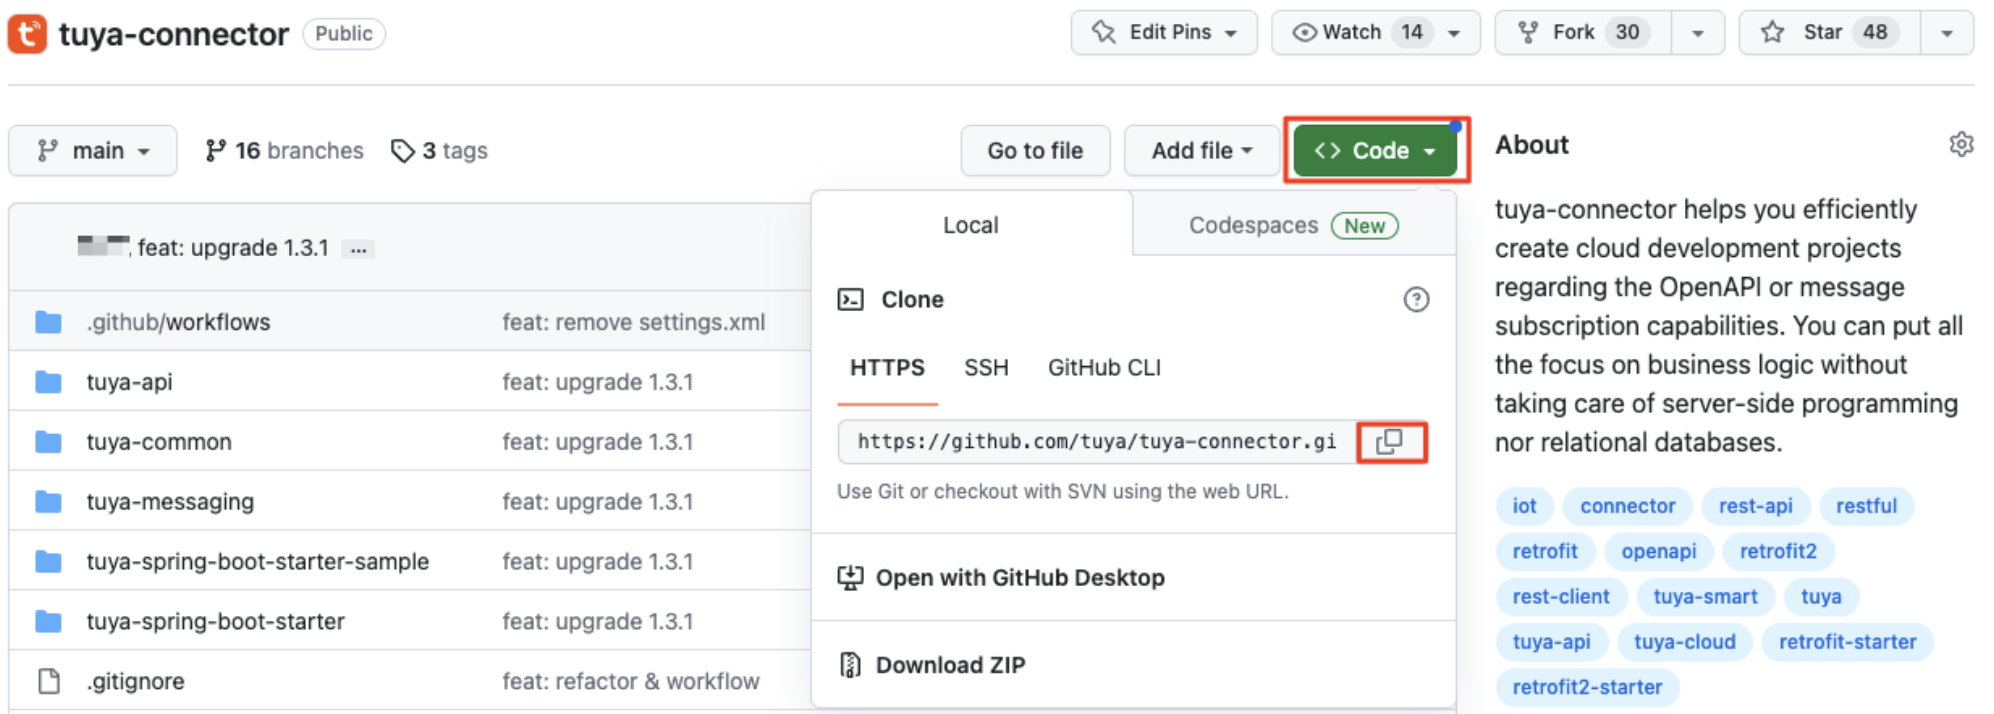
This topic is based on the Tuya-connector-Java SDK. Tuya-connector helps you efficiently create cloud development projects regarding the OpenAPI or message subscription capabilities. You can put all the focus on business logic. Perform the following cloning steps:
-
Get the SDK URL at Tuya-connector-Java.
-
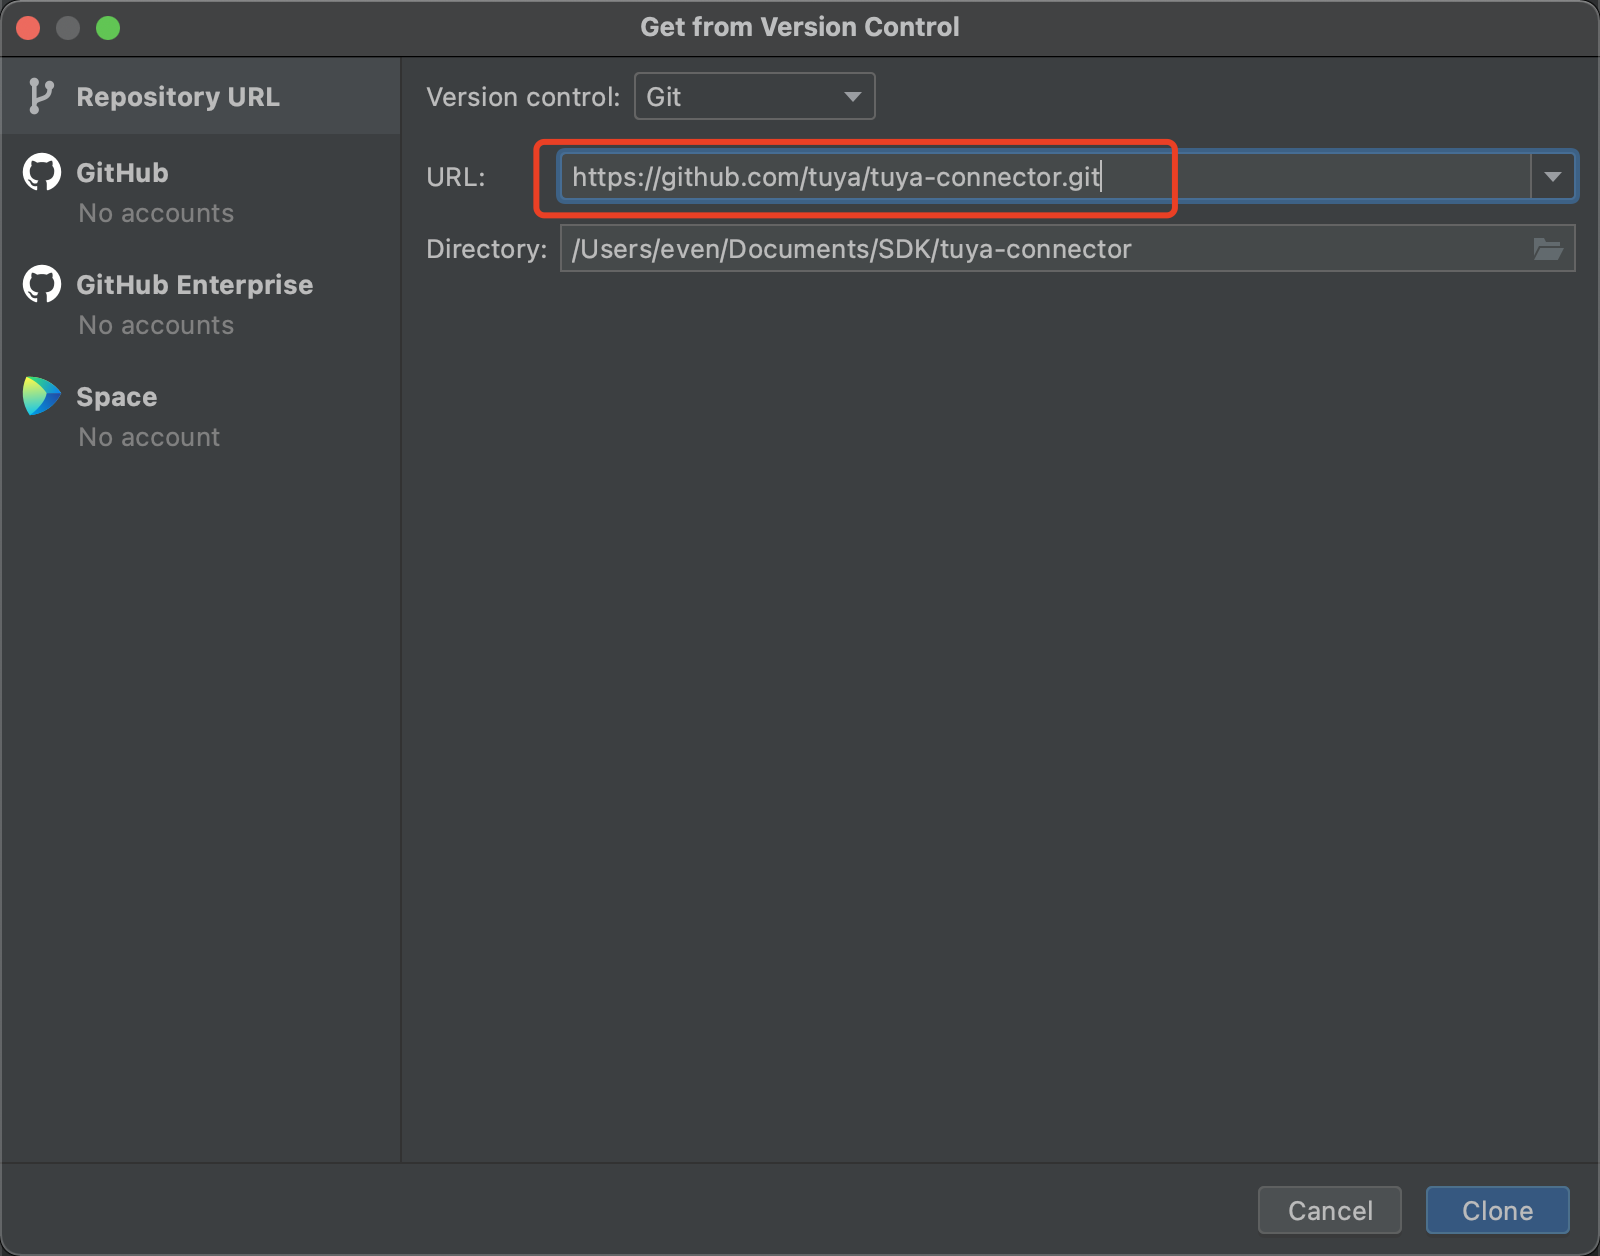
Go to Projects > Get from VCS > URL, enter the SDK URL, and then click Clone.
Procedures
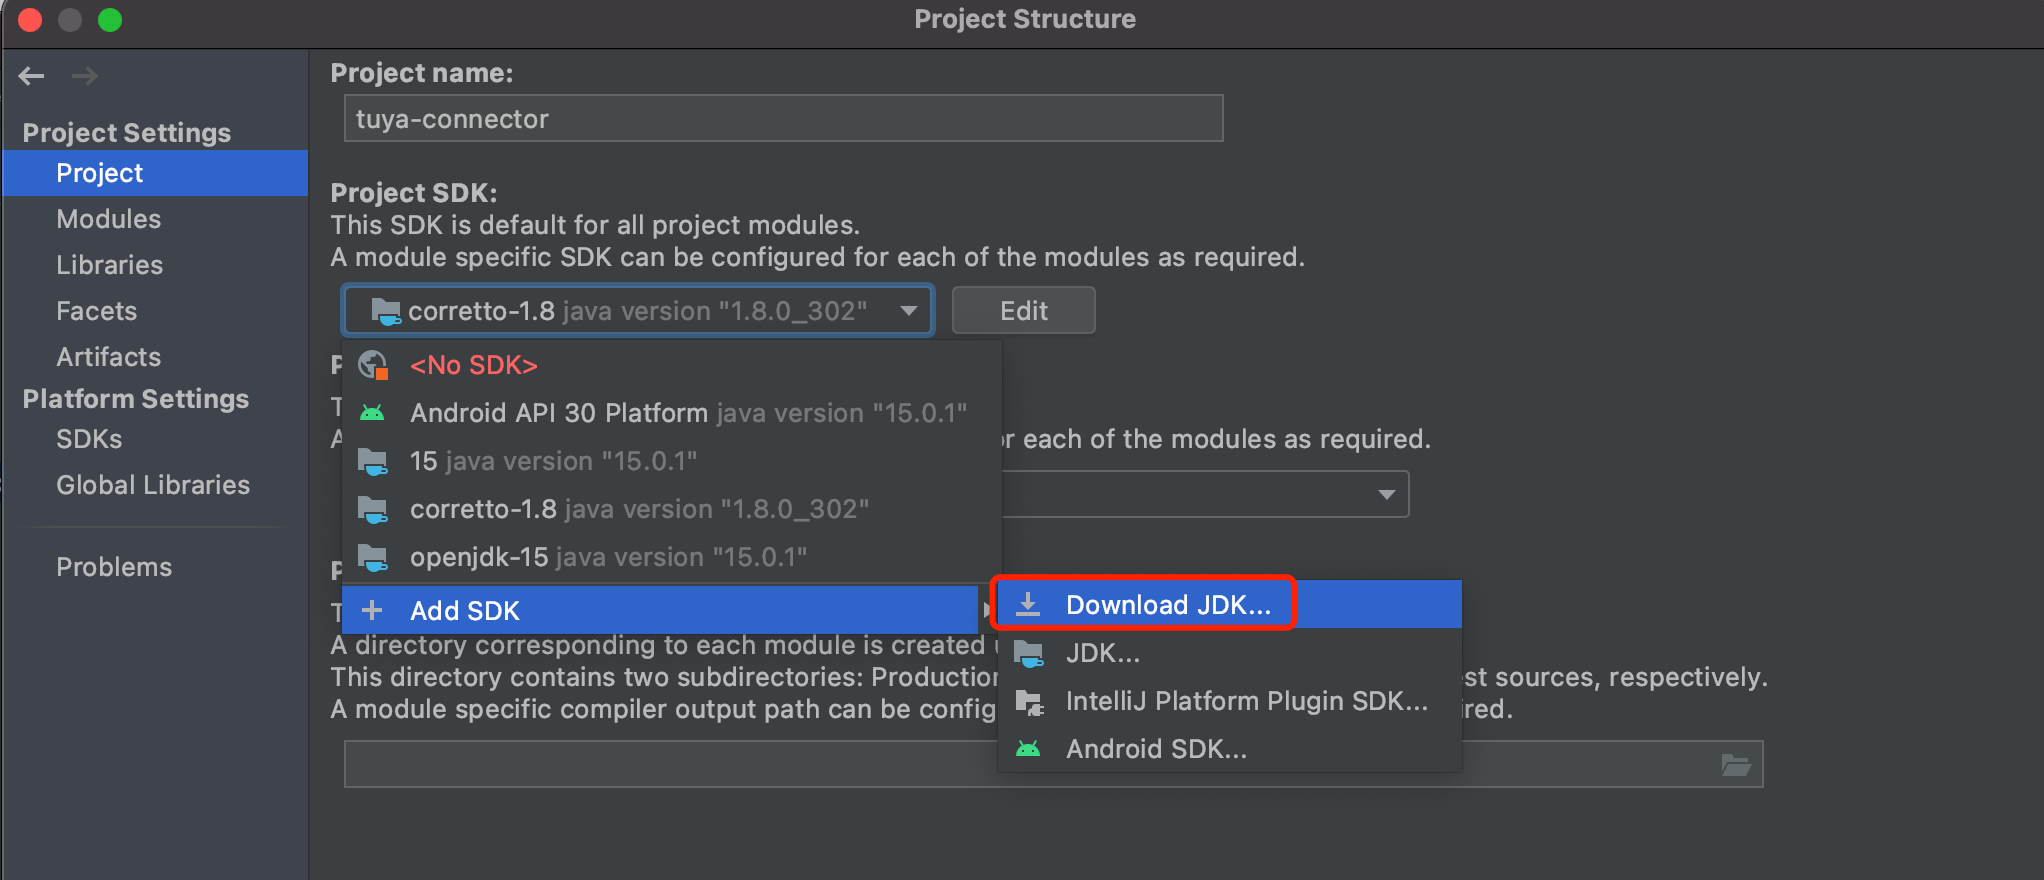
Step 1: Modify the JDK version
On IntelliJ IDEA, set the JDK version to JDK8.
Tuya-connector Java SDK is currently compatible with JDK8 and JDK11. You can change the version to JDK11 in a way similar to that of JDK8.
-
Choose File > Project Structure > Project > Project SDK, and find Add SDK > Download JDK.
-
Choose the version
1.8.0_***JDK of any manufacturer.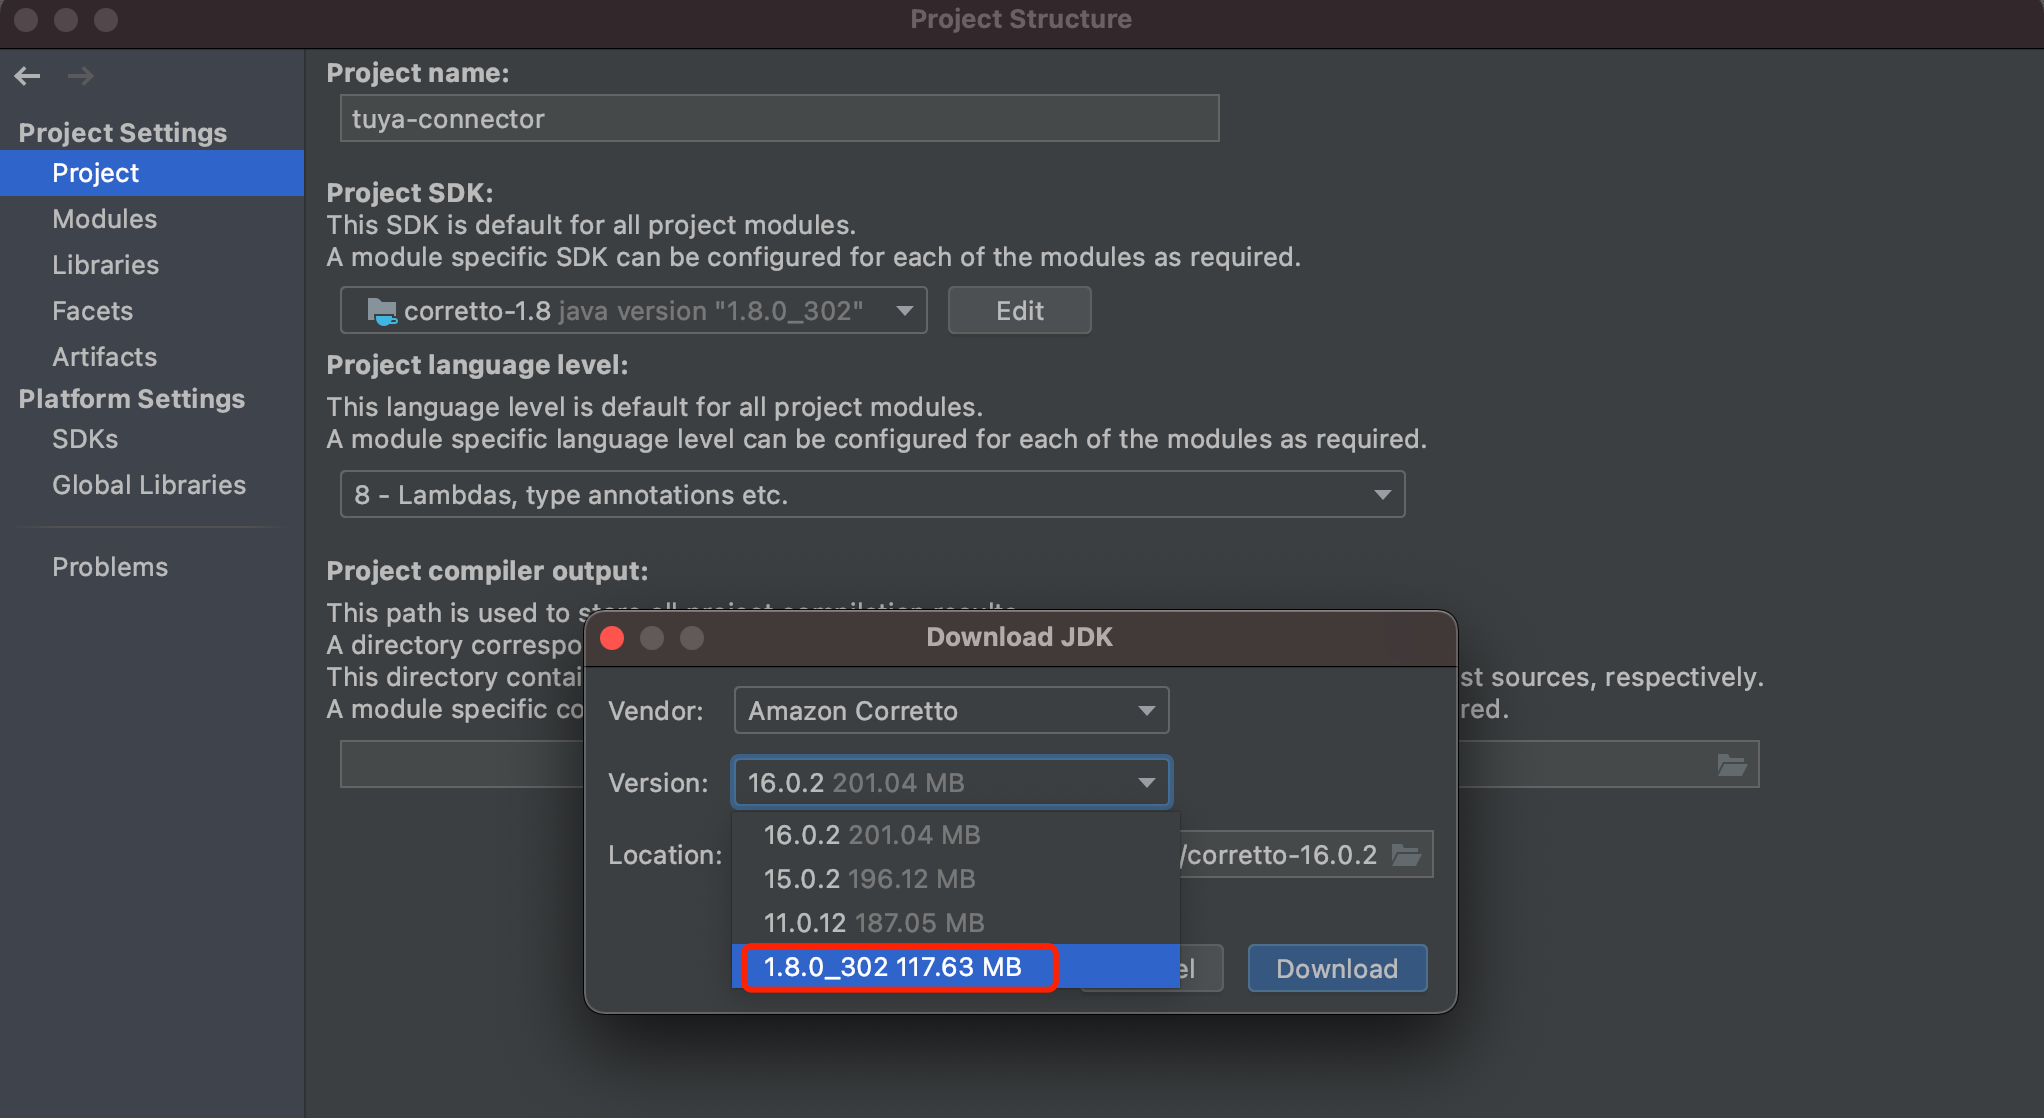
-
Select the JDK version
1.8.0_***in Project SDK.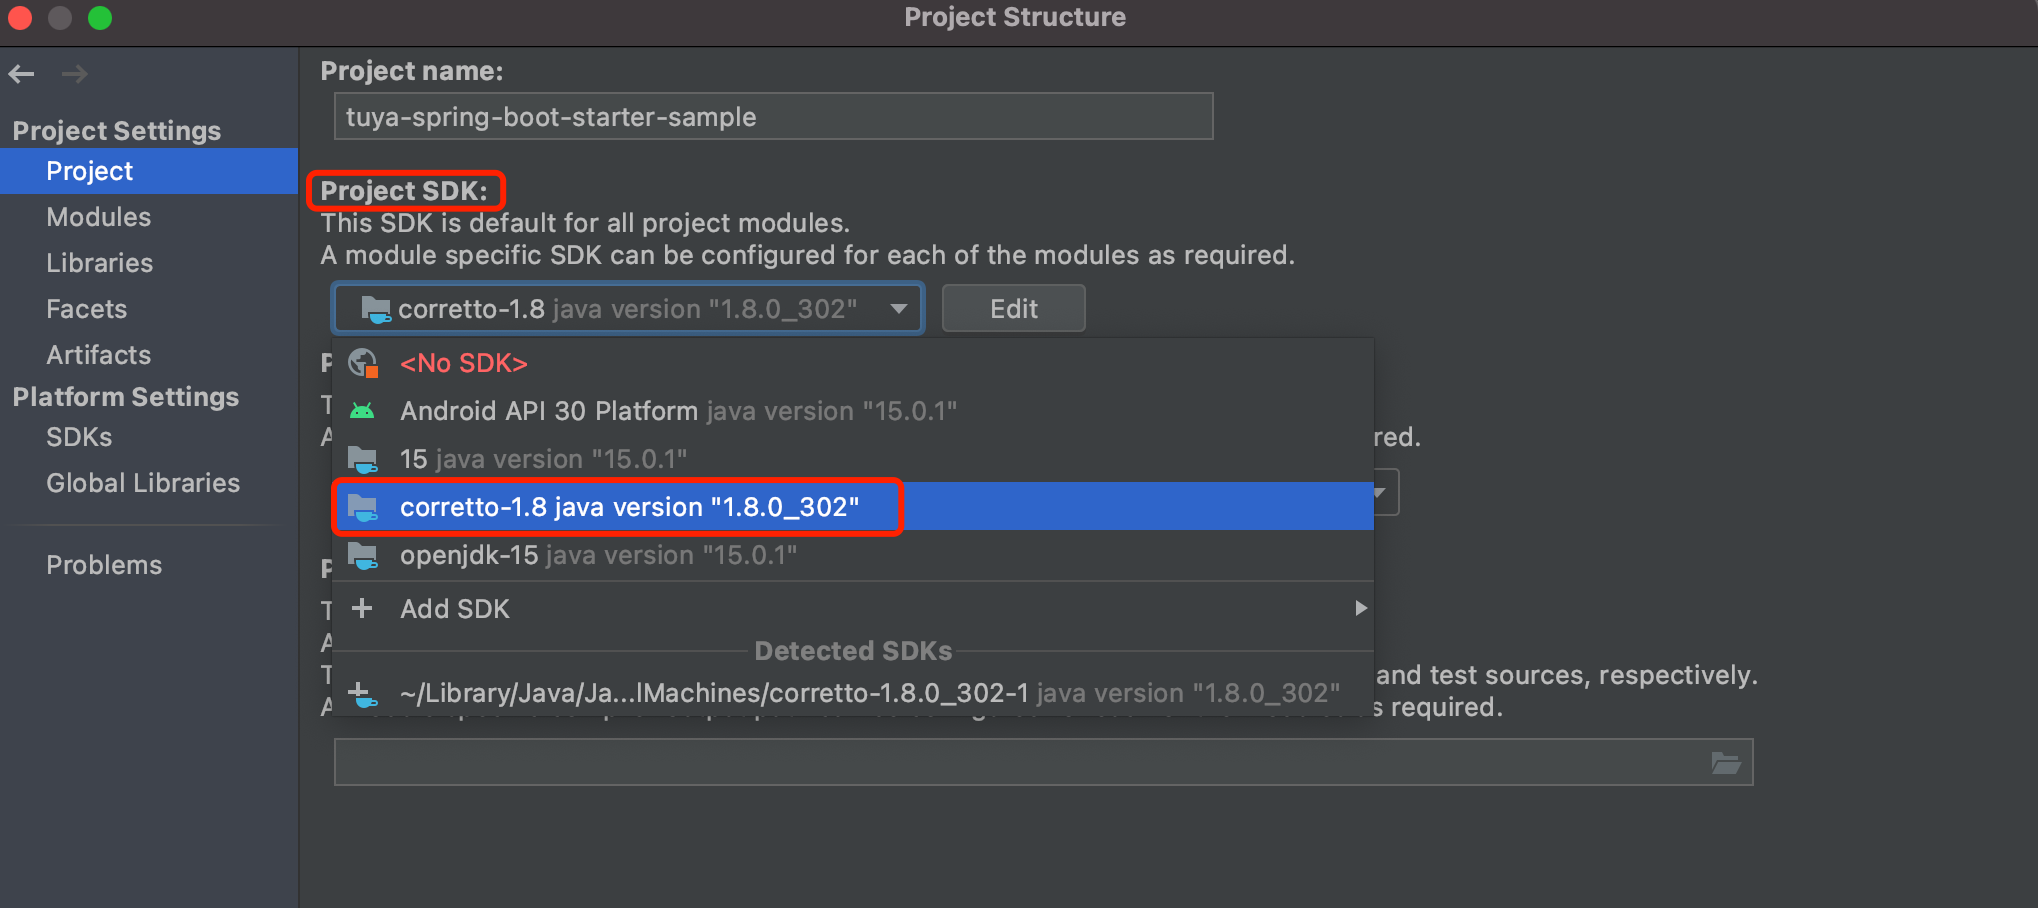
-
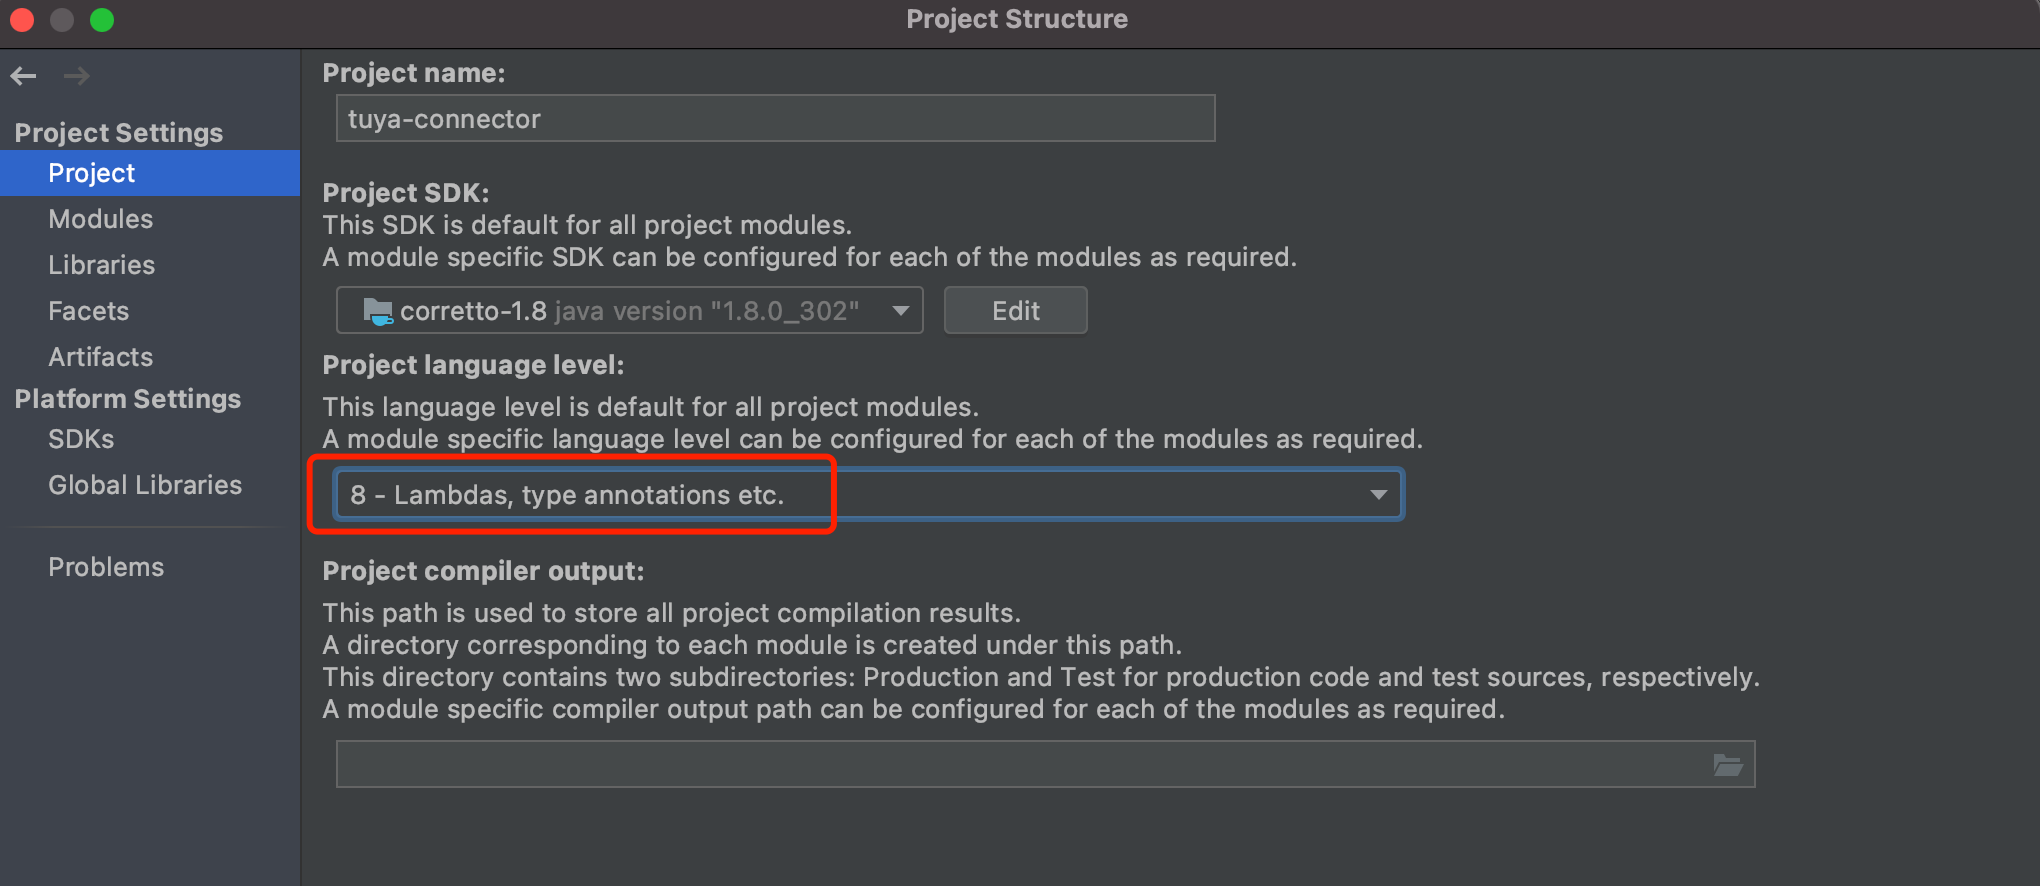
Select 8 in Project language level.
-
Click Apply > OK.
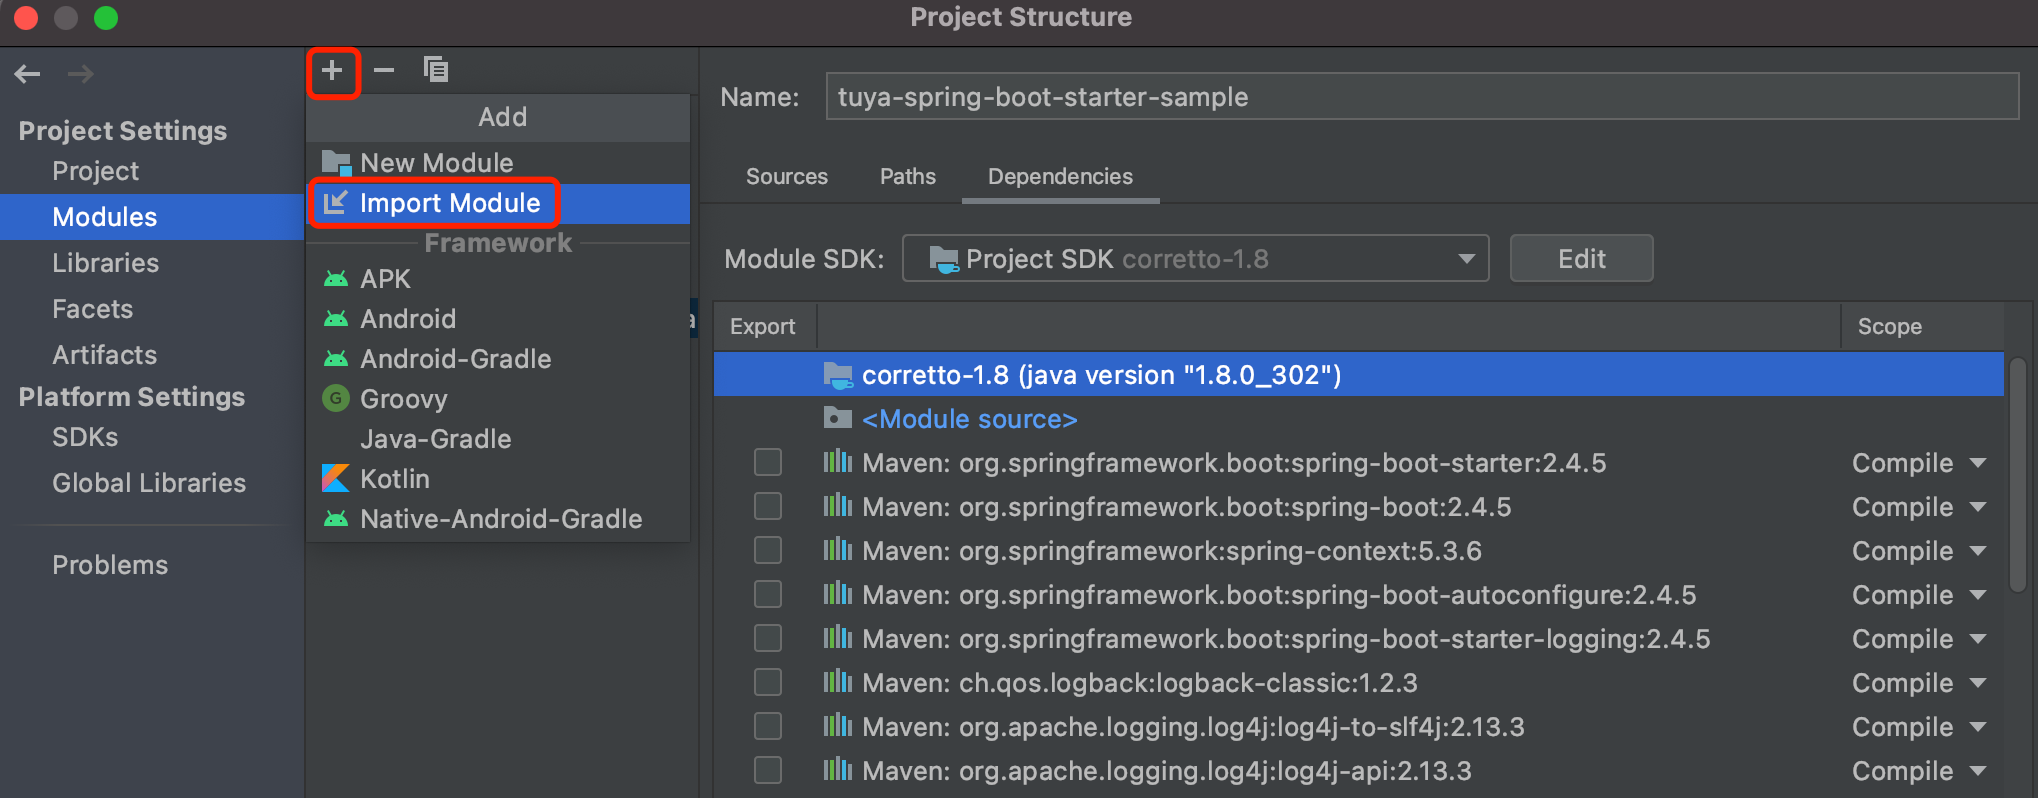
Step 2: Add dependencies
Add the tuya-spring-boot-starter-sample module.
-
Choose File > Project Structure > Modules, and click + > Import Module.
-
Import
tuya-spring-boot-starter-samplefrom the SDK file address.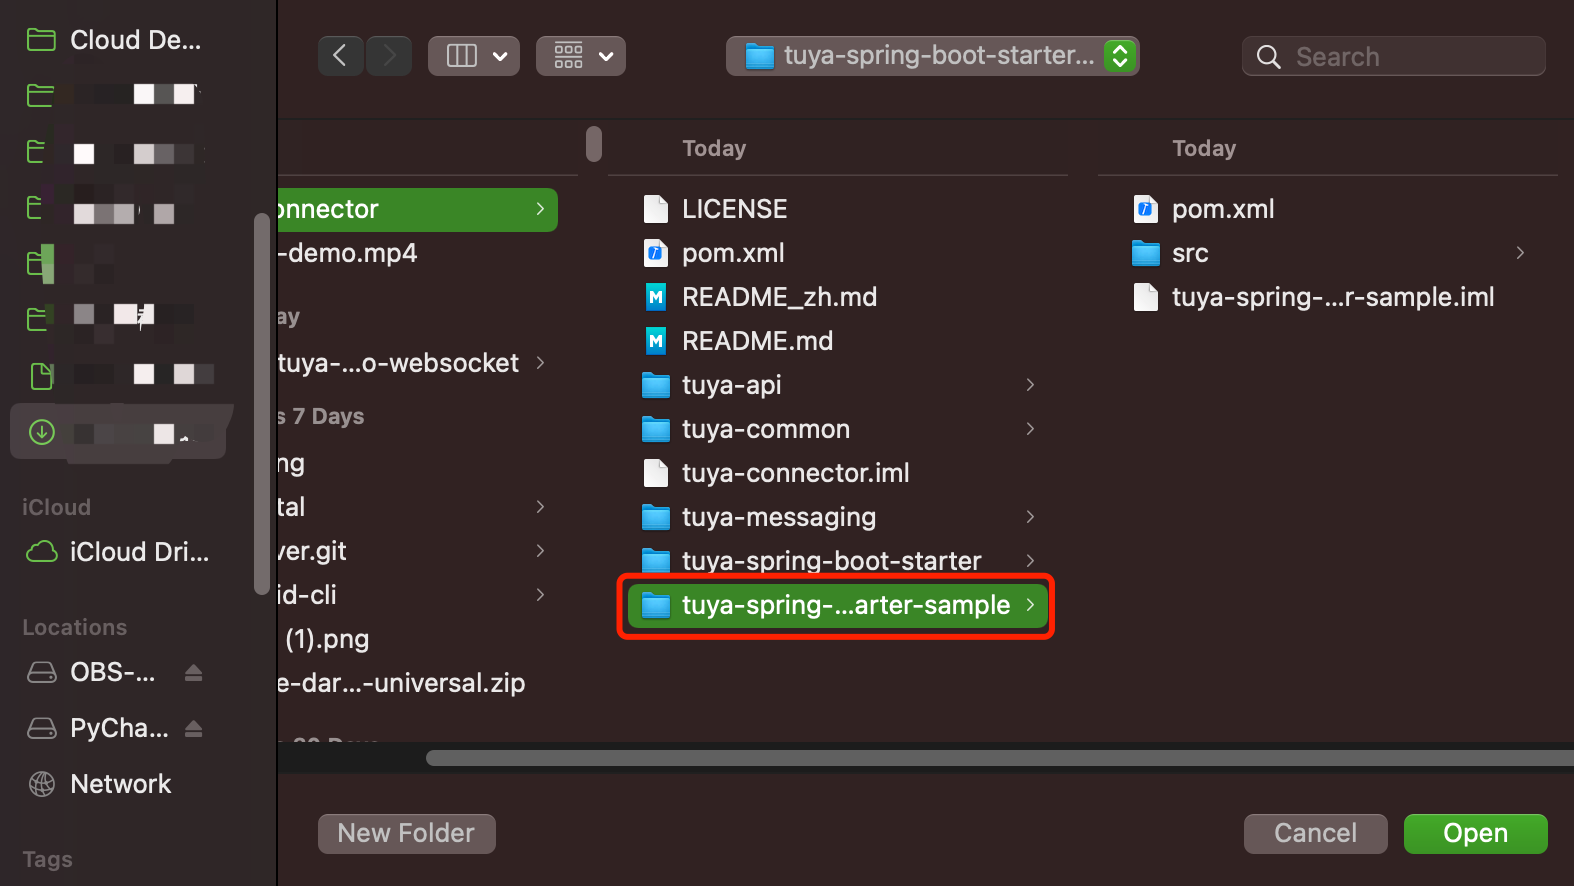
-
Import the module from Maven.
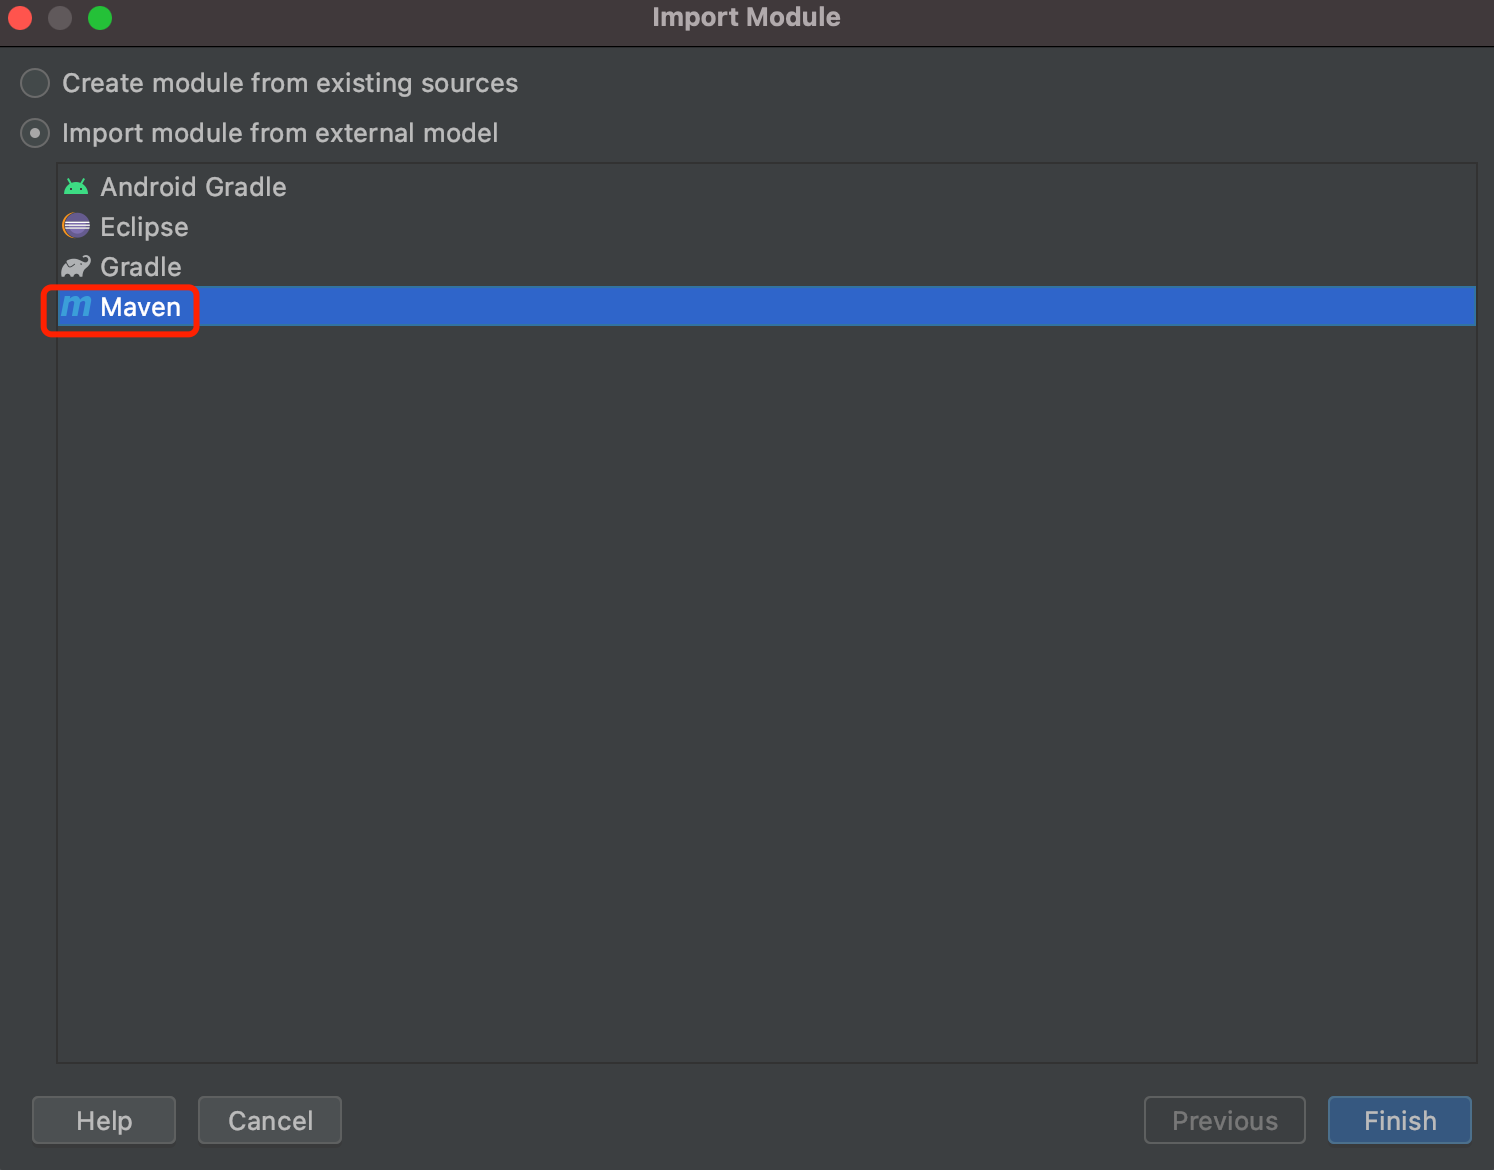
-
Click Finish.
Step 3: Edit the profile
Before development, you need to configure environment variables in the application.properties file.
-
Go to the Tuya Developer Platform and click Open Project to open the desired cloud project. Click Overview and find the Authorization Key, including Access ID and Access Secret.

-
Configure environment variables in the
application.propertiesfile.-
connector.ak: Enter the value of Access ID in the Authorization Key section on the platform. -
connector.sk: Enter the value of Access Secret in the Authorization Key section on the platform. -
connector.region: data center. Refer to the TuyaRegion.java file.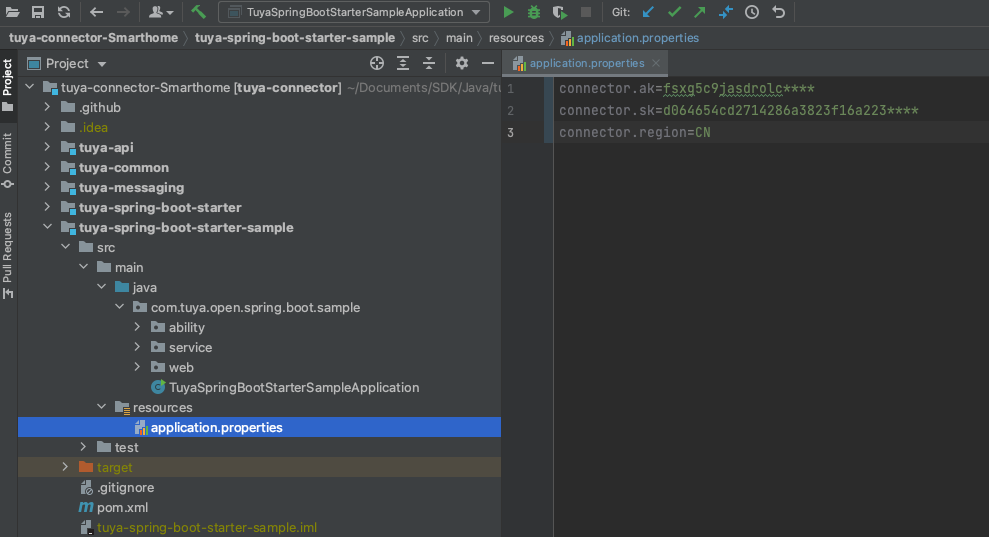
# ClientId & SecretKey generated on the Tuya Developer Platform
connector.ak=fsxg5c9jasdrolc****//ClientId
connector.sk=d064654cd2714286a3823f16a223****//SecretKey
connector.region=CN //Data Center
-
Step 4: Control devices
After the environment is ready, you can start your coding journey.
The strip lights are controlled in this example. The standard instruction for turning lights on or off is the switch_led. To control other devices, query the standard instruction set and modify the code.
-
Create the Connector interface, which is the mapping class of OpenAPI.
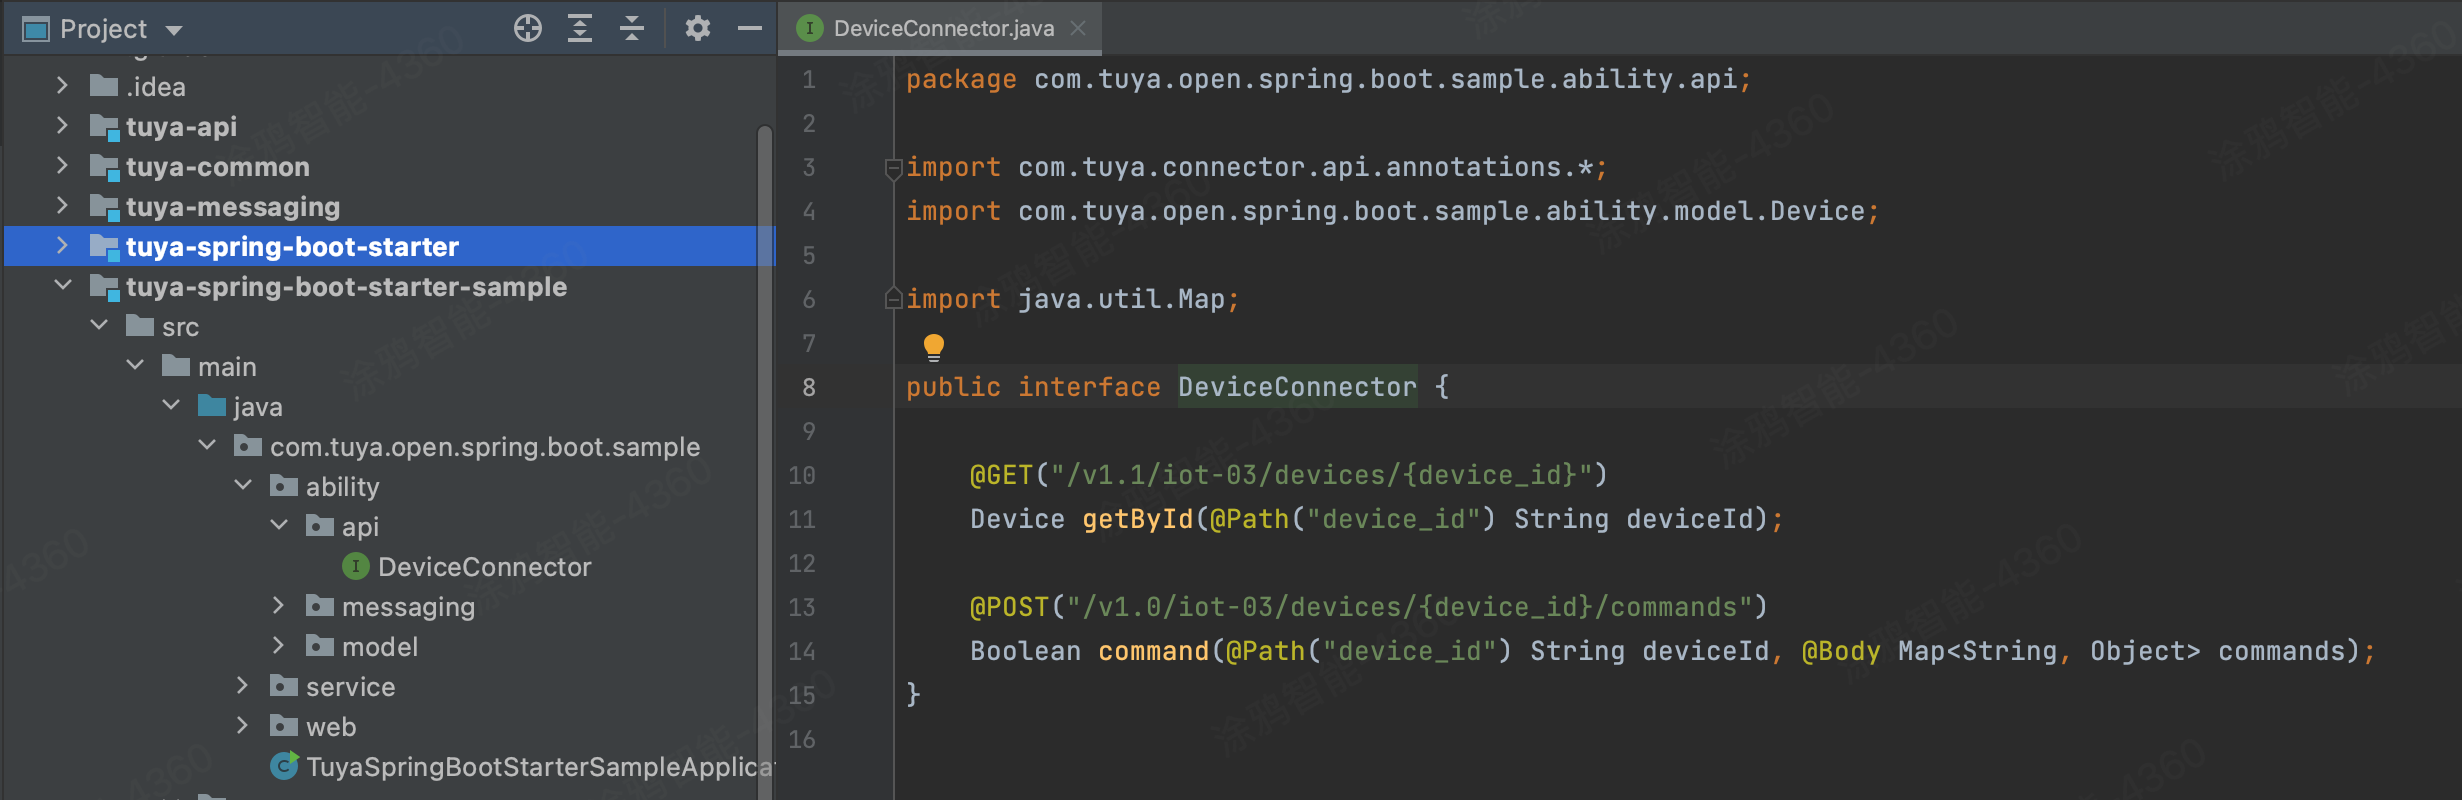
Sample code:
package com.tuya.open.spring.boot.sample.ability.api; import com.tuya.connector.api.annotations.*; import com.tuya.open.spring.boot.sample.ability.model.Device; public interface DeviceConnector { //Get the device information @GET("/v1.0/iot-03/devices/{device_id}") Device getById(@Path("device_id") String deviceId); //Send commands @POST("/v1.0/iot-03/devices/{device_id}/commands") Boolean commands(@Path("device_id") String deviceId, @Body Map<String, Object> commands); } -
Import
DeviceConnector.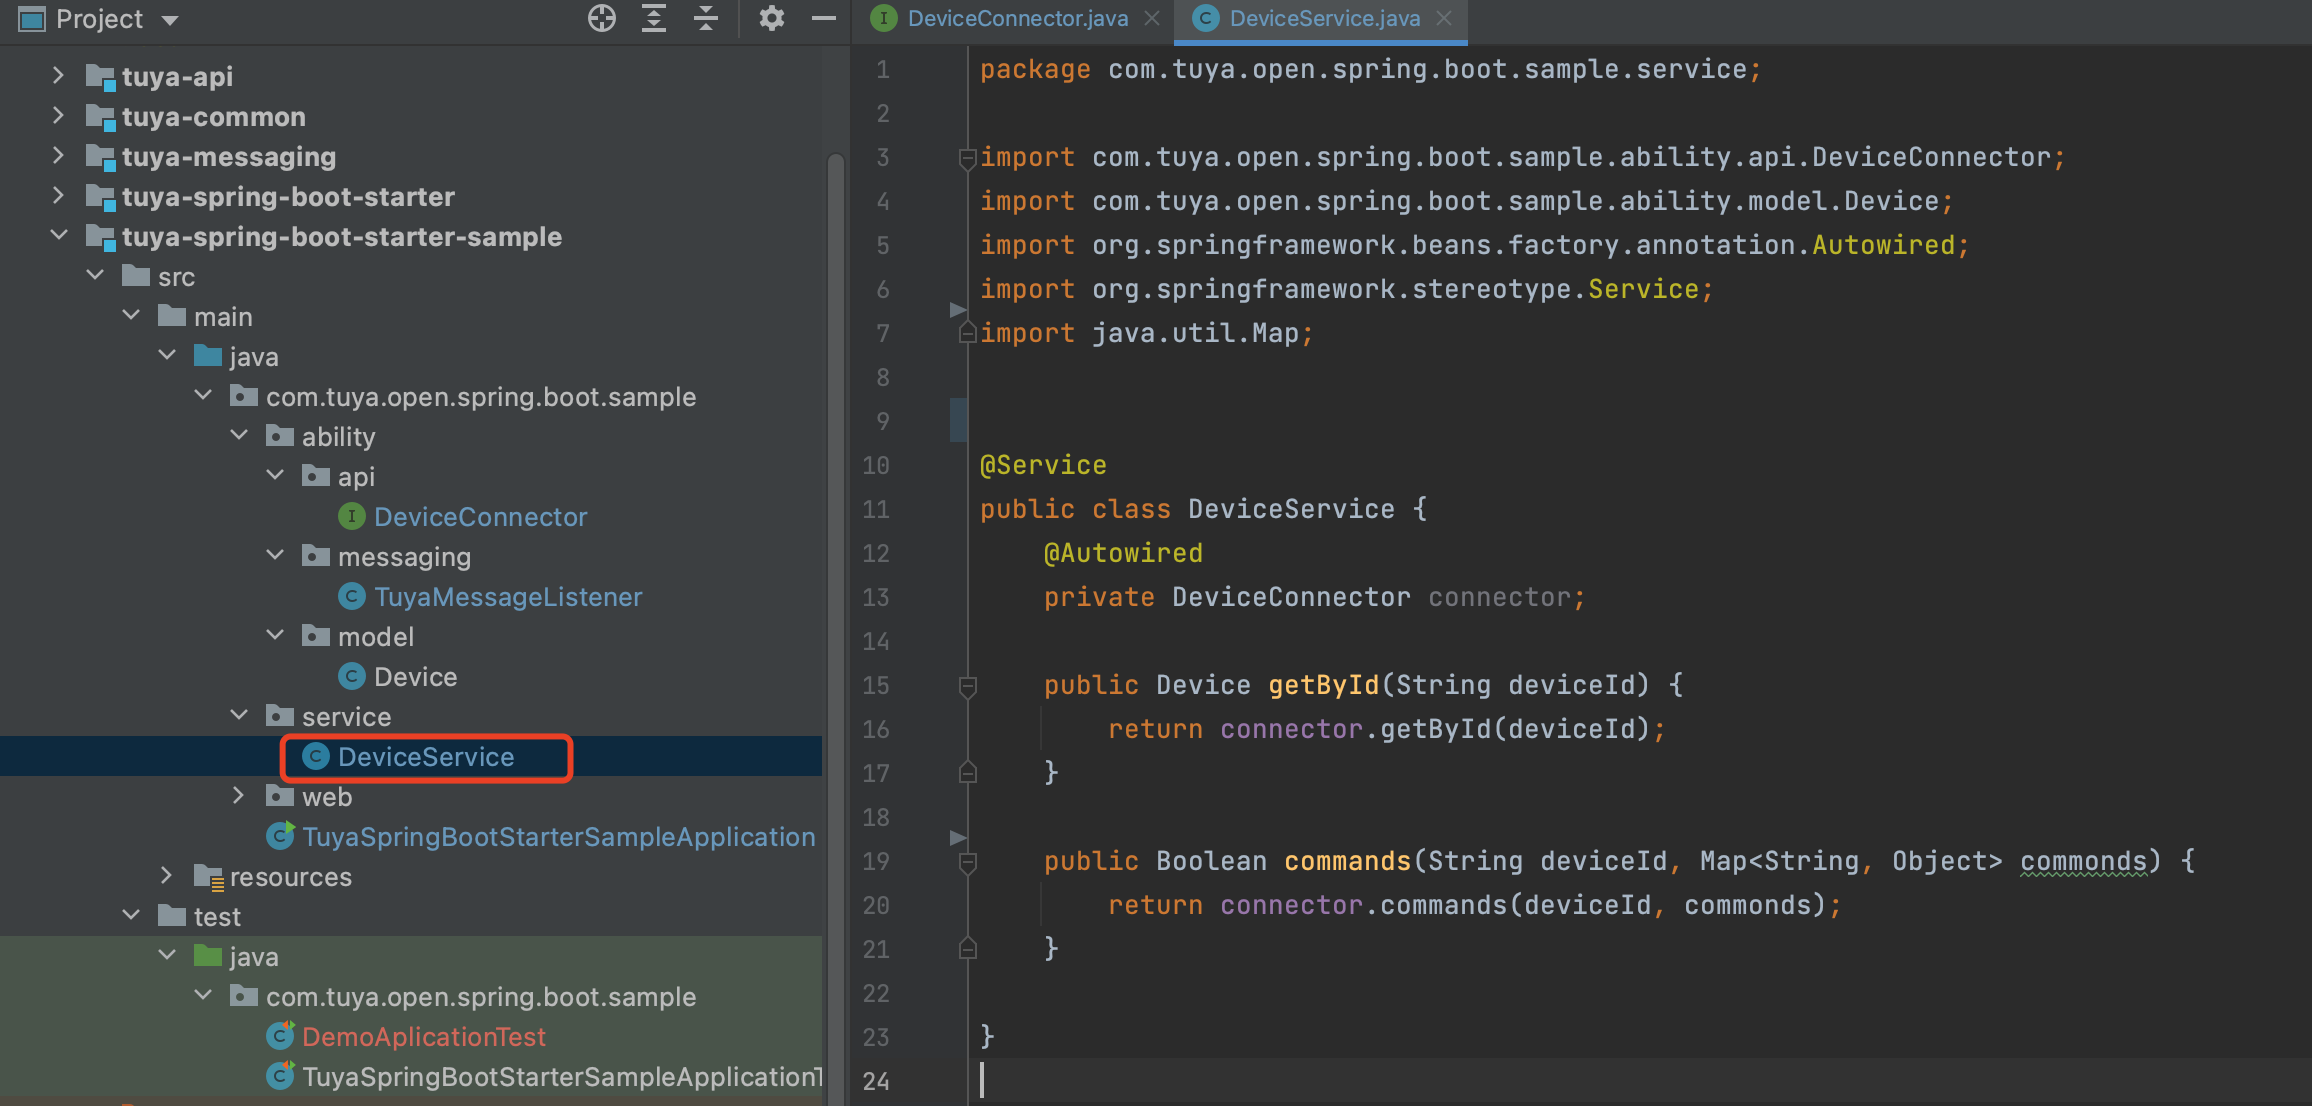
Sample code:
package com.tuya.open.spring.boot.sample.service; import com.tuya.open.spring.boot.sample.ability.api.DeviceConnector; import com.tuya.open.spring.boot.sample.ability.model.Device; import org.springframework.beans.factory.annotation.Autowired; import org.springframework.stereotype.Service; import java.util.Map; @Service public class DeviceService { @Autowired private DeviceConnector connector; public Device getById(String deviceId) { return connector.getById(deviceId); } public Boolean commands(String deviceId, Map<String, Object> commonds) { return connector.commands(deviceId, commonds); } } -
Create a test interface.
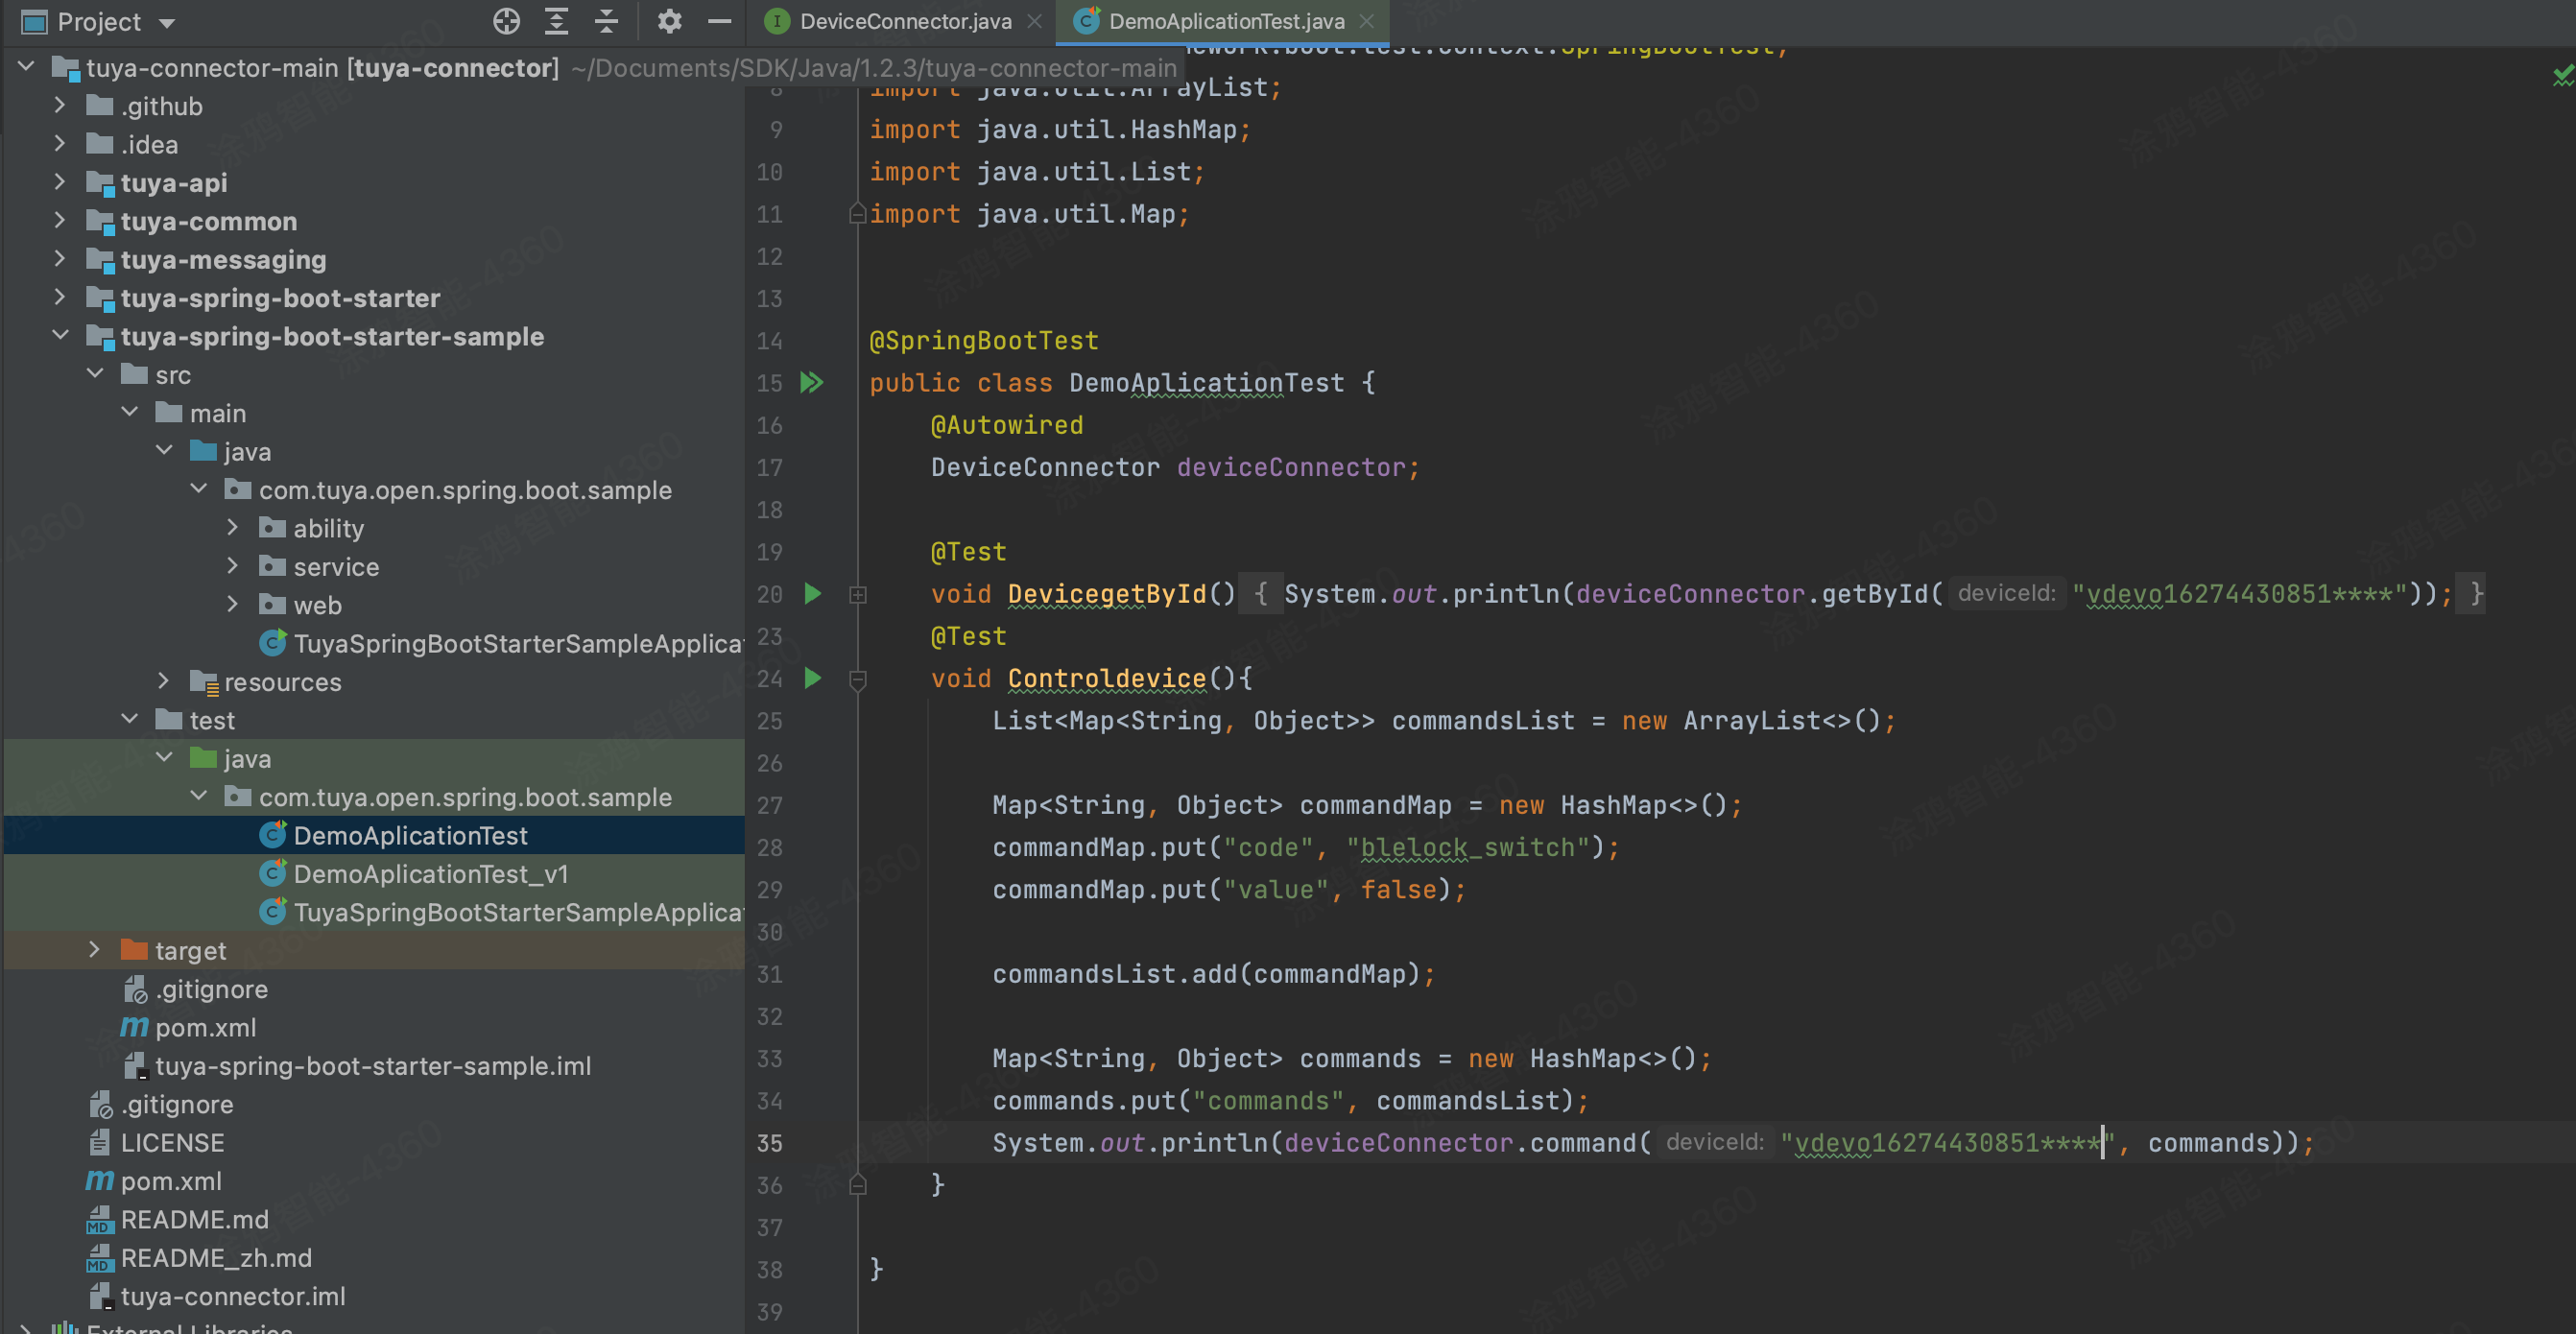
Sample code:
package com.tuya.open.spring.boot.sample;

import com.tuya.open.spring.boot.sample.ability.api.DeviceConnector;
import org.junit.jupiter.api.Test;
import org.springframework.beans.factory.annotation.Autowired;
import org.springframework.boot.test.context.SpringBootTest;
import java.util.ArrayList;
import java.util.List;
import java.util.Map;

@SpringBootTest
public class DemoAplicationTest {

    @Autowired
    DeviceConnector deviceConnector;

    @Test
    void DevicegetById(){
        System.out.println(deviceConnector.getById("vdevo16274430851****"));
    }
    @Test
    void Controldevice(){

    List<Map<String, Object>> commandsList = new ArrayList<>();
    Map<String, Object> commandMap = new HashMap<>();

    commandMap.put("code", "switch_led");
    commandMap.put("value", true);

    commandsList.add(commandMap);

    Map<String, Object> commands = new HashMap<>();
    commands.put("commands", commandsList);

        System.out.println(deviceConnector.commands("vdevo16274430851****",commands));
    }

}
Example of the returned data:
-
Get the device information:
2021-08-03 20:17:15.625 INFO 34281 --- [ main] c.t.o.s.boot.sample.DemoAplicationTest : Started DemoAplicationTest in 3.49 seconds (JVM running for 5.157) 2021-08-03 20:17:16.408 INFO 34281 --- [ main] c.t.c.o.api.header.TuyaHeaderProcessor : URL PATH: /v1.0/iot-03/devices/vdevo162799080003567 2021-08-03 20:17:16.431 INFO 34281 --- [ main] c.t.c.o.api.header.TuyaHeaderProcessor : URL PATH: /v1.0/token 2021-08-03 20:17:16.441 INFO 34281 --- [ main] c.t.c.o.api.header.TuyaHeaderProcessor : headers==>{t=1627993036432, sign_method=HMAC-SHA256, sign=DDE5D9982B2DF6C****875D332****01F06F****4173A78C47064DBAB291D, lang=zh, nonce=, client_id=fsxg5c9jasdrolc****, Signature-Headers=} 2021-08-03 20:17:16.839 INFO 34281 --- [ main] c.t.c.open.api.token.TuyaTokenManager : Get token success, token: TuyaToken(access_token=3ce6061f2****6772216****fef9, expire_time=5030, refresh_token=e0f****8177b970b85****456dcd, uid=******869632028HJBe) 2021-08-03 20:17:16.840 INFO 34281 --- [ main] c.t.c.o.api.header.TuyaHeaderProcessor : headers==>{access_token=3ce6061****f2791****32b9863fef9, t=1627993036840, sign_method=HMAC-SHA256, sign=44D74E6D08B6248260B4D6BDA****AD61475C31D3E****E73078E97612, lang=zh, nonce=, client_id=fsxg5c9jasdrolc****, Signature-Headers=} Device(active_time=1627990800, biz_type=0, category=dj, create_time=1627990800, icon=smart/program_****_****/dj.png, id=vdevo16274430851****, ip=, local_key=25bfe******5b257, model=, name=smart bulb, online=true, owner_id=null, product_id=yju2e******jr5zx, product_name=smart bulb, status=null, sub=false, time_zone=+08:00, uid=null, update_time=1627990800, uuid=vdevo16274430851****) 2021-08-03 20:17:16.972 INFO 34281 --- [extShutdownHook] o.s.s.concurrent.ThreadPoolTaskExecutor : Shutting down ExecutorService 'applicationTaskExecutor' -
Send instructions:
2021-08-03 20:20:30.101 INFO 34299 --- [           main] c.t.o.s.boot.sample.DemoAplicationTest   : Started DemoAplicationTest in 3.401 seconds (JVM running for 5.127)
2021-08-03 20:20:31.192 INFO 34299 --- [           main] c.t.c.o.api.header.TuyaHeaderProcessor   : URL PATH: /v1.0/iot-03/devices/vdevo16274430851****/commands
2021-08-03 20:20:31.216 INFO 34299 --- [           main] c.t.c.o.api.header.TuyaHeaderProcessor   : URL PATH: /v1.0/token
2021-08-03 20:20:31.227 INFO 34299 --- [           main] c.t.c.o.api.header.TuyaHeaderProcessor   : headers==>{t=1627993231217, sign_method=HMAC-SHA256, sign=8589C29441071F26************3178E2426DCD425DF****89ACDFB01882A, lang=zh, nonce=, client_id=fsxg5c9jasdrolc****, Signature-Headers=}
2021-08-03 20:20:31.738 INFO 34299 --- [           main] c.t.c.open.api.token.TuyaTokenManager    : Get token success, token: TuyaToken(access_token=3ce6061f279186772****2b9863fef9, expire_time=4835, refresh_token=e0fbd2e****177b970b854e456dcd, uid=*******869632028HJBe)
2021-08-03 20:20:31.741 INFO 34299 --- [           main] c.t.c.o.api.header.TuyaHeaderProcessor   : headers==>{access_token=3ce6061f2****772216632b9863fef9, t=1627993231739, sign_method=HMAC-SHA256, sign=1570645BFE1716C7C1CF9****413B928EFAC7CBE84D****A175671396, lang=zh, nonce=, client_id=fsxg5c9jasdrolc****, Signature-Headers=}
true
-
Step 5: Publish and subscribe to messages
The code implements the interface for message publishing in the connector framework. The dispatcher features message ordering and data decryption. This allows you to create specific message types and publish messages based on Spring’s event mechanism.
The message service is required to enable this feature.
-
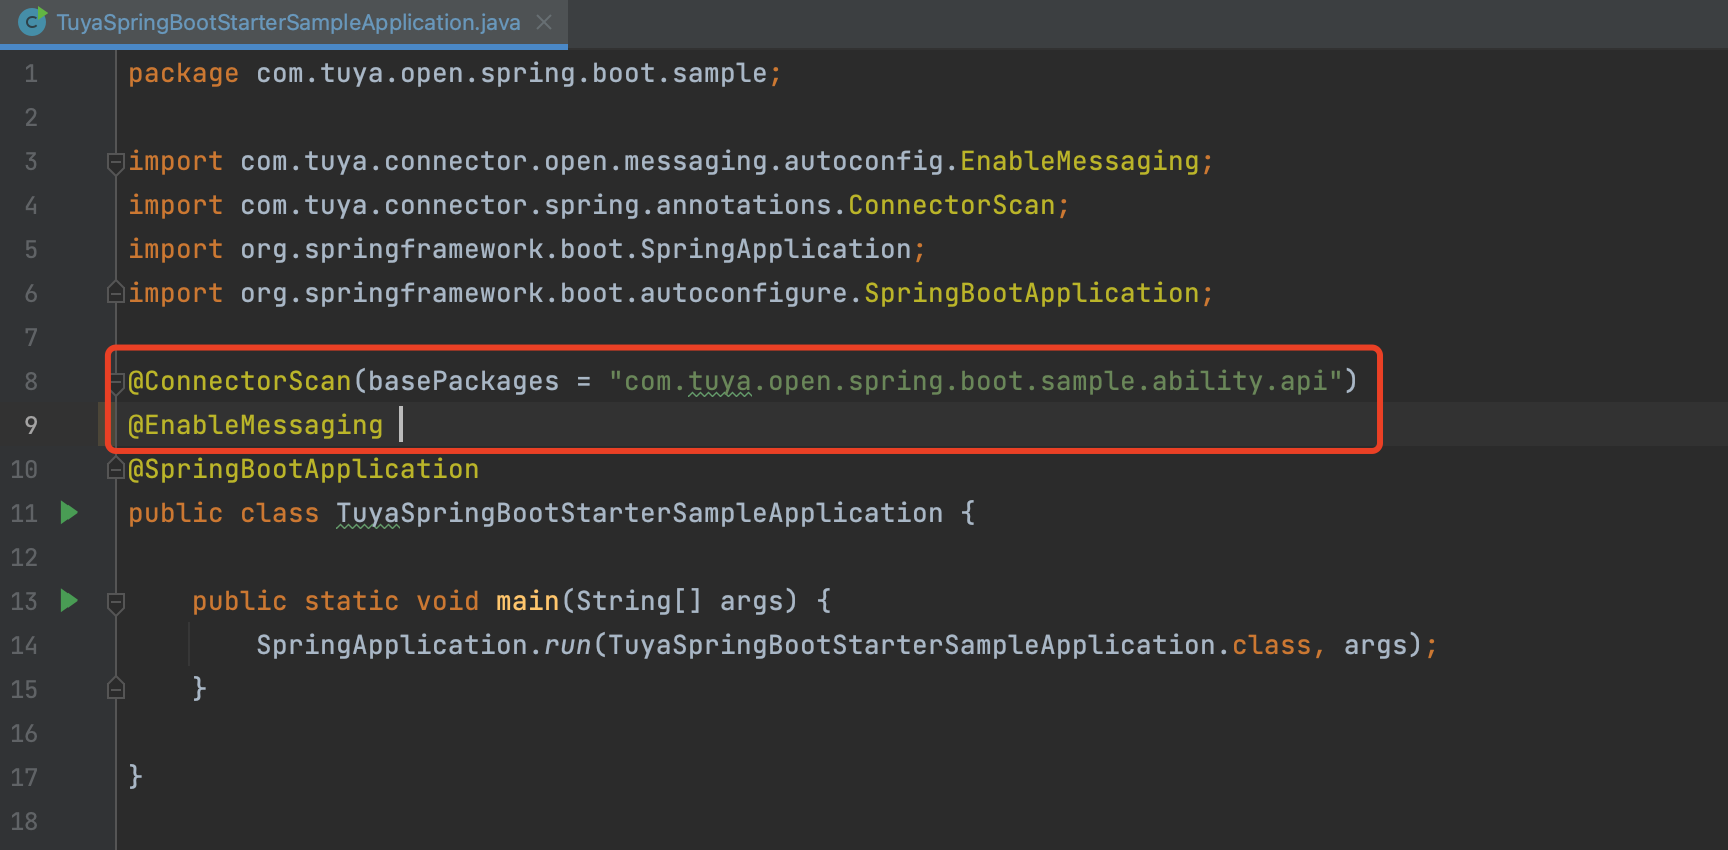
Set @ConnectorScan for the class of the Spring Boot application. You can set @EnableMessaging to enable the message subscription capability.
Sample code:
package com.tuya.open.spring.boot.sample; import com.tuya.connector.open.messaging.autoconfig.EnableMessaging; import com.tuya.connector.spring.annotations.ConnectorScan; import org.springframework.boot.SpringApplication; import org.springframework.boot.autoconfigure.SpringBootApplication; @ConnectorScan(basePackages = "com.tuya.open.spring.boot.sample.ability.api") @EnableMessaging // Enable the message service @SpringBootApplication public class TuyaSpringBootStarterSampleApplication { public static void main(String[] args) { SpringApplication.run(TuyaSpringBootStarterSampleApplication.class, args); } } -
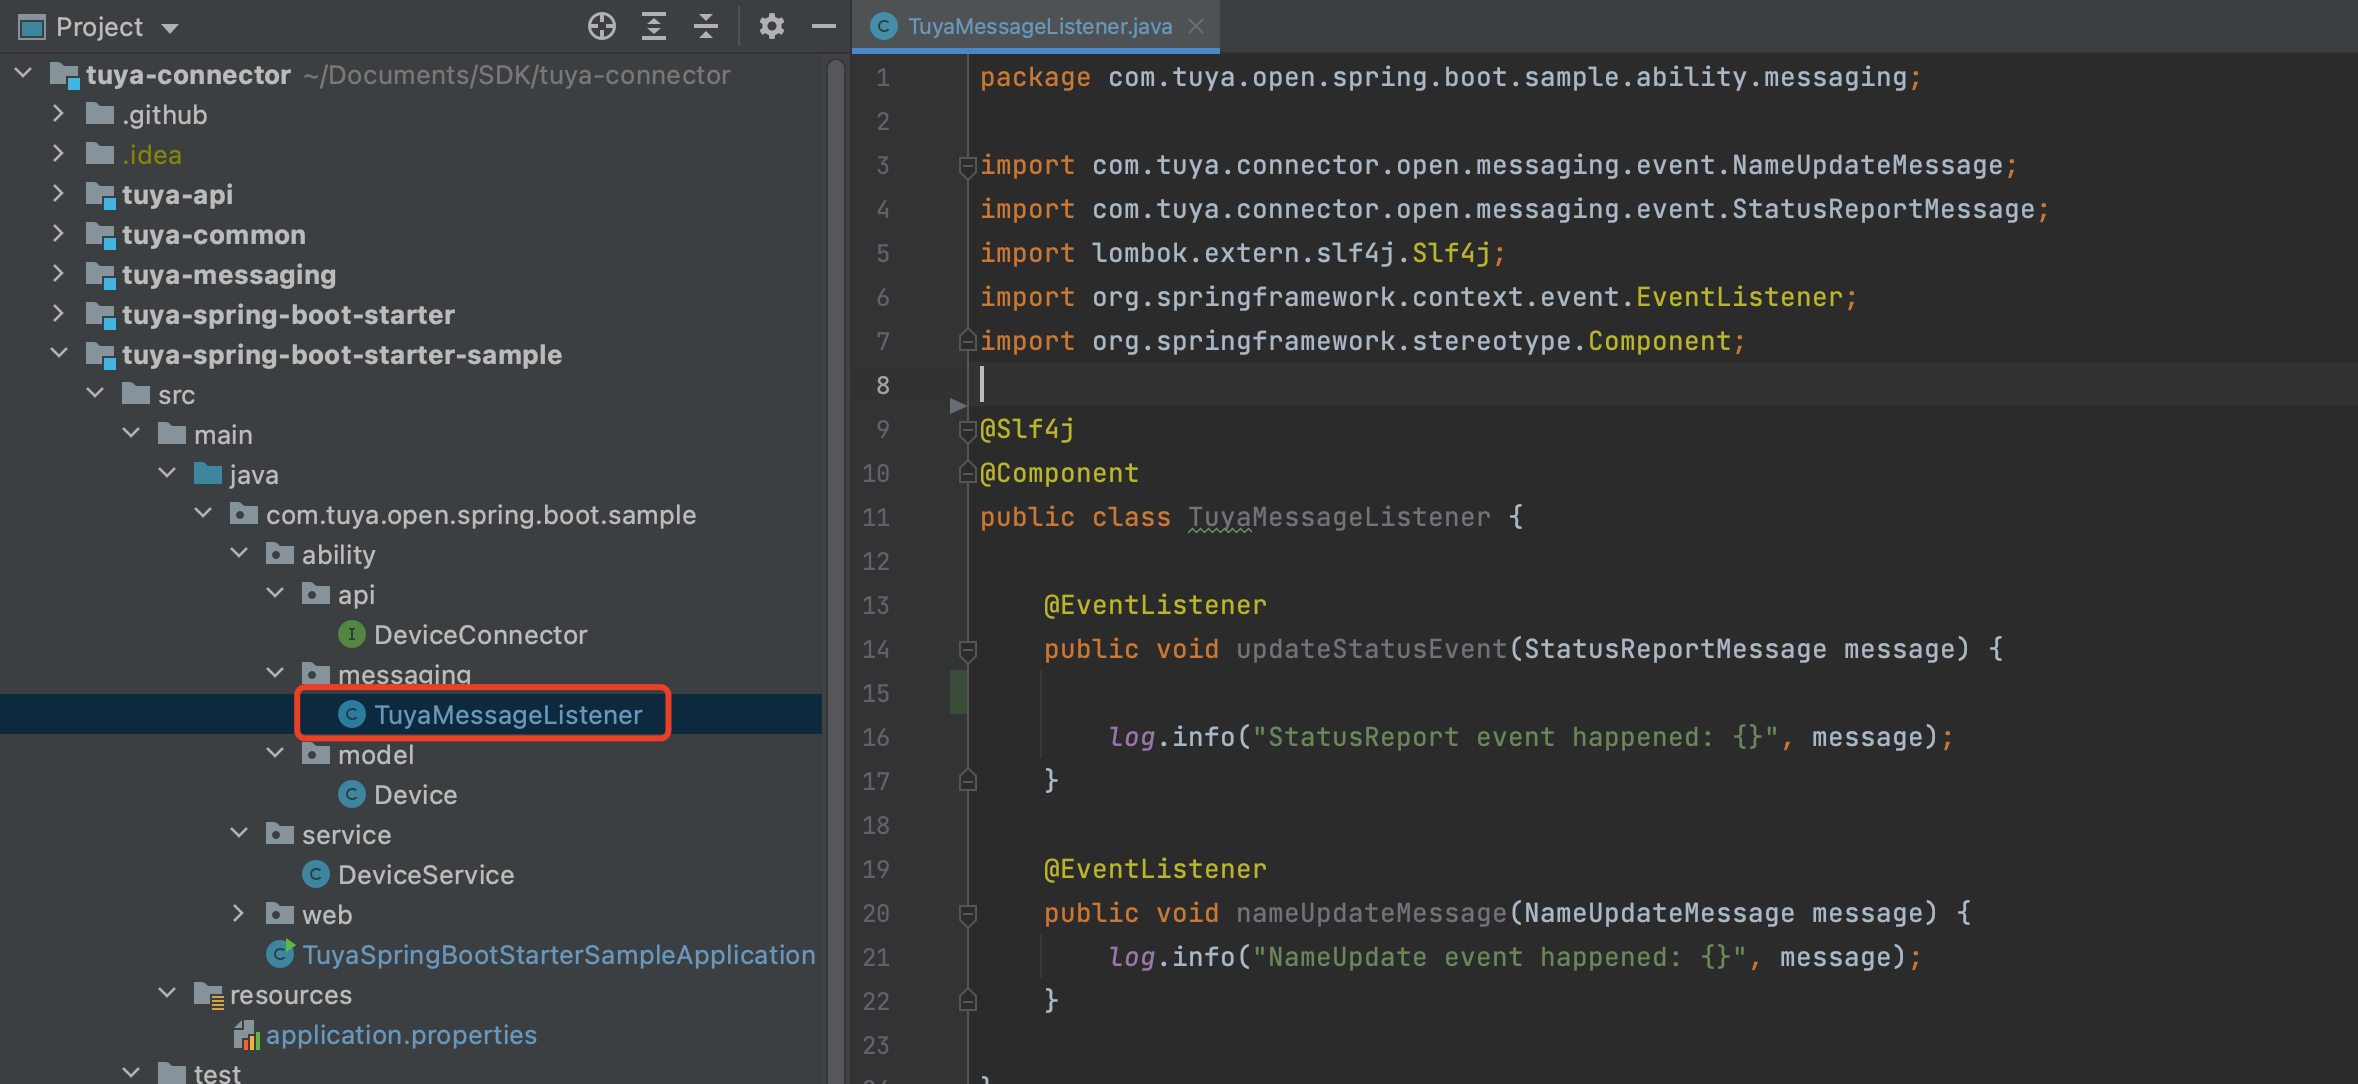
Subscribe to message events
You can add ApplicationListener to listen for required events. The framework includes all the Tuya’s message event types. The message data contains ciphertext messages and plaintext messages.
Sample code:
package com.tuya.open.spring.boot.sample.ability.messaging;

import com.tuya.connector.open.messaging.event.NameUpdateMessage;
import com.tuya.connector.open.messaging.event.StatusReportMessage;
import lombok.extern.slf4j.Slf4j;
import org.springframework.context.event.EventListener;
import org.springframework.stereotype.Component;

@Slf4j
@Component
public class TuyaMessageListener {

    @EventListener
    public void updateStatusEvent(StatusReportMessage message) {

        log.info("StatusReport event happened: {}", message);
    }

    @EventListener
    public void nameUpdateMessage(NameUpdateMessage message) {
        log.info("NameUpdate event happened: {}", message);
    }

}
Example of the returned data:
2021-07-27 10:37:28,087 INFO 33746 --- [pool-2-thread-1] c.t.o.s.b.s.a.m.TuyaMessageListener : StatusReport event happened: {"356c93f2-3929-4a8f-ae28-ae5607efc7ad","devId":"***1626937310799","productKey":"yju2******ujr5zx","sourceMessage":{"data":"AAAADN2q/ueLzZE78ubHsQ9Nk+iUBd7QOfPyB78P2Fspm2rMMHYymWYVnZL1m*****/kpPaGVDXsAIlrIIaM6k6wWWAezW7SJLF6gER*****/GQ24QYahT3UvadDx4v45sWuyssg33sX1uC0PFP9kvghc8o9Q1QELGFgmc7JPb0FQ4HDxW98DJPCeIgYTWmmz+BHoaDbH6iOV0SEcsi6vlFGtYQ*****/t/O/g0bTT9RdnmLbGxllJjedwBA2c6XPKNv7HHrouF7LfTDmXwFHml5q6*****","protocol":4,"pv":"2.0","sign":"65f7dcb59************74e93484e7************fae4dcb3e******fbee66","t":1627353446615},"status":[{"code":"switch_led","t":1627353446615,"value":False}]}
Is this page helpful?
YesFeedbackIs this page helpful?
YesFeedback


