Develop with Python SDK
This topic describes how to develop a program to control devices based on the open capabilities and SDK of the Tuya Developer Platform.
Prerequisites
Procedure
Step 1: Set up development environment
This step is based on the Tuya-connector-Python SDK. Tuya-connector helps you efficiently create cloud development projects regarding the OpenAPI or message subscription capabilities. You can put all the focus on business logic without taking care of server-side programming nor relational databases.
-
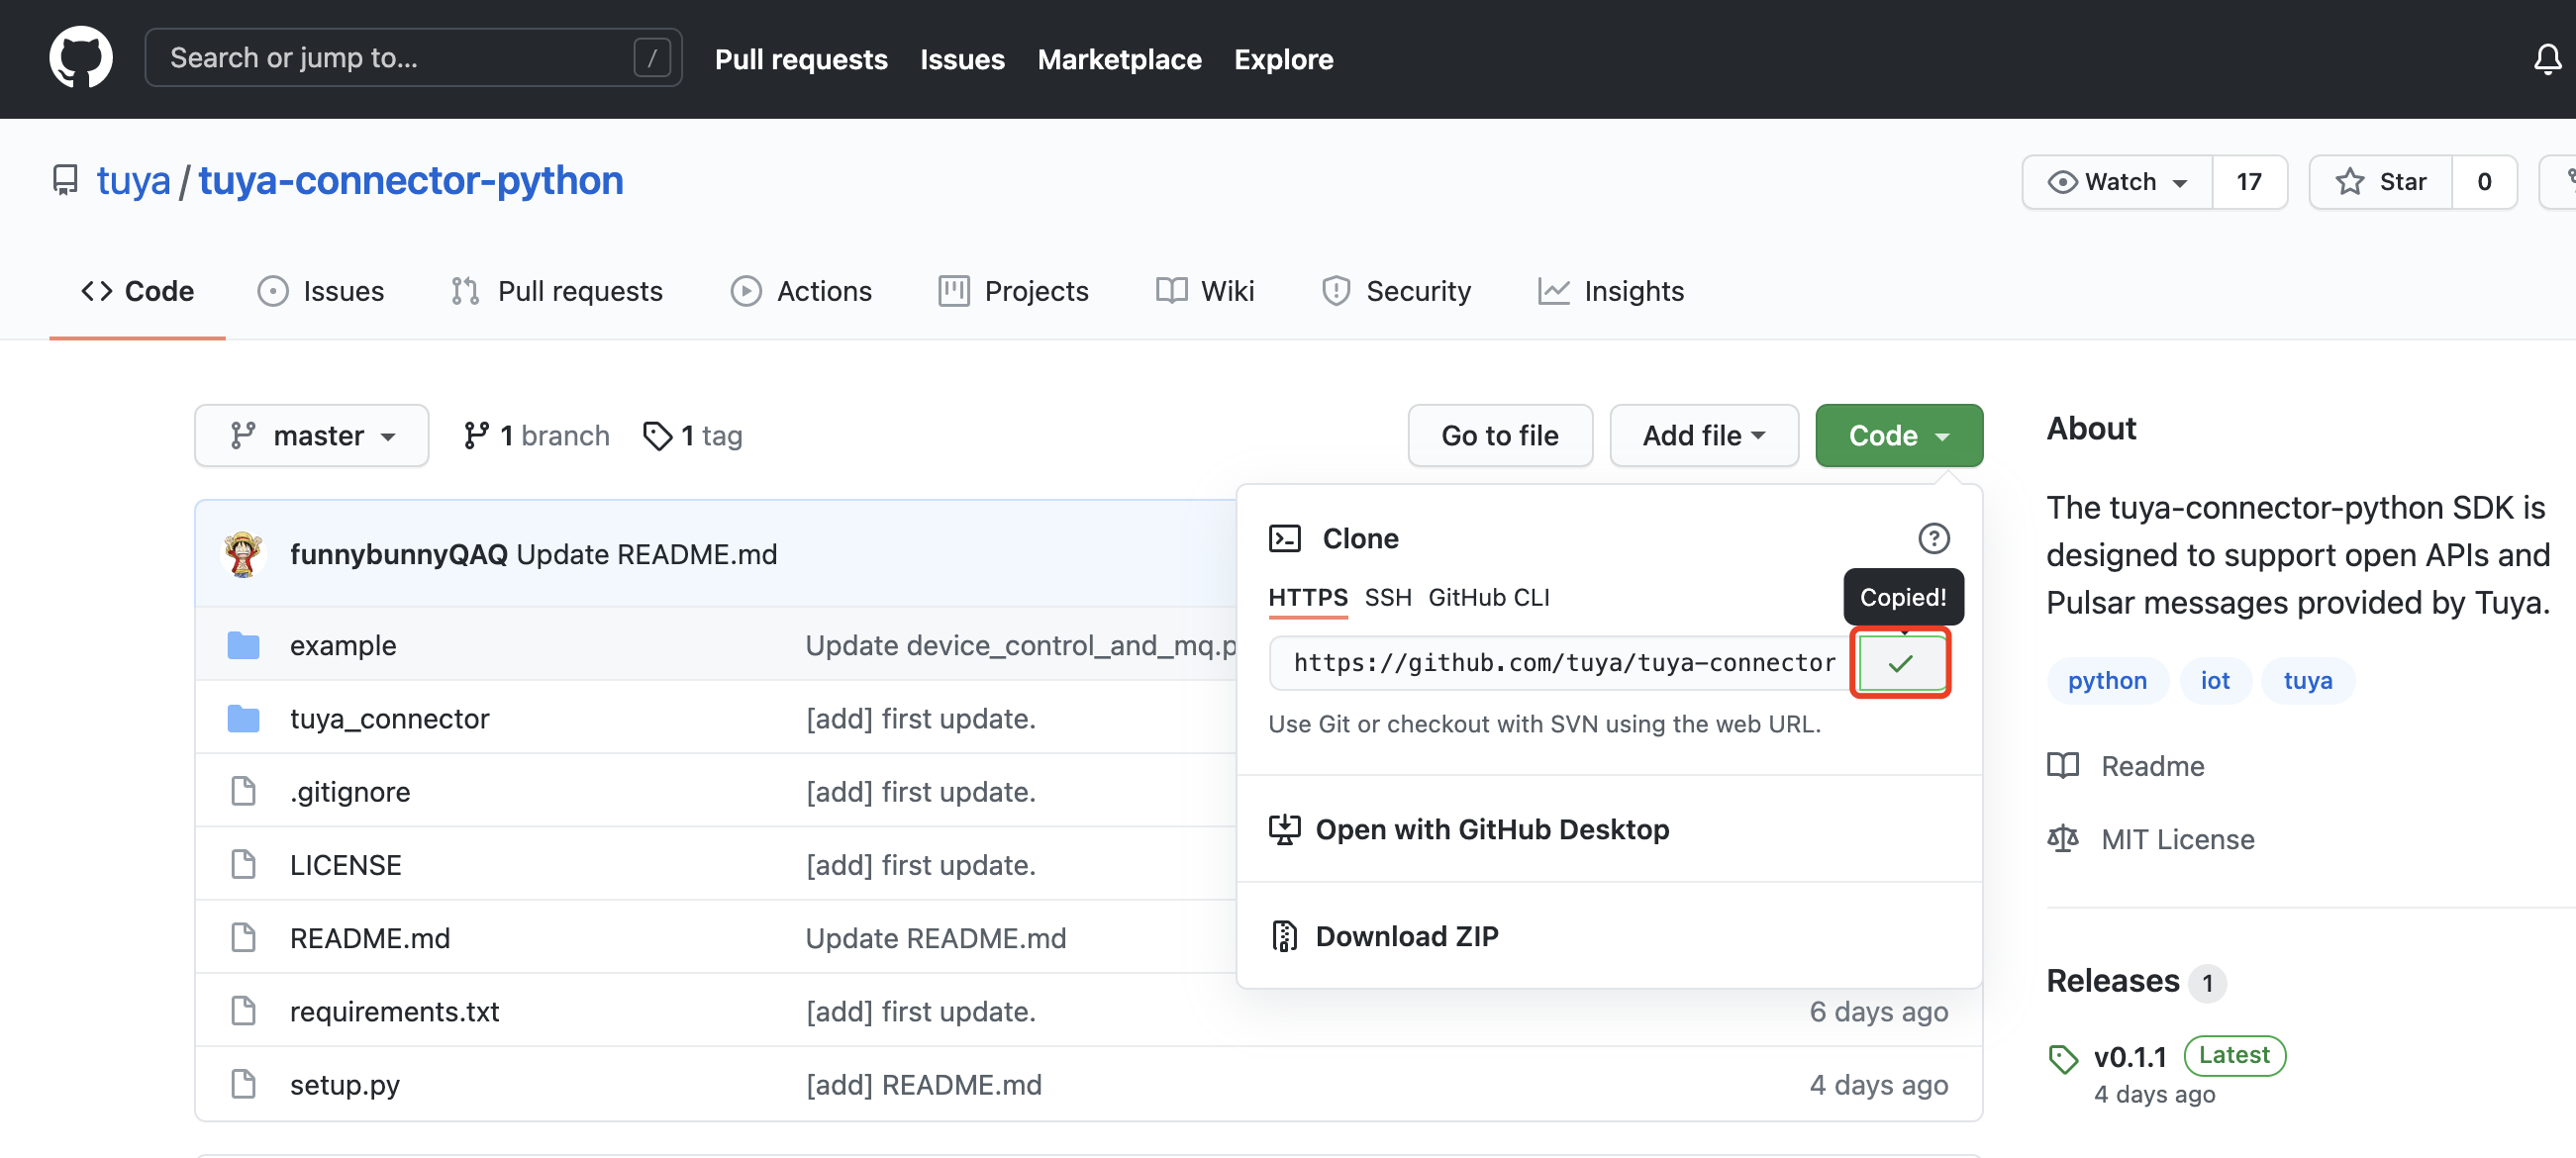
Get the SDK address at Tuya-connector-Python.
-
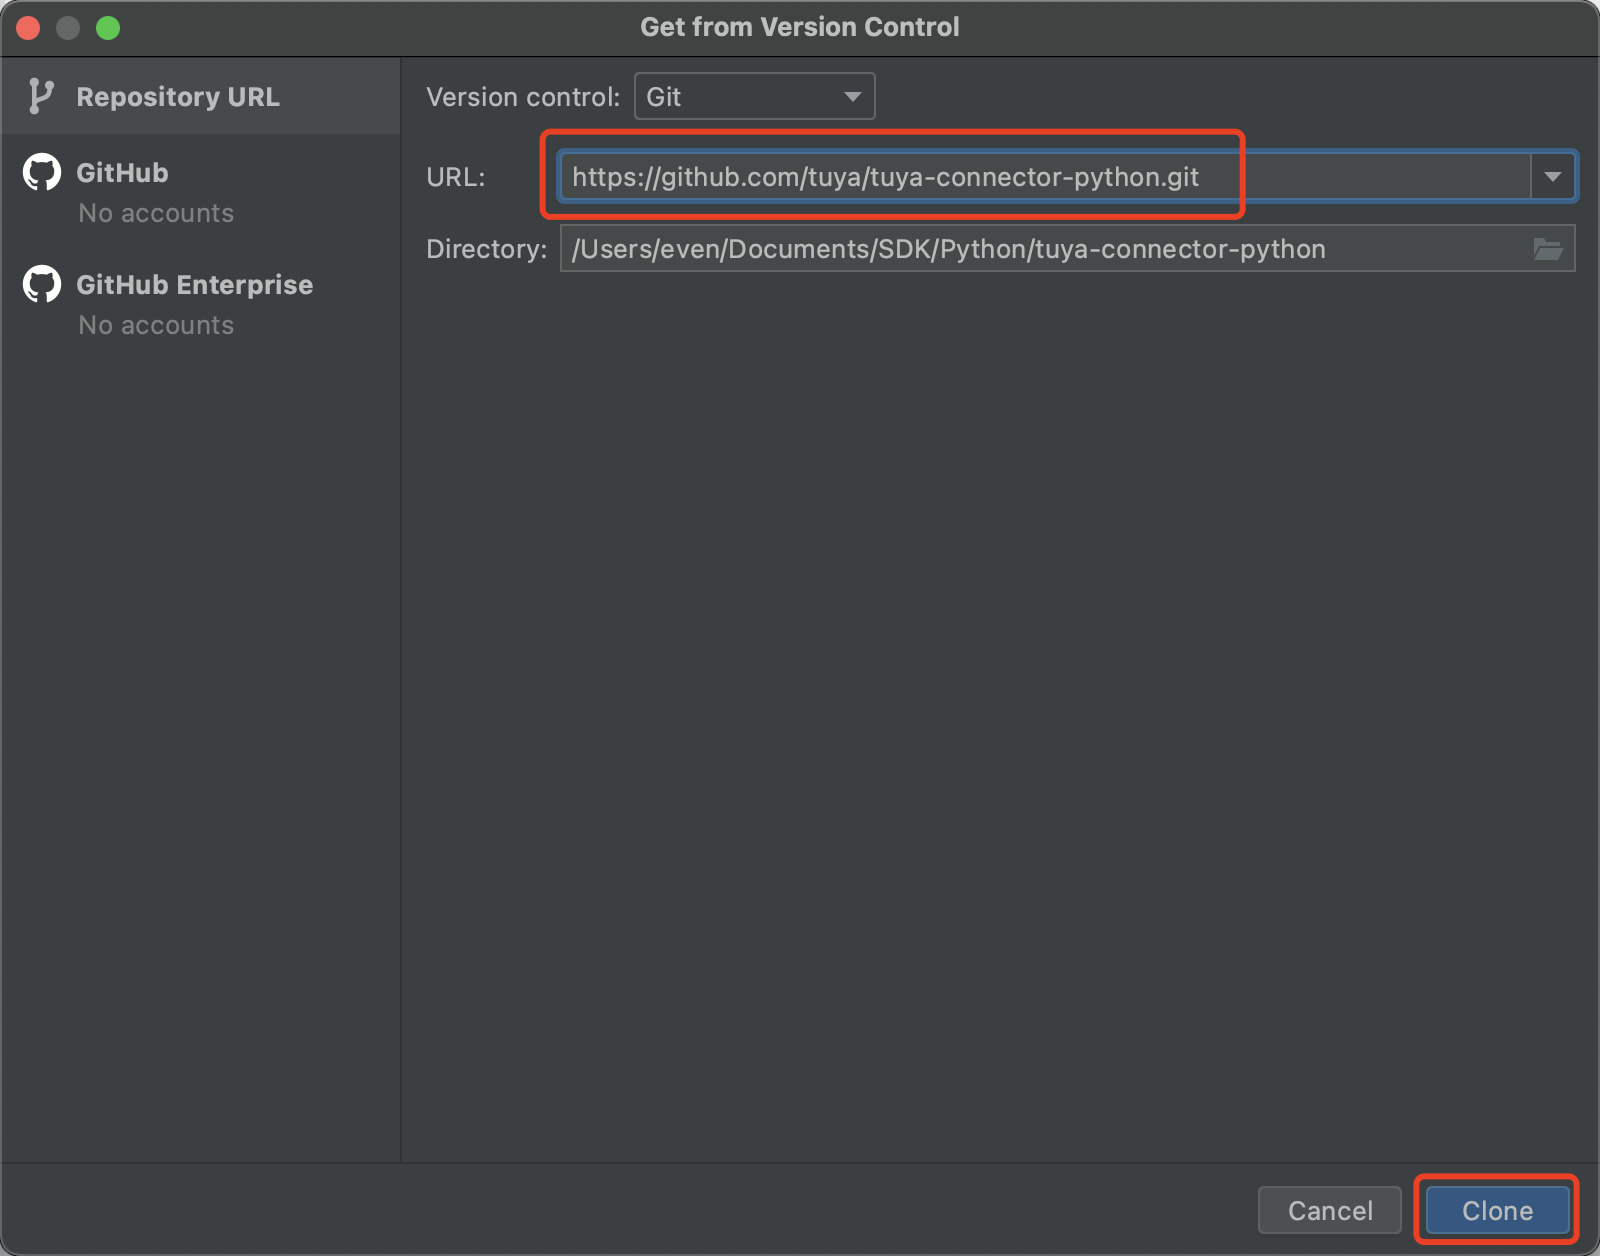
Go to Projects > Get from Version Control > URL, enter the SDK address, and then click Clone.
-
(Independent project development) Import Python dependency package.
Note: The GitHub hosting platform contains the SDK source code. The API request used in this topic is the source code in the SDK project. If you develop an independent project, the PIP tool can be used to import the Python dependency package.
Import code:
pip3 install tuya-connector-python
Step 2: Edit profile
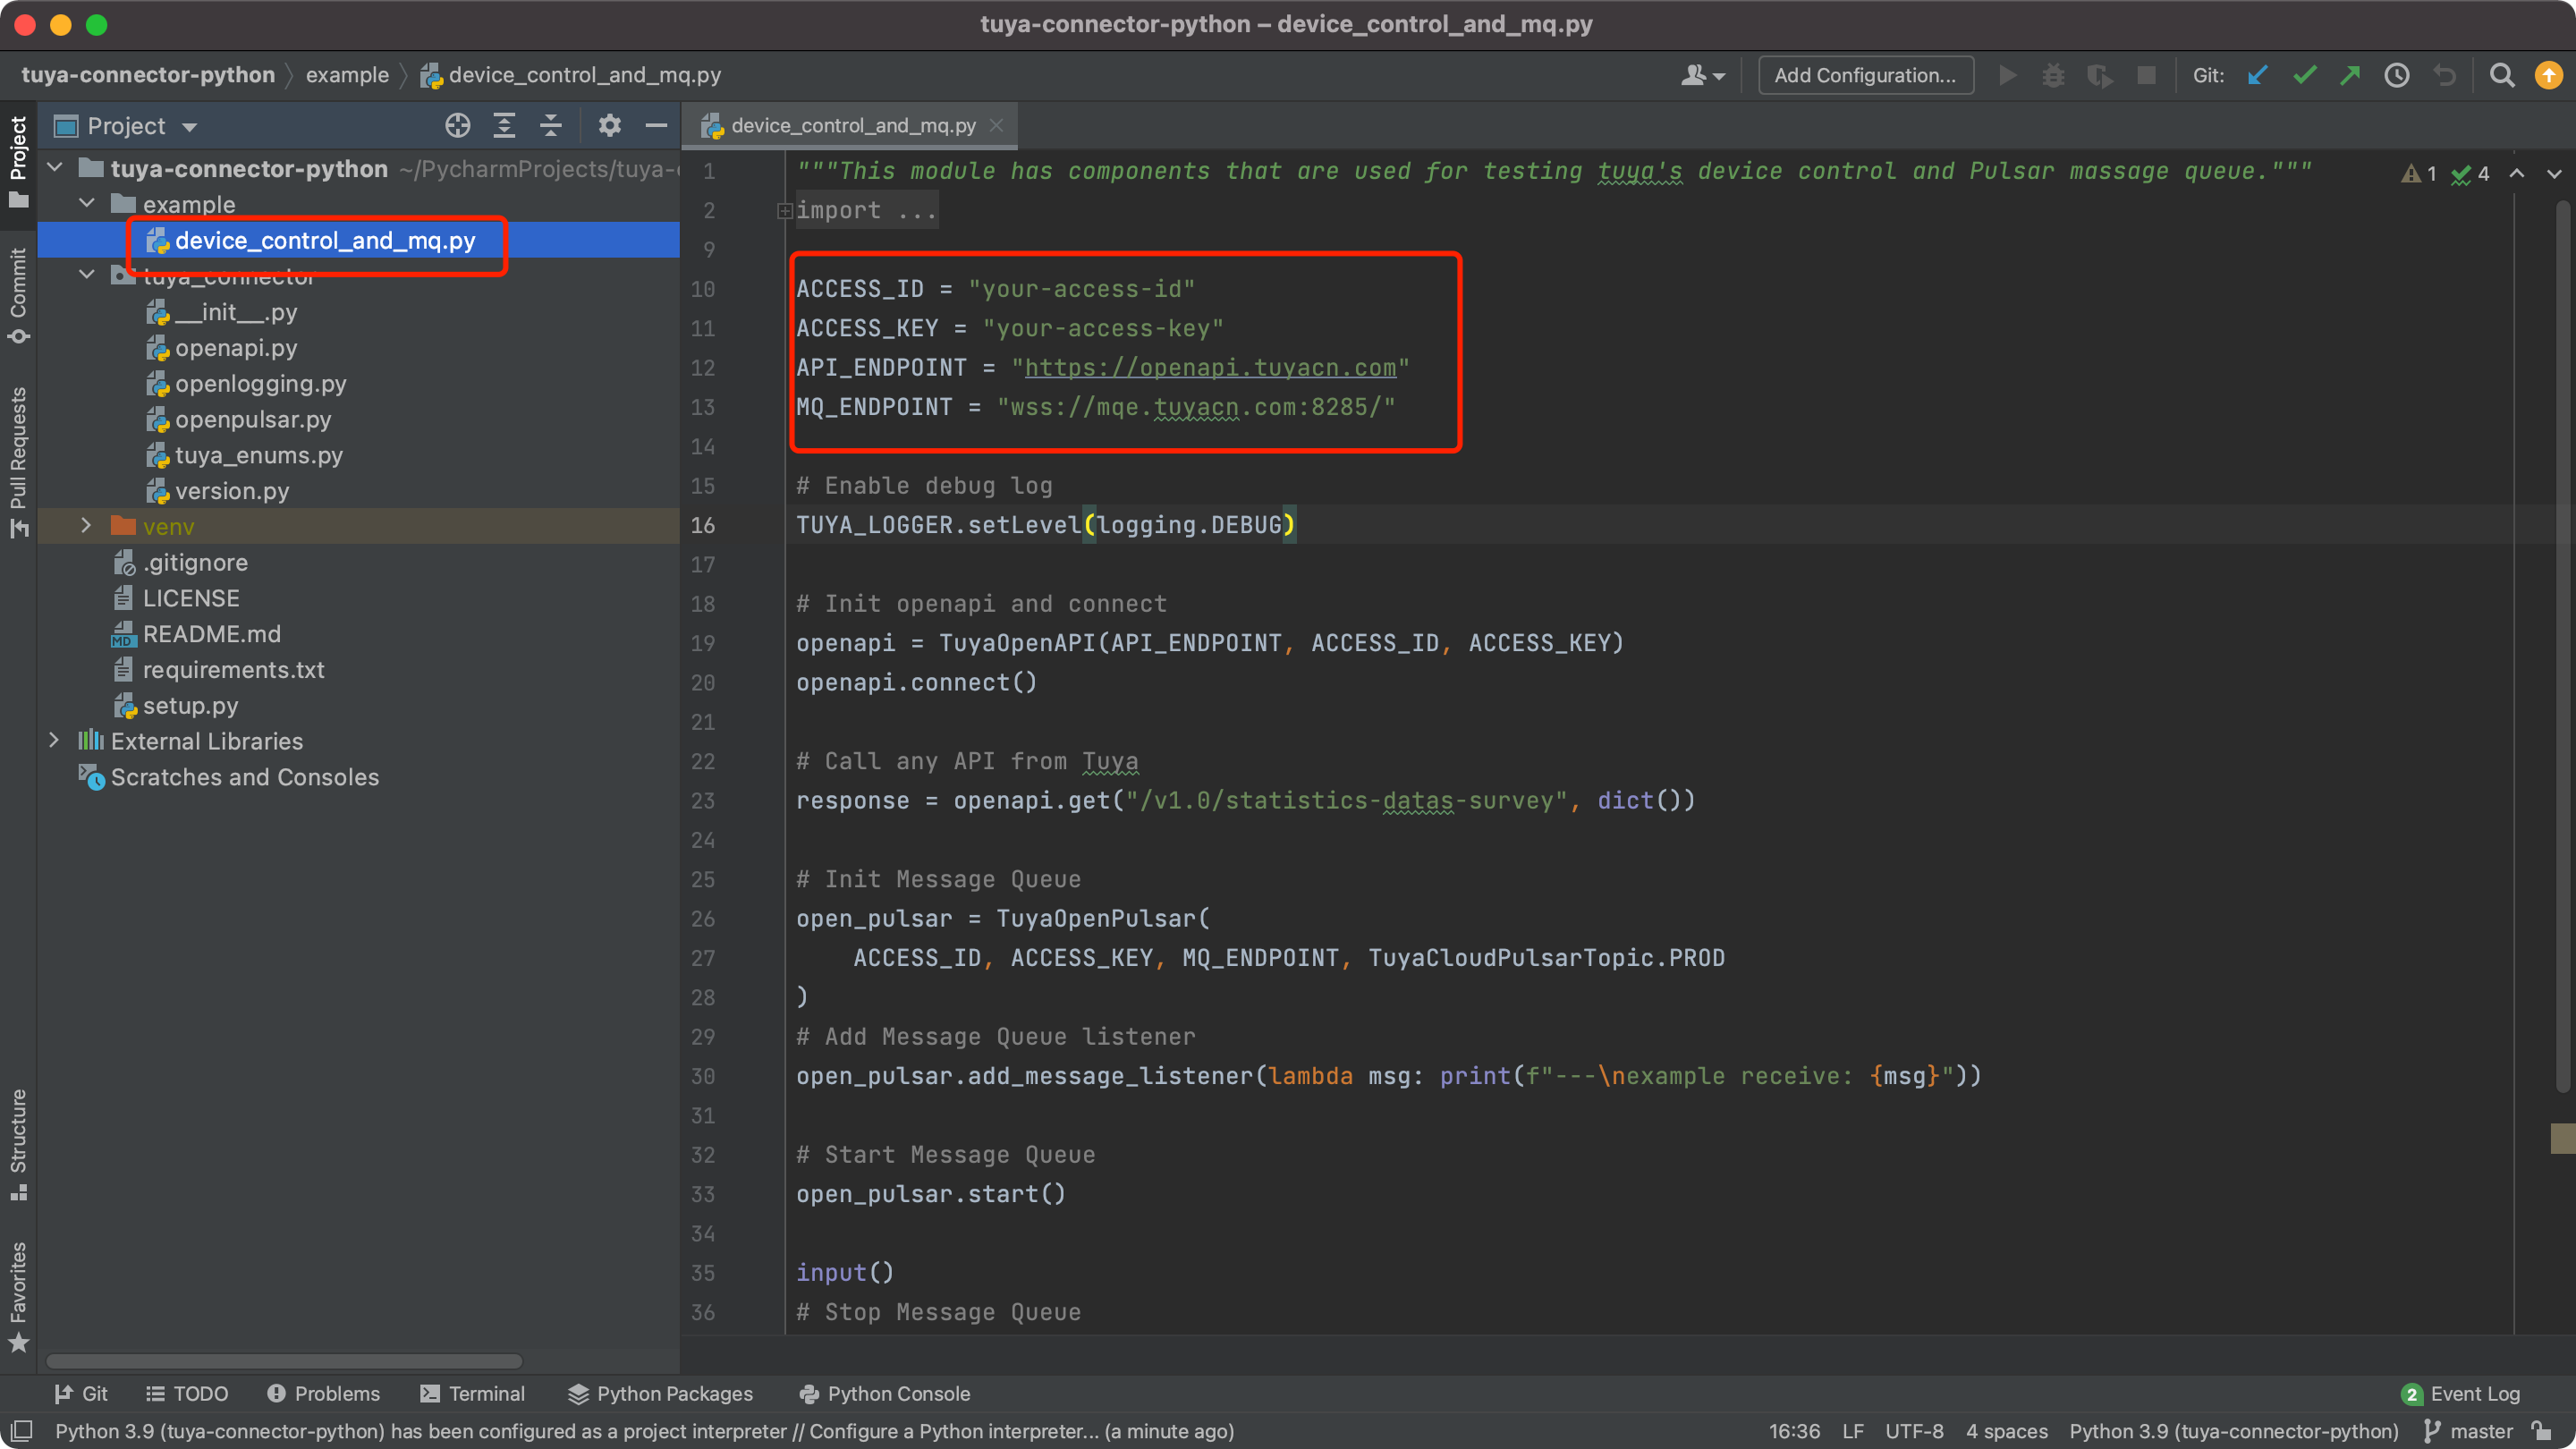
Configure environment variables in the py file.
-
ACCESS_IDandACCESS_KEY: Enter the values of Access ID and Access Key in the Authorization Key section. For more information, see Query project information. -
API_ENDPOINT: the data center address of API requests. See thetuya-connector-python/tuya_connector/tuya_enums.pyfile. -
MQ_ENDPOINT: the request address of message subscription. See thetuya-connector-python/tuya_connector/tuya_enums.pyfile.Location API_ENDPOINT MQ_ENDPOINT China https://openapi.tuyacn.com wss://mqe.tuyacn.com:8285/ America https://openapi.tuyaus.com wss://mqe.tuyaus.com:8285/ Europe https://openapi.tuyaeu.com wss://mqe.tuyaeu.com:8285/ India https://openapi.tuyain.com wss://mqe.tuyain.com:8285/
Example:
ACCESS_ID = "xtu7m*****48ufod"
ACCESS_KEY = "479bcba6d*******d9c4e080f7"
API_ENDPOINT = "https://openapi.tuyacn.com"
MQ_ENDPOINT = "wss://mqe.tuyacn.com:8285/"
Step 3: Control devices
After the project parameters are edited, you can start your coding journey. Device control is a must-have feature.
The following code block is the sample code for cloud project authorization key authentication and query device details, get device instruction set, send instruction set, and query device status for your reference.
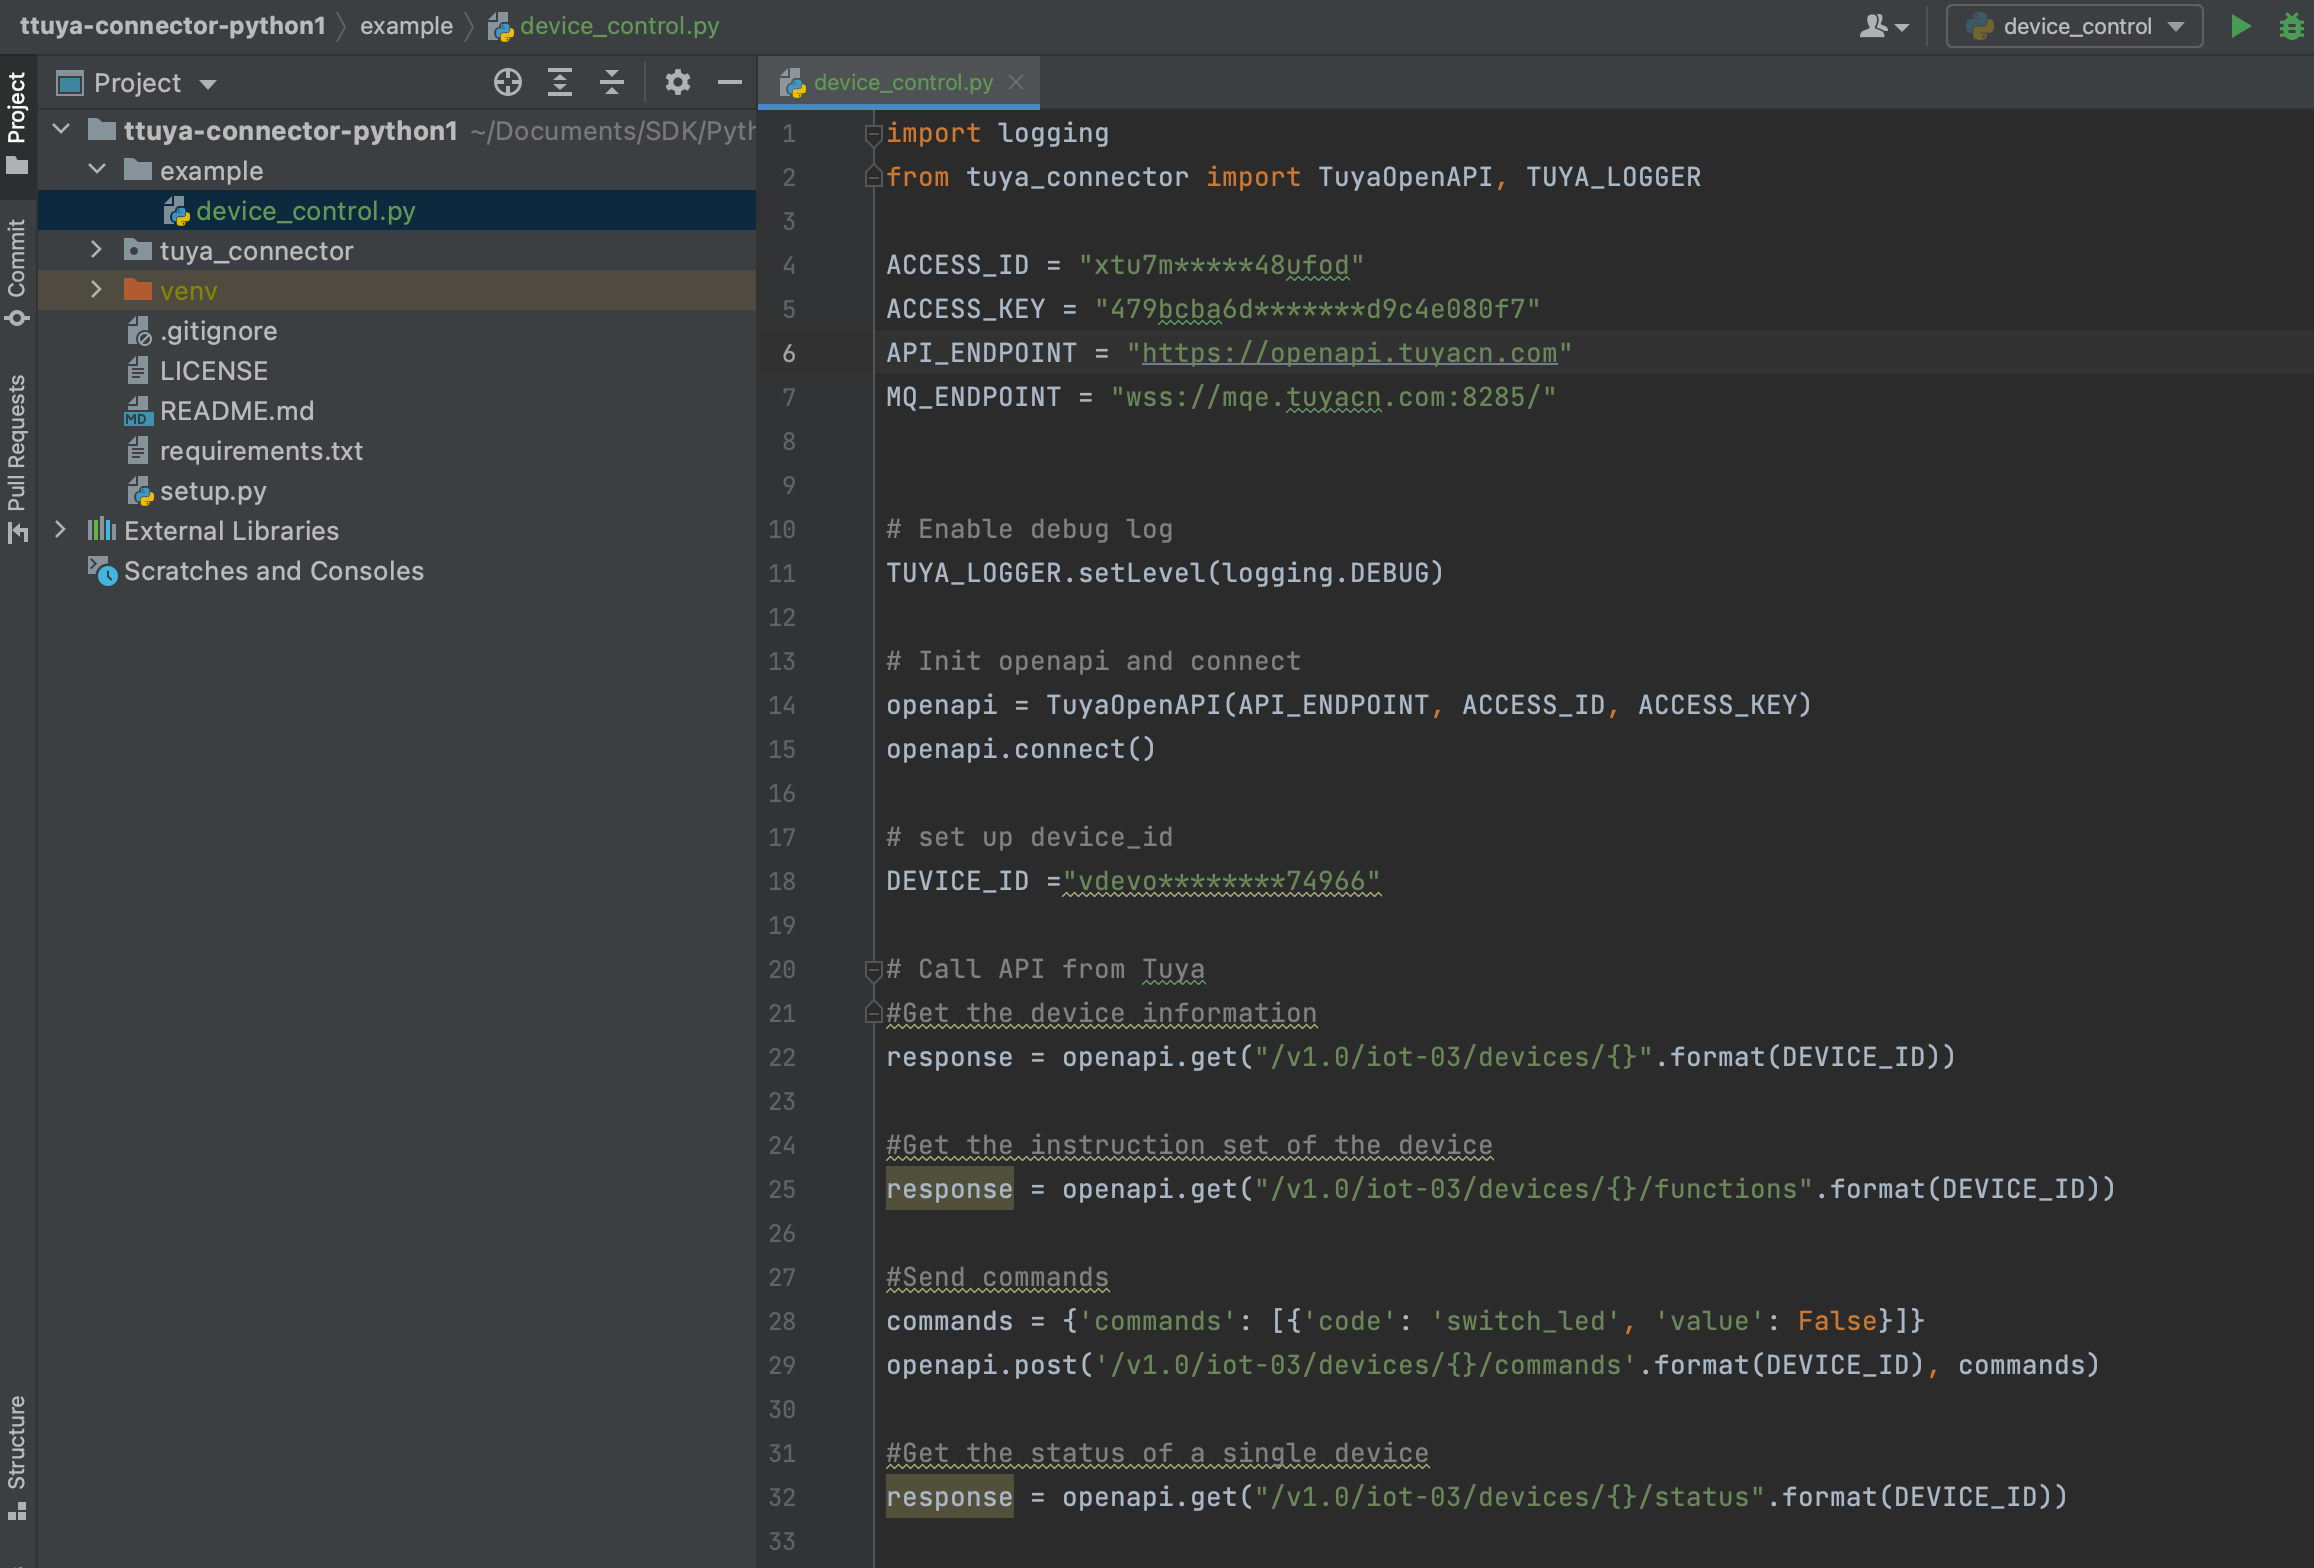
Sample code of querying devices and issuing instructions: device_control.py
import logging
from tuya_connector import TuyaOpenAPI, TUYA_LOGGER

ACCESS_ID = "xtu7m*****48ufod"
ACCESS_KEY = "479bcba6d*******d9c4e080f7"
API_ENDPOINT = "https://openapi.tuyacn.com"


# Enable debug log
TUYA_LOGGER.setLevel(logging.DEBUG)

# Init OpenAPI and connect
openapi = TuyaOpenAPI(API_ENDPOINT, ACCESS_ID, ACCESS_KEY)
openapi.connect()

# Set up device_id
DEVICE_ID ="vdevo********74966"

# Call APIs from Tuya
# Get the device information
response = openapi.get("/v1.0/iot-03/devices/{}".format(DEVICE_ID))

# Get the instruction set of the device
response = openapi.get("/v1.0/iot-03/devices/{}/functions".format(DEVICE_ID))

# Send commands
commands = {'commands': [{'code': 'switch_led', 'value': False}]}
openapi.post('/v1.0/iot-03/devices/{}/commands'.format(DEVICE_ID), commands)

# Get the status of a single device
response = openapi.get("/v1.0/iot-03/devices/{}/status".format(DEVICE_ID))
Sample response
/Users/even/Documents/SDK/Python/ttuya-connector-python1/venv/bin/python /Users/even/Documents/SDK/Python/ttuya-connector-python/example/device_control.py
[2021-08-24 16:27:21,832] [tuya-openapi] Request: method = GET,url = https://openapi.tuyacn.com/v1.0/token,params = {'grant_type': 1},body = None,t = 1629793641832
[2021-08-24 16:27:22,007] [tuya-openapi] Response: {
  "result": {
    "access_token": "***",
    "expire_time": 6147,
    "refresh_token": "***",
    "uid": "***"
  },
  "success": true,
  "t": 1629793642090
}
[2021-08-24 16:27:22,007] [tuya-openapi] Request: method = GET,url = https://openapi.tuyacn.com/v1.0/iot-03/devices/vdevo********74966,params = None,body = None,t = 1629793642007
[2021-08-24 16:27:22,183] [tuya-openapi] Response: {
  "result": {
    "active_time": 1629792940,
    "asset_id": "14178********2832",
    "category": "dj",
    "category_name": "Light Source",
    "create_time": 1629792940,
    "gateway_id": "",
    "icon": "smart/icon/bay161786******240908156830dd.png",
    "id": "vdevo********74966",
    "ip": "***",
    "lat": "***",
    "local_key": "***",
    "lon": "***",
    "model": "",
    "name": "Dimmable White Light (C)_SIG-vdevo",
    "online": true,
    "product_id": "ppg6apfp",
    "product_name": "Dimmable White Light (C)_OEM",
    "sub": false,
    "time_zone": "+08:00",
    "update_time": 1629793223,
    "uuid": "vdevo********74966"
  },
  "success": true,
  "t": 1629793642263
}
[2021-08-24 16:27:22,183] [tuya-openapi] Request: method = GET,url = https://openapi.tuyacn.com/v1.0/iot-03/devices/vdevo********74966/functions,params = None,body = None,t = 1629793642183
[2021-08-24 16:27:22,256] [tuya-openapi] Response: {
  "result": {
    "category": "dj",
    "functions": [
      {
        "code": "switch_led",
        "desc": "switch led",
        "name": "switch led",
        "type": "Boolean",
        "values": "{}"
      },
      {
        "code": "work_mode",
        "desc": "work mode",
        "name": "work mode",
        "type": "Enum",
        "values": "{\"range\":[\"white\",\"colour\",\"scene\",\"music\"]}"
      },
      {
        "code": "bright_value_v2",
        "desc": "bright value v2",
        "name": "bright value v2",
        "type": "Integer",
        "values": "{\"min\":10,\"max\":1000,\"scale\":0,\"step\":1}"
      },
      {
        "code": "scene_data_v2",
        "desc": "scene data v2",
        "name": "scene data v2",
        "type": "Json",
        "values": "{\"scene_num\":{\"min\":1,\"scale\":0,\"max\":8,\"step\":1},\"scene_units\": {\"unit_change_mode\":{\"range\":[\"static\",\"jump\",\"gradient\"]},\"unit_switch_duration\":{\"min\":0,\"scale\":0,\"max\":100,\"step\":1},\"unit_gradient_duration\":{\"min\":0,\"scale\":0,\"max\":100,\"step\":1},\"bright\":{\"min\":0,\"scale\":0,\"max\":1000,\"step\":1},\"temperature\":{\"min\":0,\"scale\":0,\"max\":1000,\"step\":1},\"h\":{\"min\":0,\"scale\":0,\"unit\":\"\",\"max\":360,\"step\":1},\"s\":{\"min\":0,\"scale\":0,\"unit\":\"\",\"max\":1000,\"step\":1},\"v\":{\"min\":0,\"scale\":0,\"unit\":\"\",\"max\":1000,\"step\":1}}}"
      },
      {
        "code": "countdown_1",
        "desc": "countdown 1",
        "name": "countdown 1",
        "type": "Integer",
        "values": "{\"unit\":\"s\",\"min\":0,\"max\":86400,\"scale\":0,\"step\":1}"
      }
    ]
  },
  "success": true,
  "t": 1629793642338
}
[2021-08-24 16:27:22,256] [tuya-openapi] Request: method = POST,url = https://openapi.tuyacn.com/v1.0/iot-03/devices/vdevo********74966/commands,params = None,body = {'commands': [{'code': 'switch_led', 'value': False}]},t = 1629793642256
[2021-08-24 16:27:22,386] [tuya-openapi] Response: {
  "result": true,
  "success": true,
  "t": 1629793642470
}
[2021-08-24 16:27:22,386] [tuya-openapi] Request: method = GET,url = https://openapi.tuyacn.com/v1.0/iot-03/devices/vdevo********74966/status,params = None,body = None,t = 1629793642386
[2021-08-24 16:27:22,461] [tuya-openapi] Response: {
  "result": [
    {
      "code": "switch_led",
      "value": false
    },
    {
      "code": "work_mode",
      "value": "white"
    },
    {
      "code": "bright_value_v2",
      "value": 10
    },
    {
      "code": "scene_data_v2",
      "value": ""
    },
    {
      "code": "countdown_1",
      "value": 0
    }
  ],
  "success": true,
  "t": 1629793642546
}

Process finished with exit code 0
Login authentication
# Init OpenAPI and connect
openapi = TuyaOpenAPI(API_ENDPOINT, ACCESS_ID, ACCESS_KEY)
openapi.connect()
Query device details
response = openapi.get("/v1.0/iot-03/devices/{}".format(DEVICE_ID))
Get the instruction set of device
response = openapi.get("/v1.0/iot-03/devices/{}/functions".format(DEVICE_ID))
Send commands
commands = {'commands': [{'code': 'switch_led', 'value': true}]}
openapi.post('/v1.0/iot-03/devices/{}/commands'.format(DEVICE_ID), commands)
Query device status
response = openapi.get("/v1.0/iot-03/devices/{}/status".format(DEVICE_ID))
Step 4: Listen for device status
The following sample code shows how to implement the forwarding feature of the message service. For example, devices get online or offline, and device status is reported.
The Message Service is required to enable this feature. For more information, see Message Service.

Sample code of message subscription: Mq.py
import logging
from tuya_connector import TUYA_LOGGER, TuyaOpenPulsar, TuyaCloudPulsarTopic

ACCESS_ID = "xtu7m*****48ufod"
ACCESS_KEY = "479bcba6d*******d9c4e080f7"
MQ_ENDPOINT = "wss://mqe.tuyacn.com:8285/"


# Enable debug log
TUYA_LOGGER.setLevel(logging.DEBUG)

# Init Message Queue
open_pulsar = TuyaOpenPulsar(
    ACCESS_ID, ACCESS_KEY, MQ_ENDPOINT, TuyaCloudPulsarTopic.PROD
)
# Add Message Queue listener
open_pulsar.add_message_listener(lambda msg: print(f"---\nexample receive: {msg}"))

# Start Message Queue
open_pulsar.start()

input()
# Stop Message Queue
open_pulsar.stop()
Sample response
/Users/even/Documents/SDK/Python/ttuya-connector-python1/venv/bin/python /Users/even/Documents/SDK/Python/ttuya-connector-python/example/Mq.py
[2021-08-24 16:44:56,274] [tuya-openpulsar] start
[2021-08-24 16:44:56,274] [tuya-openpulsar] ws-client connect status is not ok.
                     trying to reconnect for the  1 time
[2021-08-24 16:44:56,274] [tuya-openpulsar] ---
ws-client connecting...
[2021-08-24 16:45:16,198] [tuya-openpulsar] received message origin payload: {"data":"hBfzoXBHP4H5S44R41JYQ6SoW2dYdwIBh/OVljw/BWnHceQwrrF0vuCyPhPmcgsLzQtf9wFhkSQ6IBE2P3yYPvavGWoPpl0r3fkcooWquX8JfG8gnY2R7wUL3Xn4MP48poM3HepgaRZOkpsSKmAqgdxobOPC7kNpk92hmXjB0PEOZ2Du4MbP4NSN49QcJ4MPl9NsbN/2CZpBNFtIusOL74T+aj0XxXAkcYXc/URNLpxRJ3xeyrLXEwM+0nBc+60qvhnd5XA0Y7aFpHh02iIbzZfTbGzf9gmaQTRbSLrDi+/NOqojg8fRo3AW+Cq6m/AtpGIRH8fwQo+FZ9RzGrk+V7bzGsXu3MK7mEqvJpca8eT7C2ZAat2eM9LwAcsDgOoQaWYWiLcqj04ZYzJqLETUGyRFs3pL4aNsWiTEGuQkMHNV0yTN7Nw/PmMonsmdM3aYSaAwQM37T2HC7gqa2exumamfEL7hh+lWoqymRU/hApq0SeBffyniddW2Daw8AUet","protocol":4,"pv":"2.0","sign":"0e523e66fea32a3873b122152fc04c84","t":1629794716261}
[2021-08-24 16:45:16,198] [tuya-openpulsar] received message descripted: {"dataId":"9aa9d3c4-04b7-11ec-8396-02425b0322e7","devId":"vdevo********74966","productKey":"ppg6apfp","status":[{"1":"true","code":"switch_led","t":1629794716199,"value":true},{"2":"white","code":"work_mode","t":1629794716199,"value":"white"},{"3":"10","code":"bright_value_v2","t":1629794716199,"value":10},{"code":"countdown_1","t":1629794716199,"7":"0","value":0}]}
---
example receive: {"dataId":"9aa9d3c4-04b7-11ec-8396-02425b0322e7","devId":"vdevo********74966","productKey":"ppg6apfp","status":[{"1":"true","code":"switch_led","t":1629794716199,"value":true},{"2":"white","code":"work_mode","t":1629794716199,"value":"white"},{"3":"10","code":"bright_value_v2","t":1629794716199,"value":10},{"code":"countdown_1","t":1629794716199,"7":"0","value":0}]}
Conclusion
In this topic, you have learned how to use the Python SDK based on the Tuya Developer Platform. You can call device APIs to control smart devices and listen for device status. Thanks to the standard ecosystem of devices, you can extend this control method to all devices of Tuya’s ecosystem, and accelerate your SaaS development based on smart devices without regard to device differences.
Is this page helpful?
YesFeedbackIs this page helpful?
YesFeedback


