Configure Pairing Guide
After creating a product on the Tuya Developer Platform, you can set up its pairing guide in Product Configuration and generate a QR code accordingly. The QR code for pairing can instruct users to easily pair their devices with the mobile app using Wi-Fi AP mode, EZ mode, or Bluetooth.
Scenarios
The QR code for pairing is typically printed on the user guide, enabling end users to scan it and begin the pairing process. You can update the guide anytime without changing the QR code.
Features
- The pairing guide is crafted using established procedures and can greatly improve the success rate of pairing.
- Sort the pairing modes and show or hide them as needed.
- The pairing guide and multi-language support are configured online, not affecting the product packaging and shipping schedule.
- Updating the pairing guide content does not change the QR code.
- The user-friendly setup process allows end users to scan the QR code and follow the instructions to complete the pairing.
Expected result
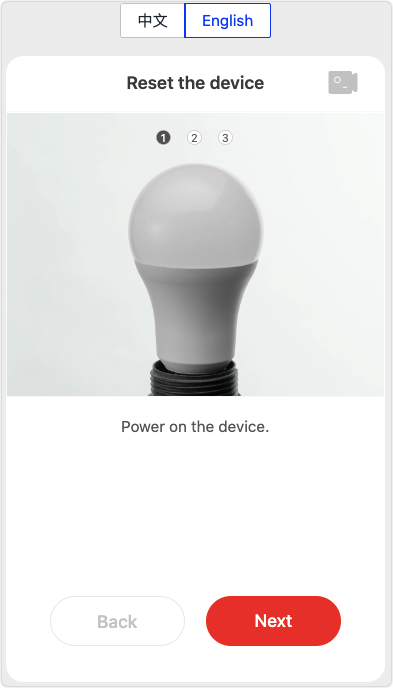
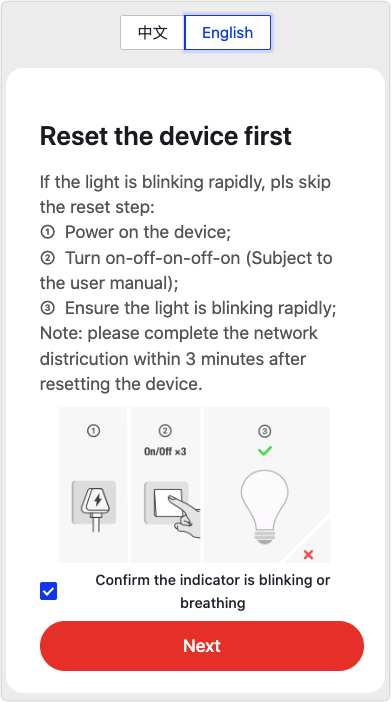
The following figure shows what the multi-step pairing guide and simple pairing guide look like on the mobile app:
Prerequisites
-
You have created at least one product. For more information, see Create Products.
-
The SmartLife app v3.12.0 and later as well as the OEM app built on ODM v3.12.0 and later support configuring the pairing guide. If you are using a legacy version, scan the QR code below to install the latest update.

Option 1: Configure multi-step pairing guide
-
Log in to the Tuya Developer Platform.
-
Go to the Product Development page.
-
Select a product in the Developing state, and click Develop in the Operation column.
-
Click Product Configuration.
-
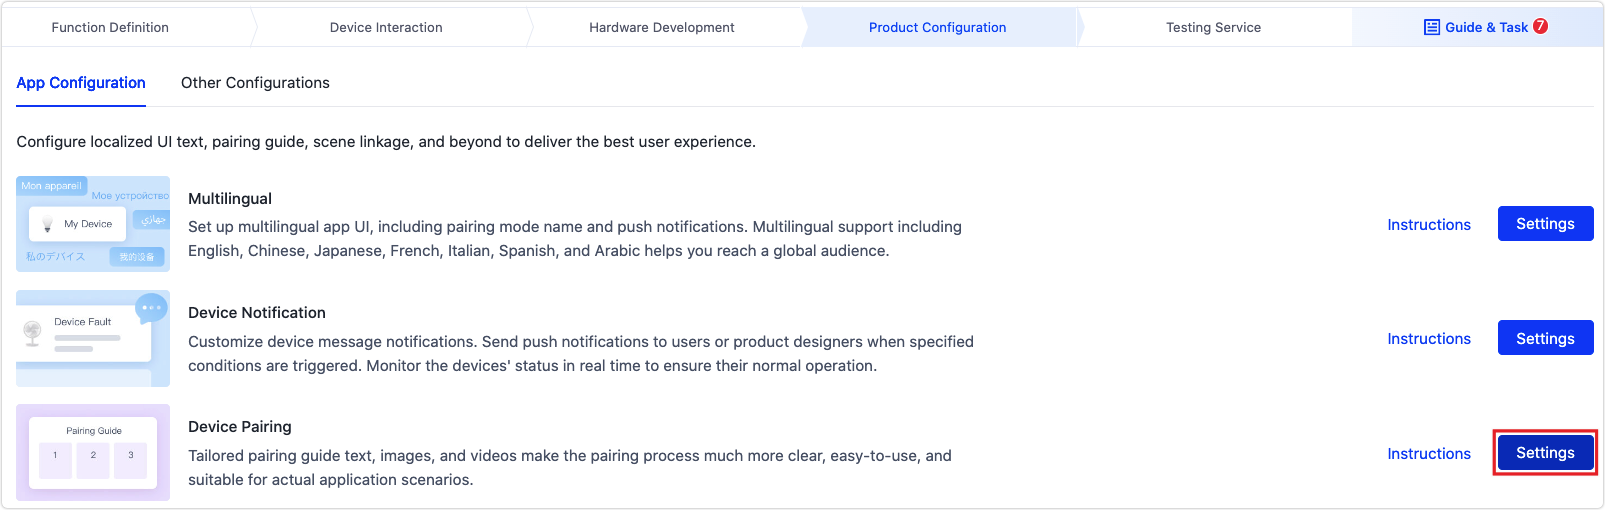
Find Device Pairing and click Settings.
-
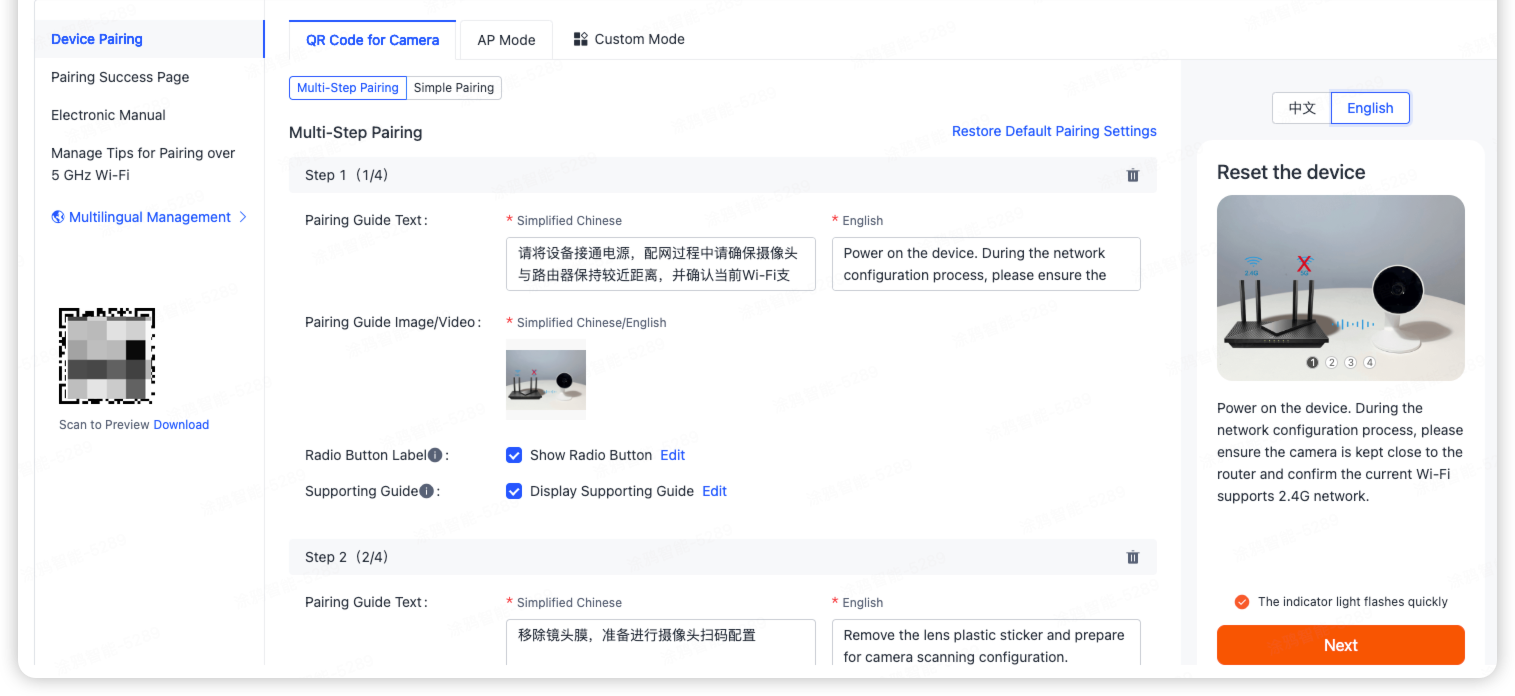
On the Pairing Guide page, complete the following configuration.
-
Pairing steps: Three steps by default, up to seven steps allowed. A pairing guide with more than five steps applies only to the SmartLife app or OEM apps v5.10.0 and later.
-
Pairing guide text: The instructions for each step, in Simplified Chinese and English.
-
Pairing guide image/video: The image or video clip for illustration. The image or video will be used in all languages, so we recommend not including text in them.
-
(Optional) Radio button text: The radio button for each step.
-
(Optional) Supporting guide: The supporting guide for each step, which can be a step-by-step guide or a specified H5 page. If you choose the step-by-step guide, you need to set the title and instructions. If you specify a H5 page, you need to maintain its URL.

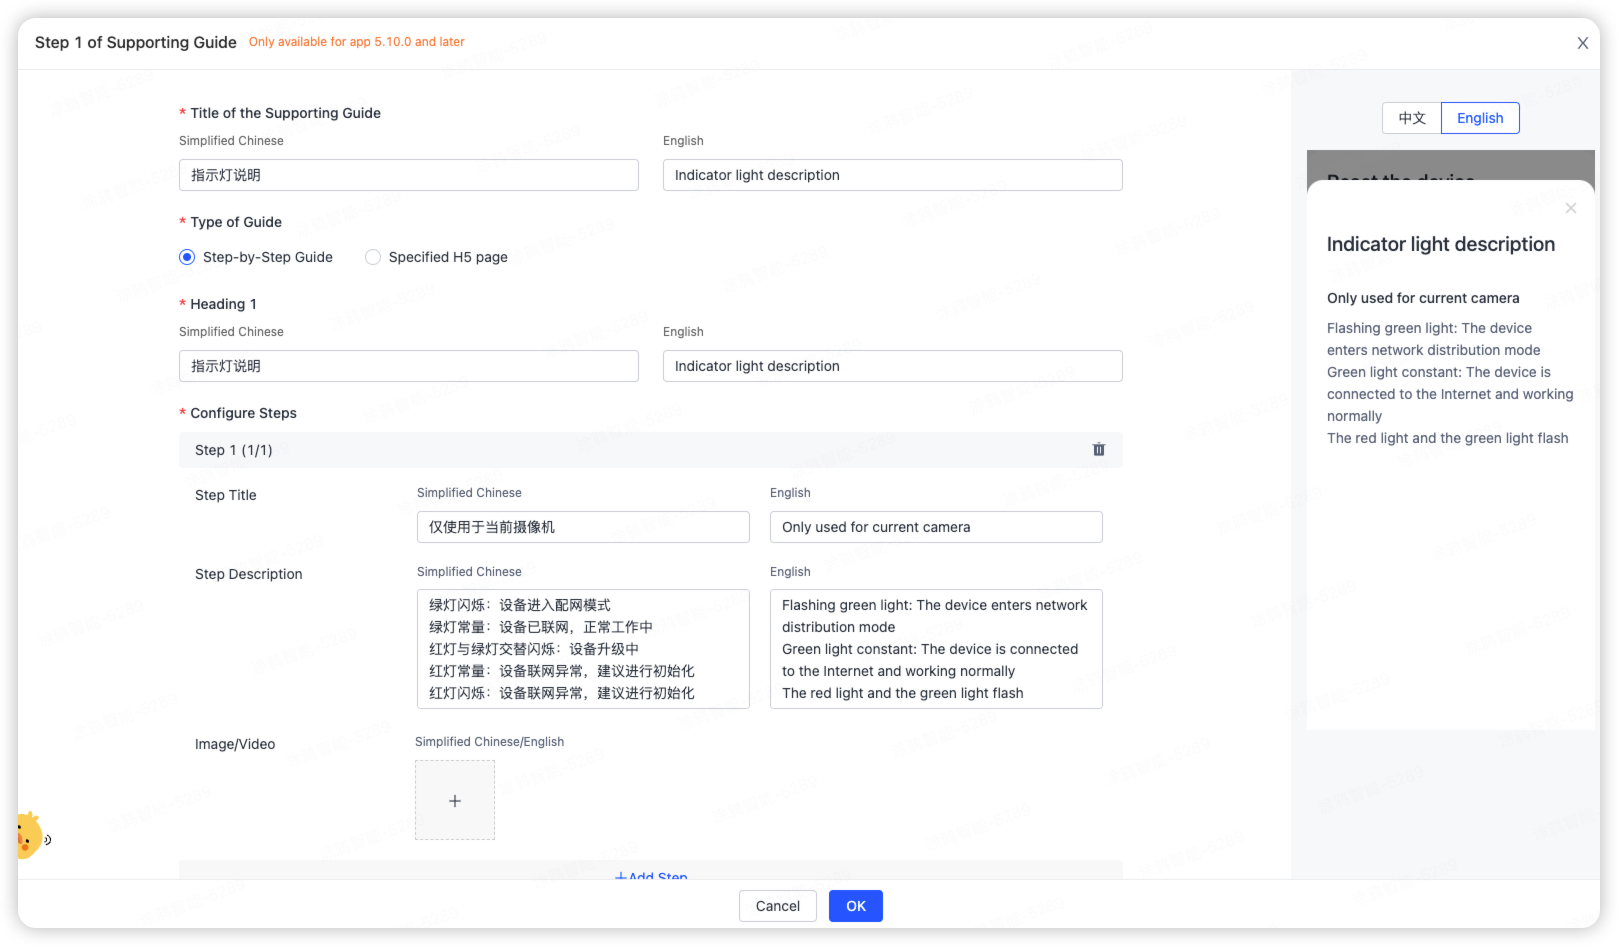
The supporting guide and radio button apply only to the SmartLife app or OEM apps v5.10.0 and later.
-
-
(Optional) You can upload a video lasting up to 45 seconds to help users understand the pairing process. Make sure to consider the size of the video clip, as a large file can impact user experience.
You can upload the video for each language separately.
-
Set tips for pairing over 5 GHz Wi-Fi.
If the hardware in your product supports 5 GHz Wi-Fi, you can enable this feature. The tip for Wi-Fi frequency bands will not be shown in the pairing guide.
-
To enable multi-language support, click More Languages and configure the text in the desired languages.
-
Click Download QR Code on the left of the page.
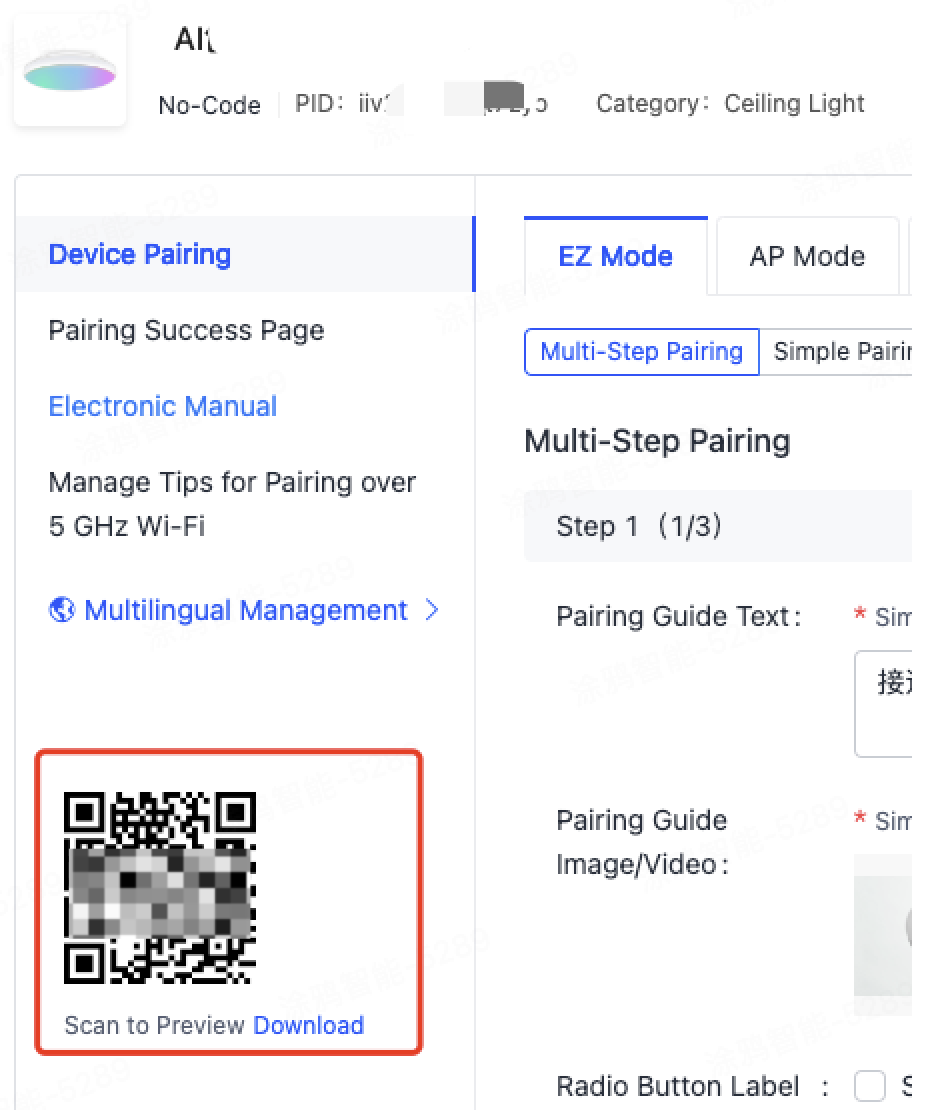
The PID-based QR code stays unchanged even if the pairing information is modified. You can include the QR code in the pairing section of your product manual, and proceed with the packaging design in advance. You can edit the pairing guide associated with the QR code later.
-
(Optional) Click Custom Mode in the top right corner to sort the pairing modes displayed on the app.
-
After you complete and review the configuration, open the app and verify the result.
For example, open the SmartLife app or your OEM app, tap Me, and then the scan icon in the top right corner. Scan the QR mode for pairing to show the pairing process.
Option 2: Configure simple pairing guide
This section describes how to configure the simple pairing guide.
-
Log in to the Tuya Developer Platform.
-
Go to the Product Development page.
-
Select a product in the Developing state, and click Develop in the Operation column.
-
Click Product Configuration.
-
Find Device Pairing and click Settings.
-
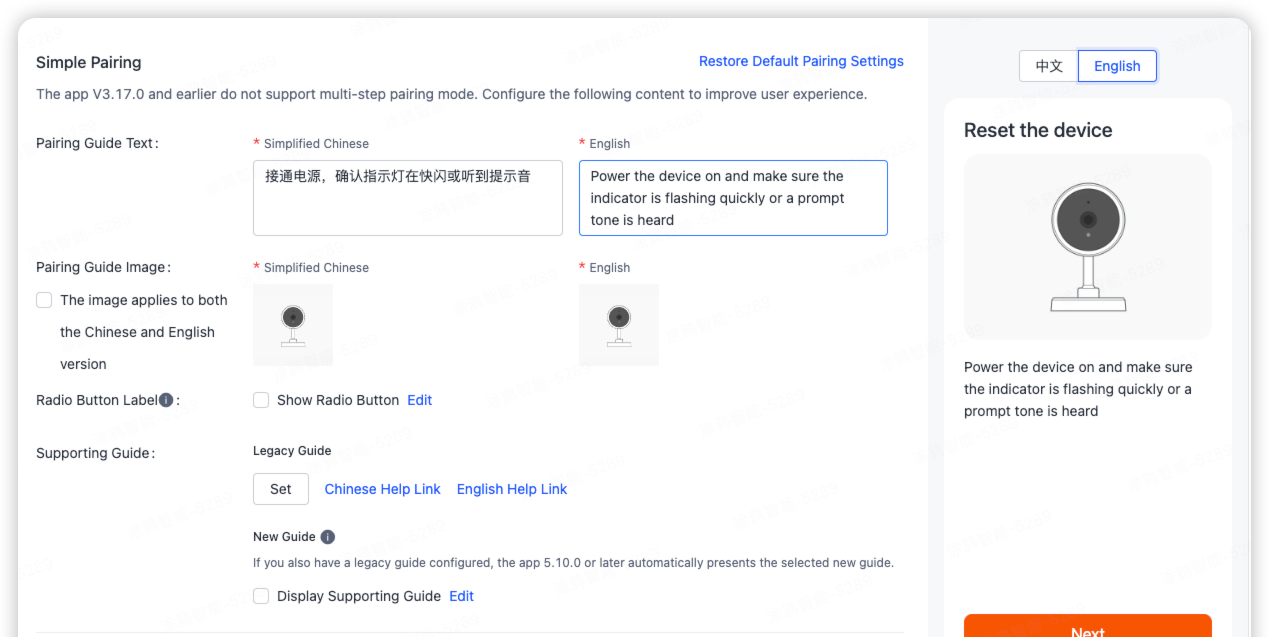
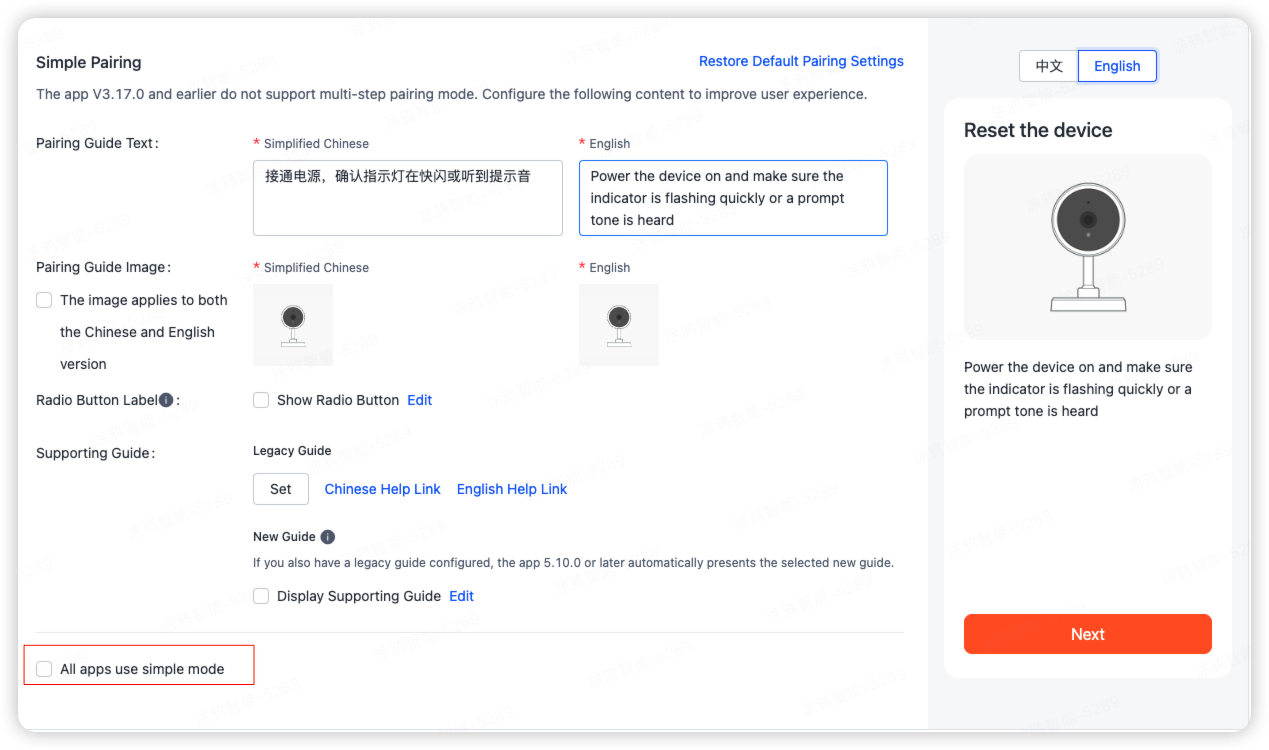
Select Simple Pairing and complete the following configuration.
-
Pairing guide text: A brief pairing guide displayed on the first page during the pairing process.
-
Pairing guide image: The image for illustration. Support the PNG and GIF formats, with a preference for GIF.
-
Radio button text: Show a radio button. The radio button label can be customized.
-
Supporting guide (new): Same as that for the multi-step guide. This feature applies only to the SmartLife app or OEM apps v5.10.0 and later.
-
Help guide (legacy): Its style is different from the supporting guide. If you do not set the help guide, the default content will be used. You can customize the help guide by following these steps. If your app is v5.10.0 or later, we recommend using the supporting guide for an improved user experience.
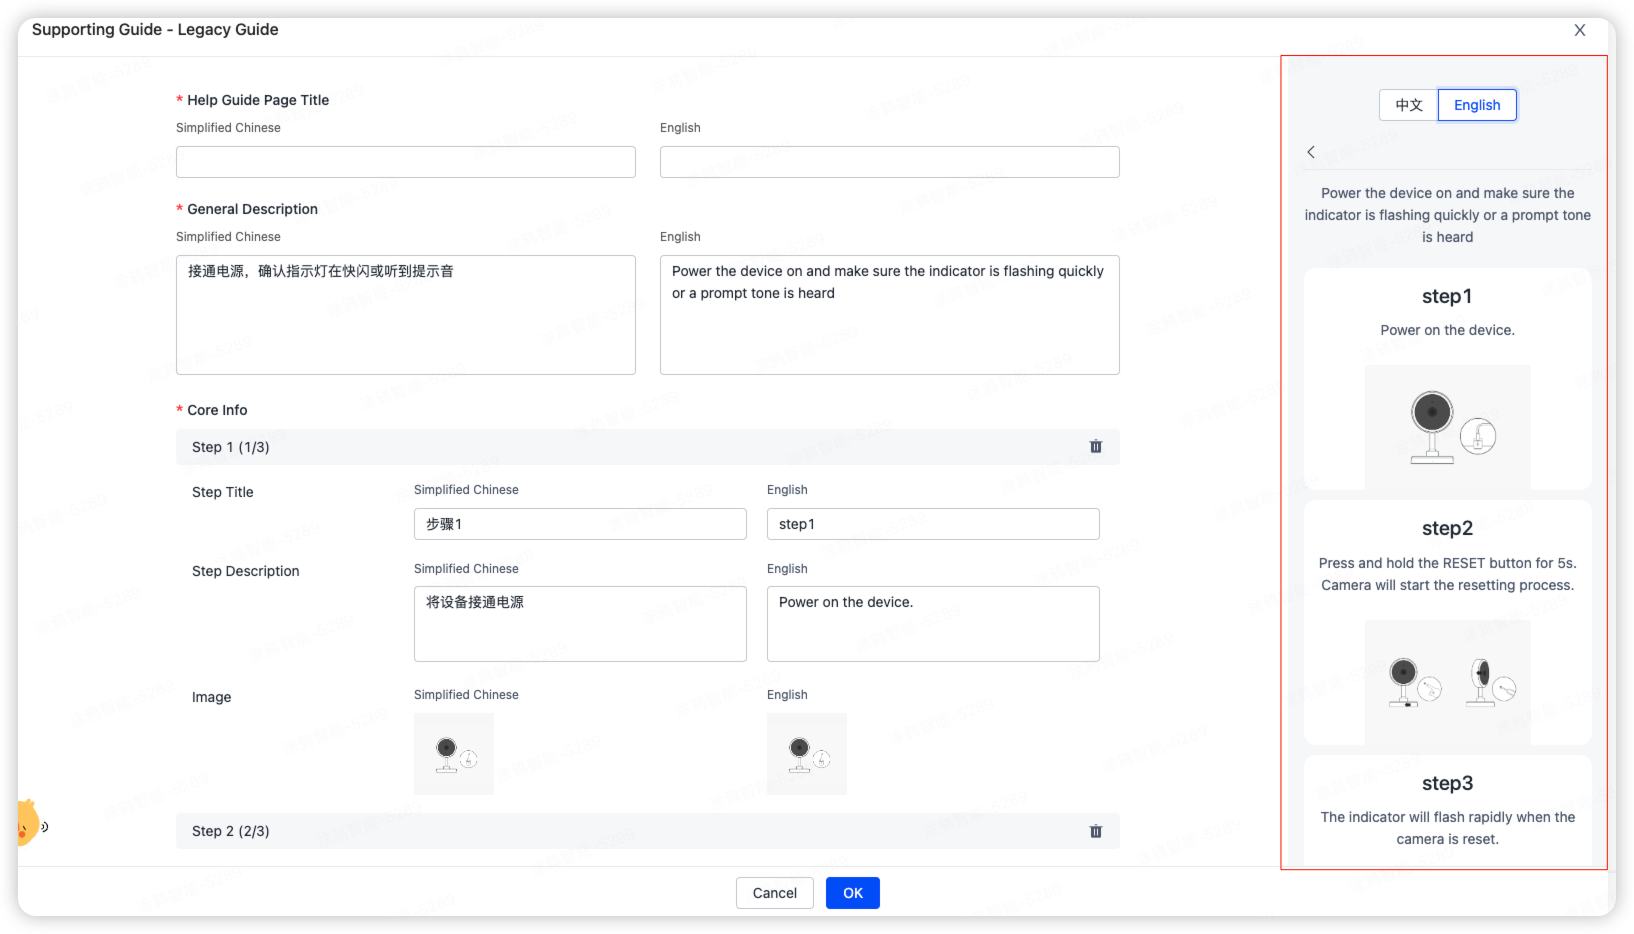
Simplified Chinese and English text is required.
-
-
After you complete and review the configuration, open the app and verify the result.
-
If you select All apps use simple mode option, all apps will display only the simple pairing guide for this product.
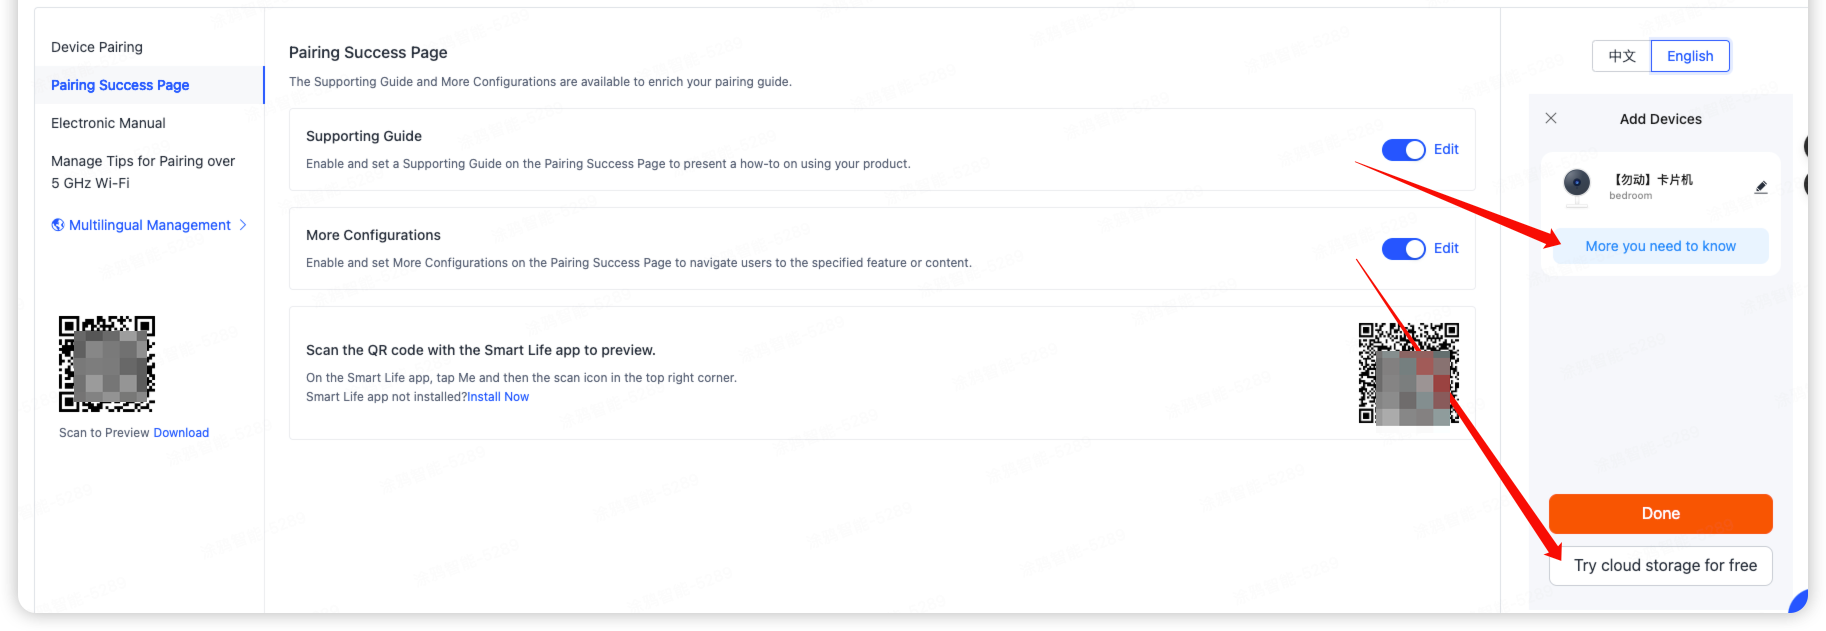
Configure pairing success page
You can add the supporting guide and more configurations to the pairing success page to enhance user experiences. This feature applies only to the SmartLife app or OEM apps v5.10.0 and later.
-
Supporting guide: Displayed at the bottom of the device information card on the pairing success page. You can set the content of the support guide to fit your needs, such as feature descriptions and important notes. The supporting guide can be a step-by-step guide or specified H5 page. For example, redirect to the user guide.
-
More configurations: Displayed at the bottom of the pairing success page, allowing you to redirect users to a guide, miniapp, or H5 page. The redirection button specified by More Configurations will only appear on the pairing success page if all devices belong to the same PID. Otherwise, it will not be displayed. The following examples are for your reference.
Pairing success page 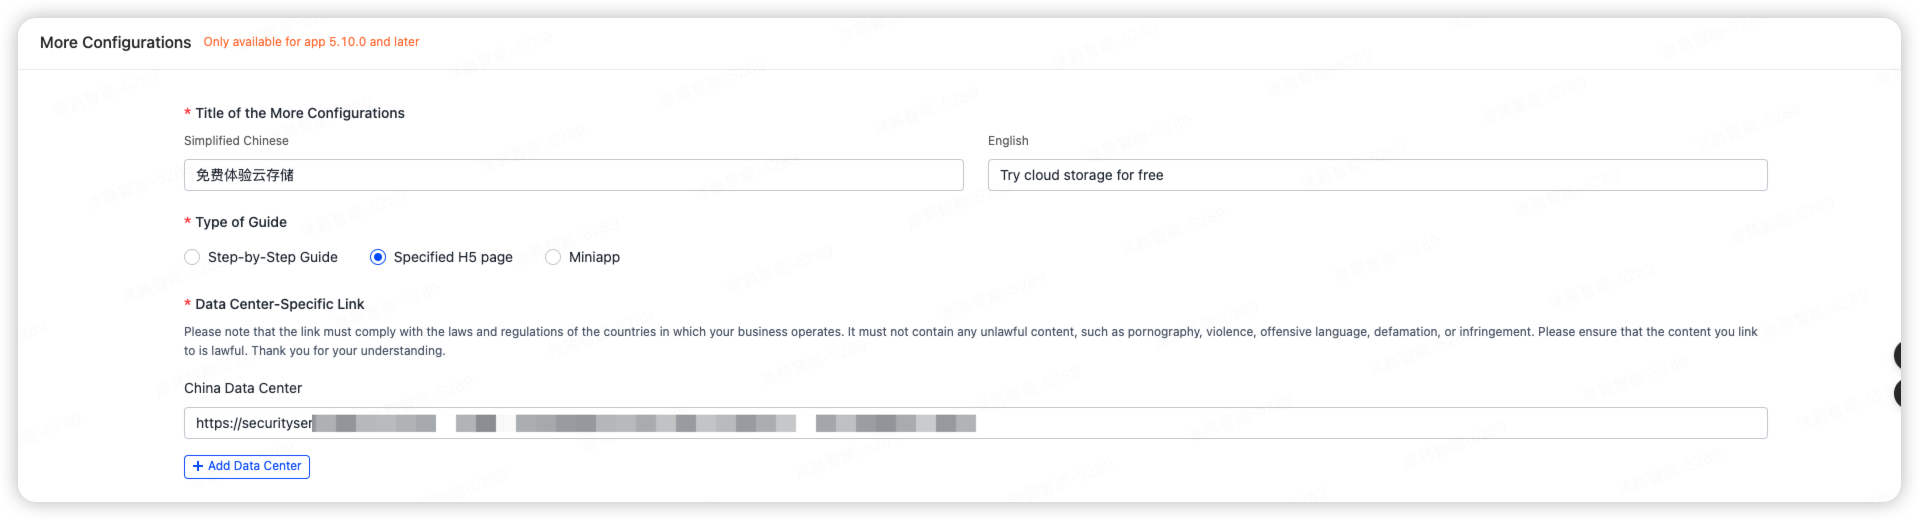
More configurations – specified H5 page 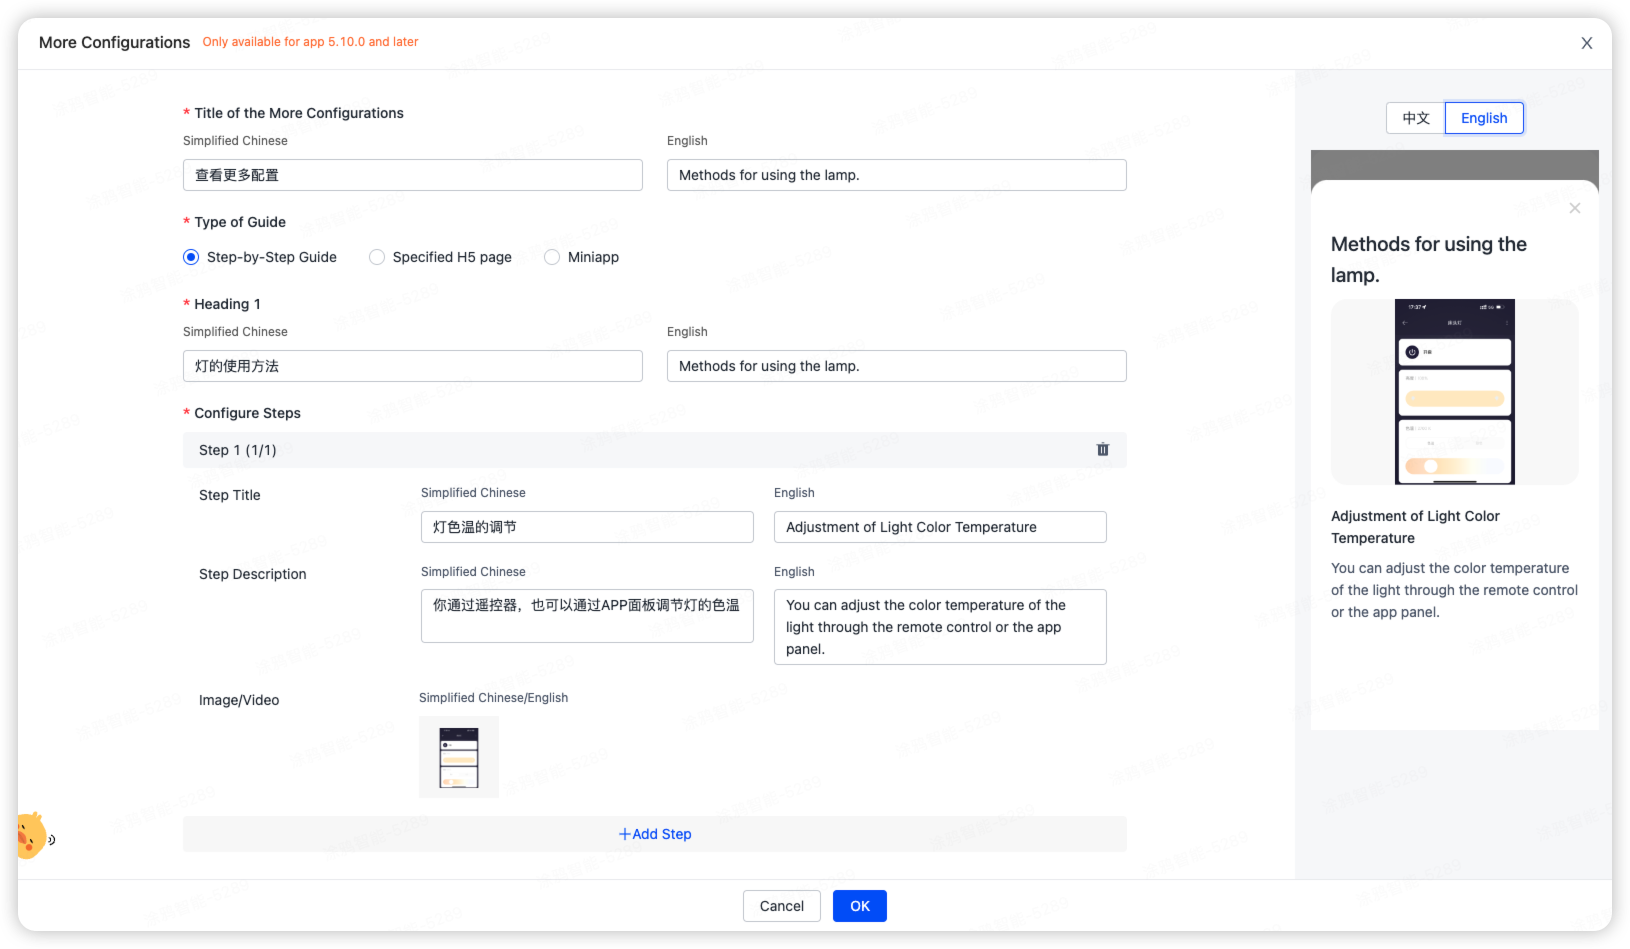
More configurations – step-by-step guide - Miniapp: Redirect users to a Tuya-enabled smart miniapp or panel miniapp. If you have a miniapp, contact your project manager for configuration.
- Specified H5 page: The link must comply with the laws and regulations of the countries in which your business operates. It must not contain any unlawful content, such as pornography, violence, offensive language, defamation, or infringement. Ensure that the content you link to is lawful.
Typical case
A paper-based manual has the following issues due to space limitations:
- Small images illustrate the pairing process without providing specific steps.
- The font and images are too small to read comfortably.
- If there are modifications to the pairing interface or procedure, the hard copy will need to undergo a redesign and be reprinted.
After setting up the pairing guide, the original section for pairing is replaced with QR codes.
- Users can scan the QR code to access the electronic pairing guide, which offers detailed information to assist them in completing the setup process smoothly.
- More space is available to present additional information.
- You do not need to change the hard copy when updating the content of the pairing guide.
- Both the SmartLife app and OEM apps support the pairing guide.
Is this page helpful?
YesFeedbackIs this page helpful?
YesFeedback


