Create OEM App for SmartLife
This topic describes how to create, configure, and launch an OEM app for Smartlife on the Tuya Developer Platform.
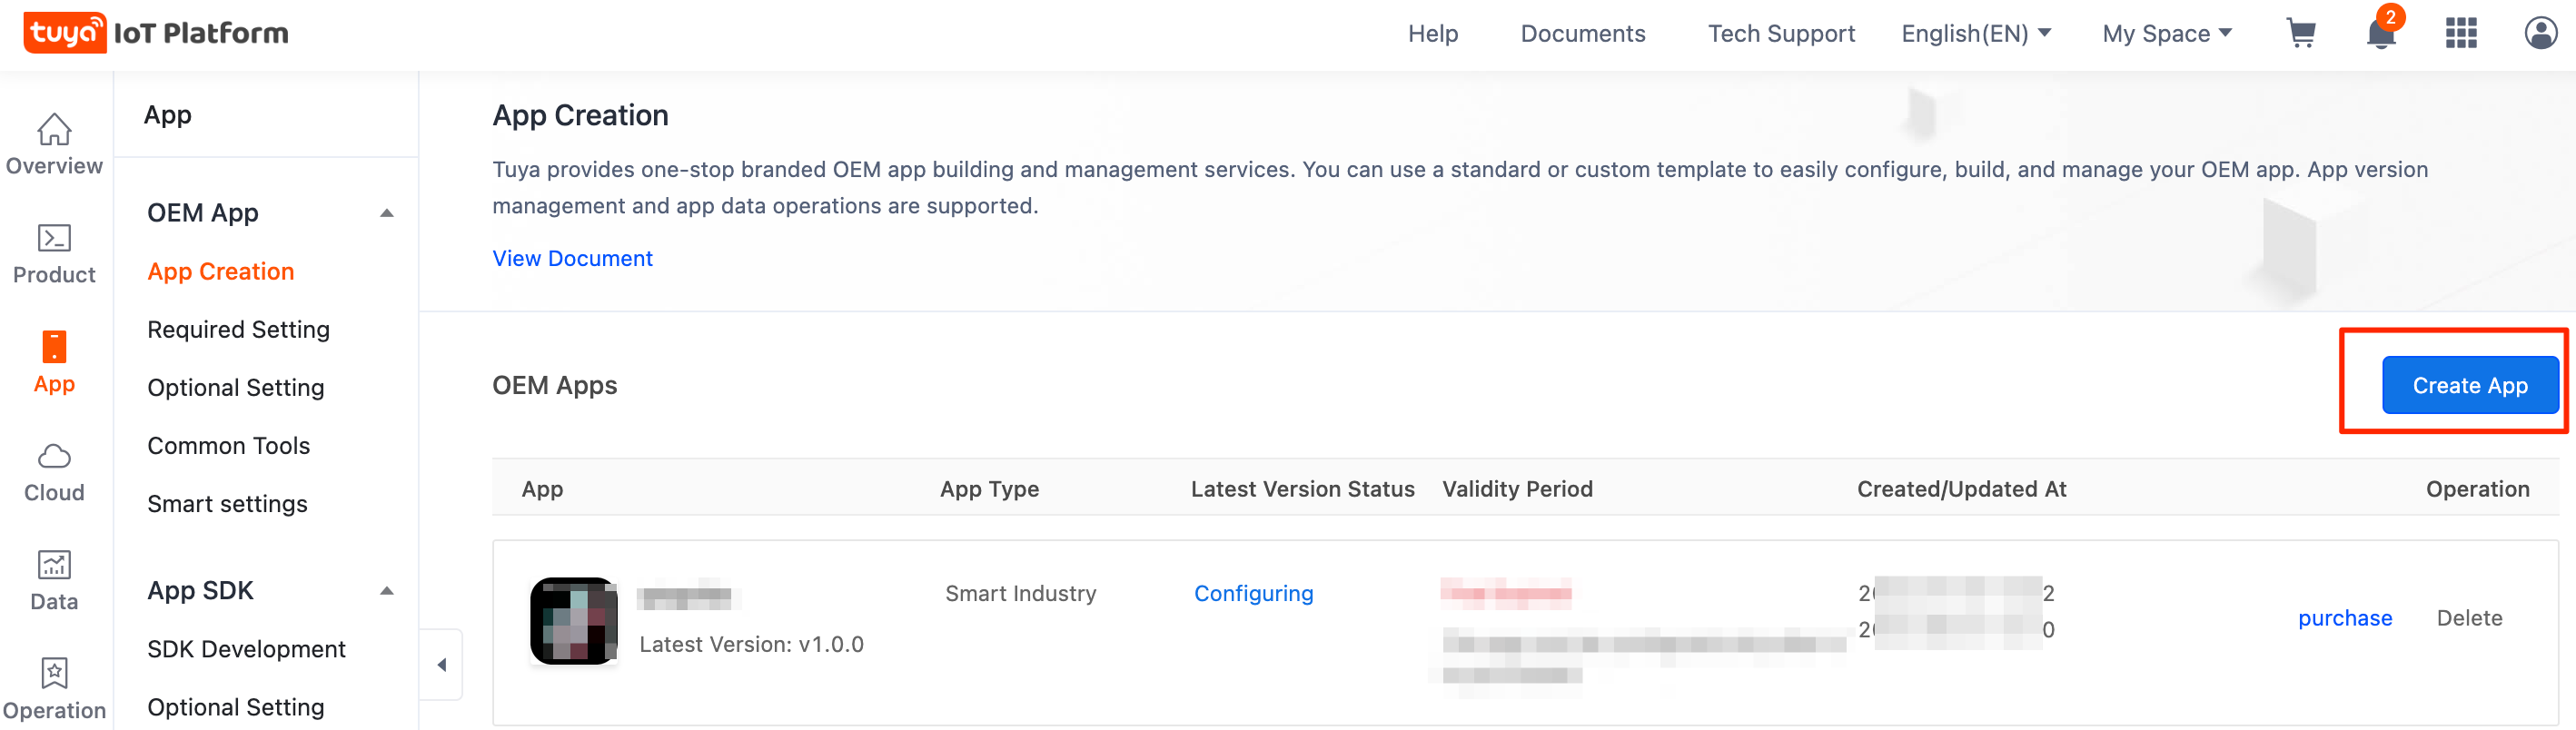
Create app
-
Go to Tuya Developer Platform > App > OEM App > App Creation.
-
Click Create App. In the Select OEM App Category dialog box, click Create for the SmartLife category.
-
In the dialog box that appears, enter the app information, and carefully read and accept the terms in OEM App Service and Software License Agreement.
Option Description Example Edition Type Choose between the following edition types to fit your needs: - Basic Edition: Provide all features of the SmartLife app for you to quickly build a branded smart app.
- Advanced Edition: Push the boundaries of quick build of branded smart apps and take your app customization to the next level, powered by Siri voice assistant and other capabilities.
Advanced Edition App Name The app name will be displayed on the user’s mobile phone home screen. We recommend that you enter a name within 6 characters in Chinese or 12 characters in English. Smart app - Package Name for Android
- Bundle ID for iOS
The unique identifier used for launching apps on app stores. - Try to include the organization’s domain name to ensure a unique package name or bundle ID.
- If the package name or bundle ID already exists on an app store, the app cannot be launched on that app store.
- Recommend letters and numbers. Three sections are recommended. Each section is separated from the other sections with periods (.) and starts with a letter. The characters such as “tuya” cannot be used.
tuya.com, the package name can be set to com.tuya.smart.com.testapp.smartiotApp Schema Optional. If not specified, the app schema is automatically generated based on the package name or bundle ID. The app schema cannot be modified after it is confirmed. It is mainly used to evoke this app on the mobile phone and is also related to the URL of the QR code to print. Auto Generated Targeted
LocationsYou must select the countries or regions where your app is available. This setting determines the available configurations and installation packages to be built in subsequent steps. You can click each option to view details.
The Global option is described as an example in the following sections.Global 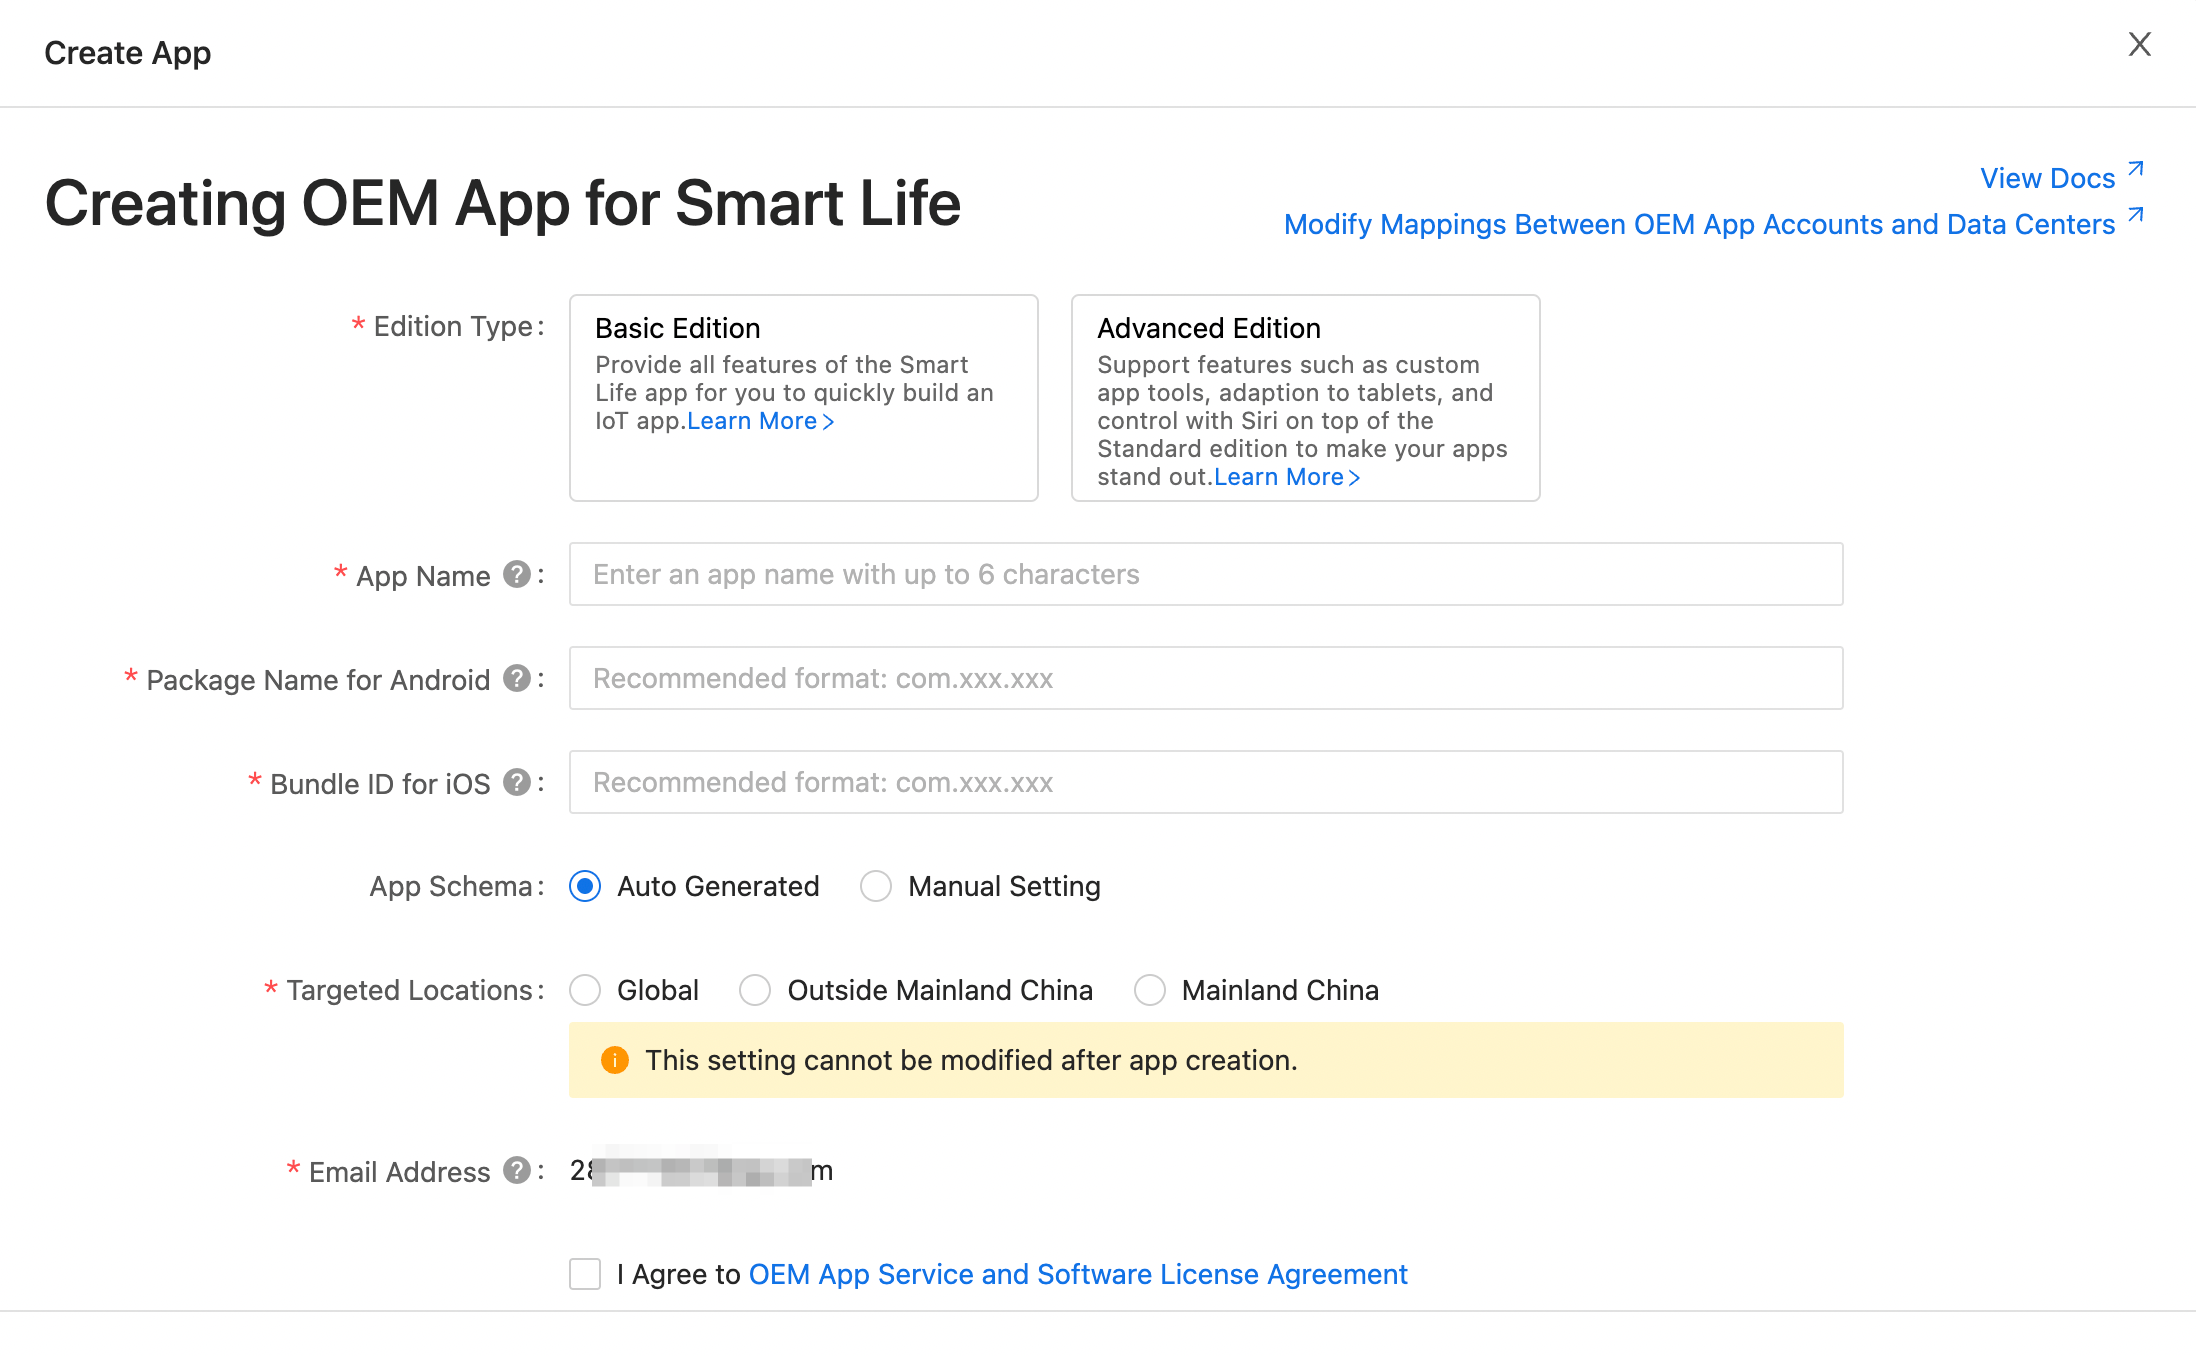
-
Click Build Now.
Configure app
Certain settings mentioned in the following sections can be applied only after you subscribe to the Advanced edition or purchase the value-added service Custom App Tools of the app. Otherwise, the default configuration takes effect or the preset configuration is automatically used according to the specified background color.
Customize UI
The custom UI styles determine the logo and appearance of your app.
-
Set App Icon.
- Only square images in the
.pngformat are supported. Do not upload images with transparent backgrounds. Otherwise, a display error might occur. - The dimensions must be 1024 × 1024 pixels.
- The file size cannot exceed 10 MB.
- Only square images in the
-
Click Detailed Settings to navigate to the Custom App Tools.

-
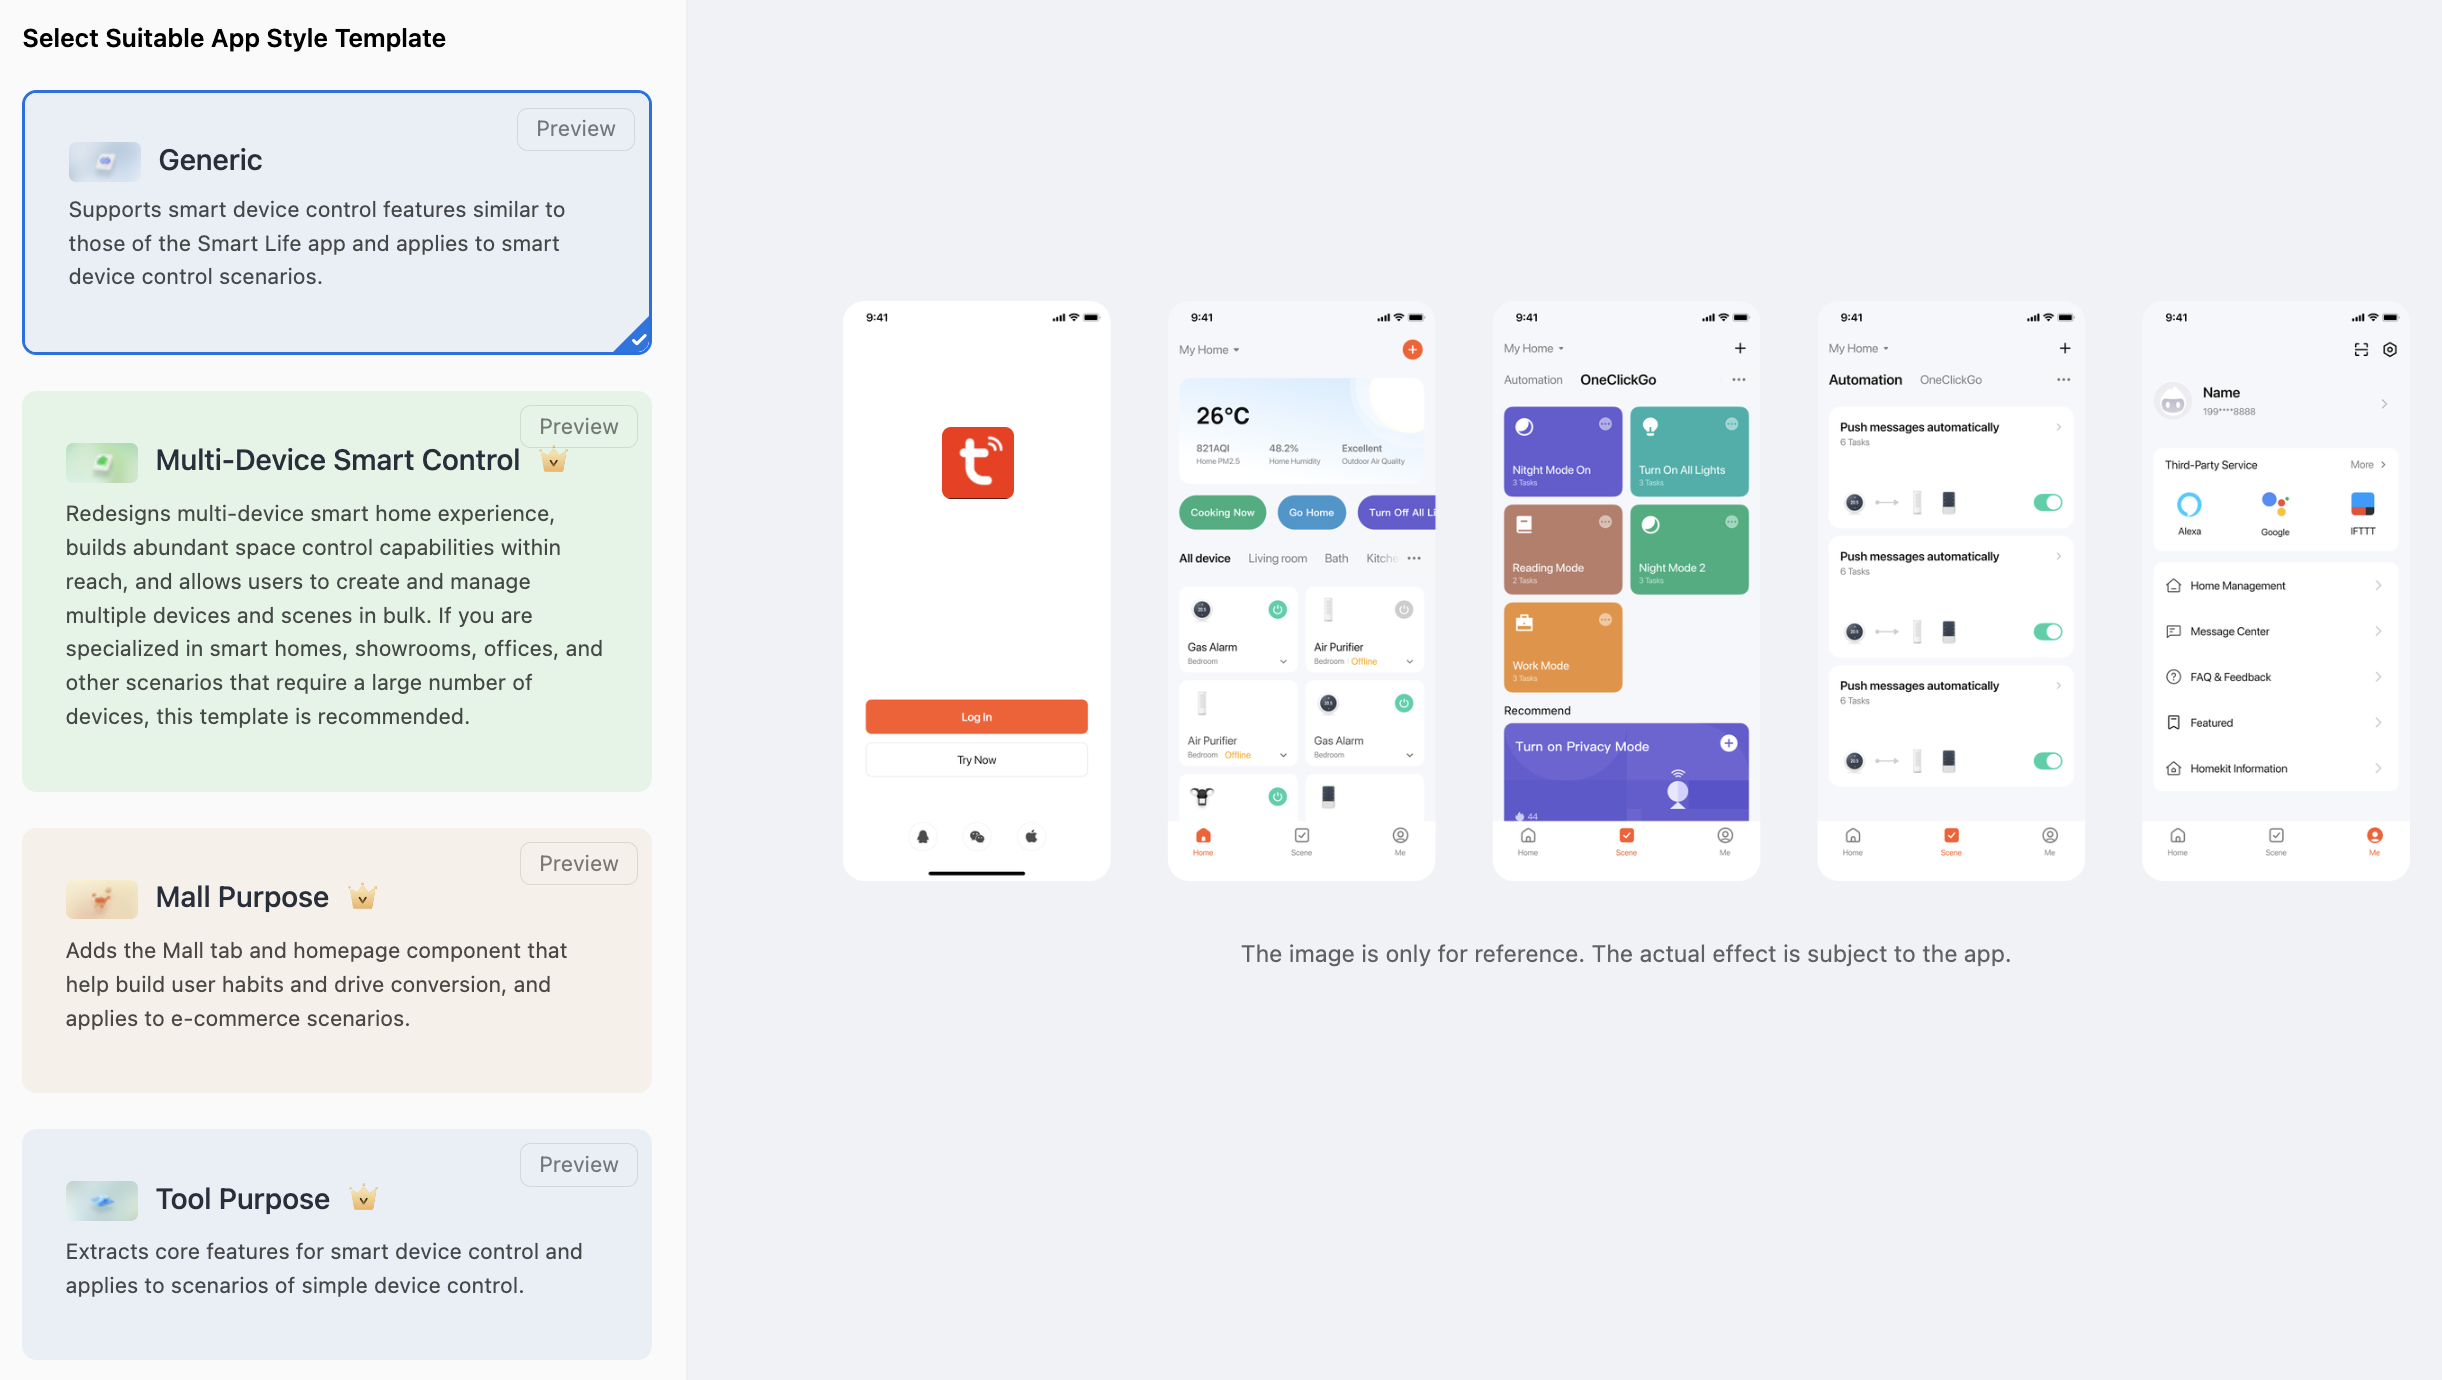
Select a suitable app style template to quickly finish UI settings.
-
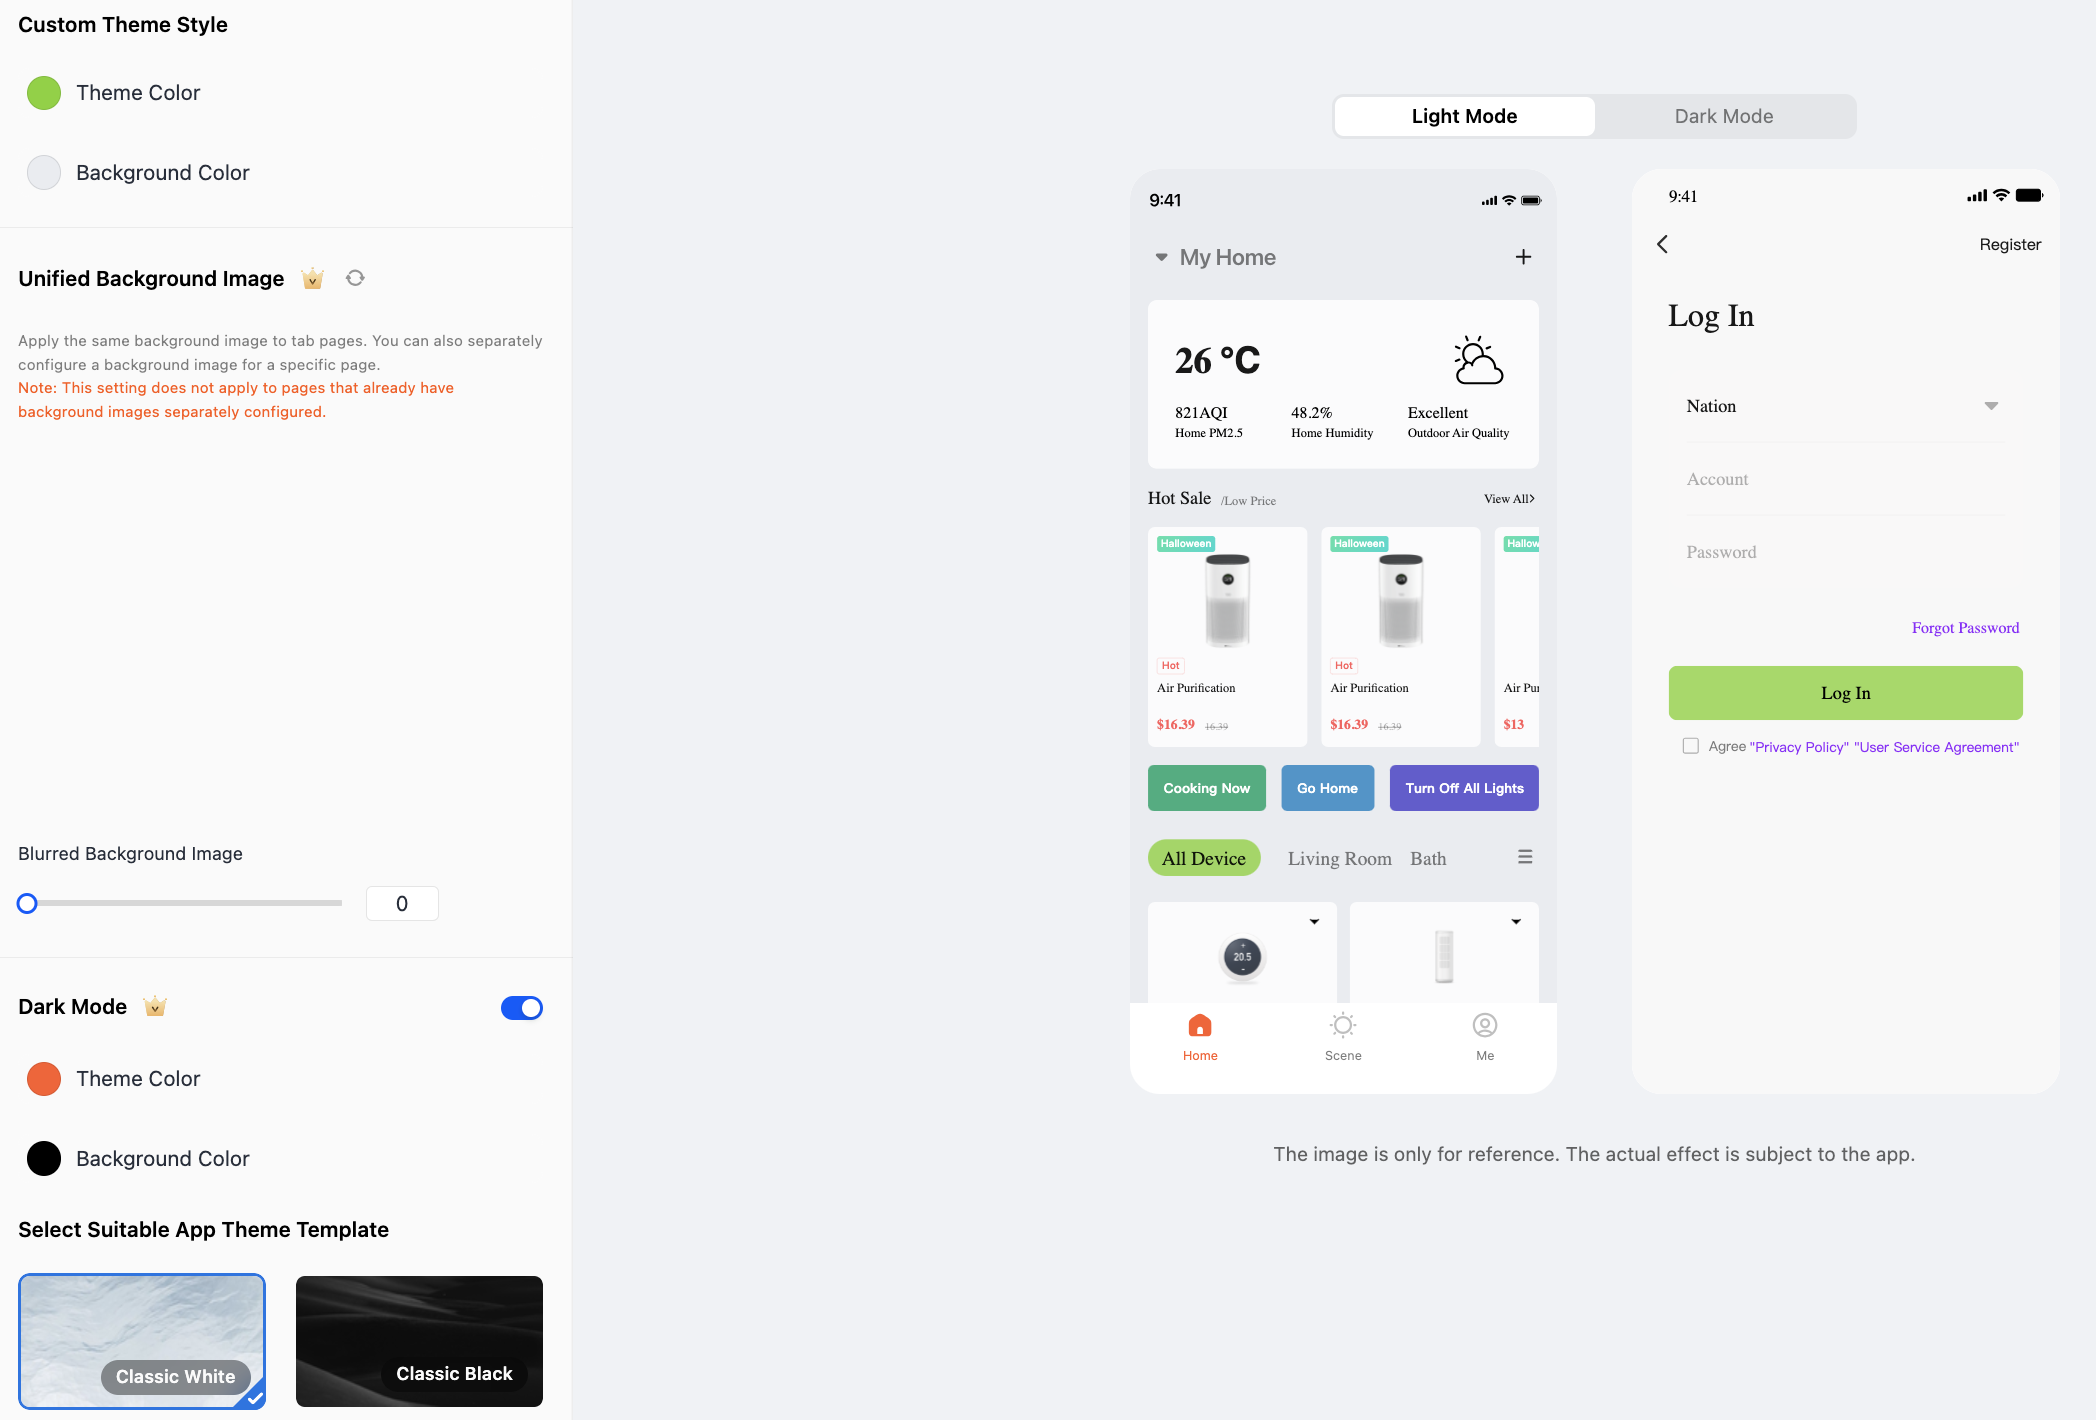
Set Theme. You can configure the Custom Theme Style, Unified Background Image, Dark Mode, and Select Suitable App Theme Template sections as needed.
-
Set Page. This component is divided into:
-
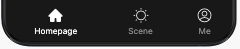
Tab Pages: includes the settings of Home, Scene, and Me.
-
General Pages: includes the settings of Pairing Devices, Login/Register, and Splash Screen. After all desired settings are finished, in the top right corner of the page, click Save, rebuild the app, and then install it on a mobile phone to view the latest custom app.
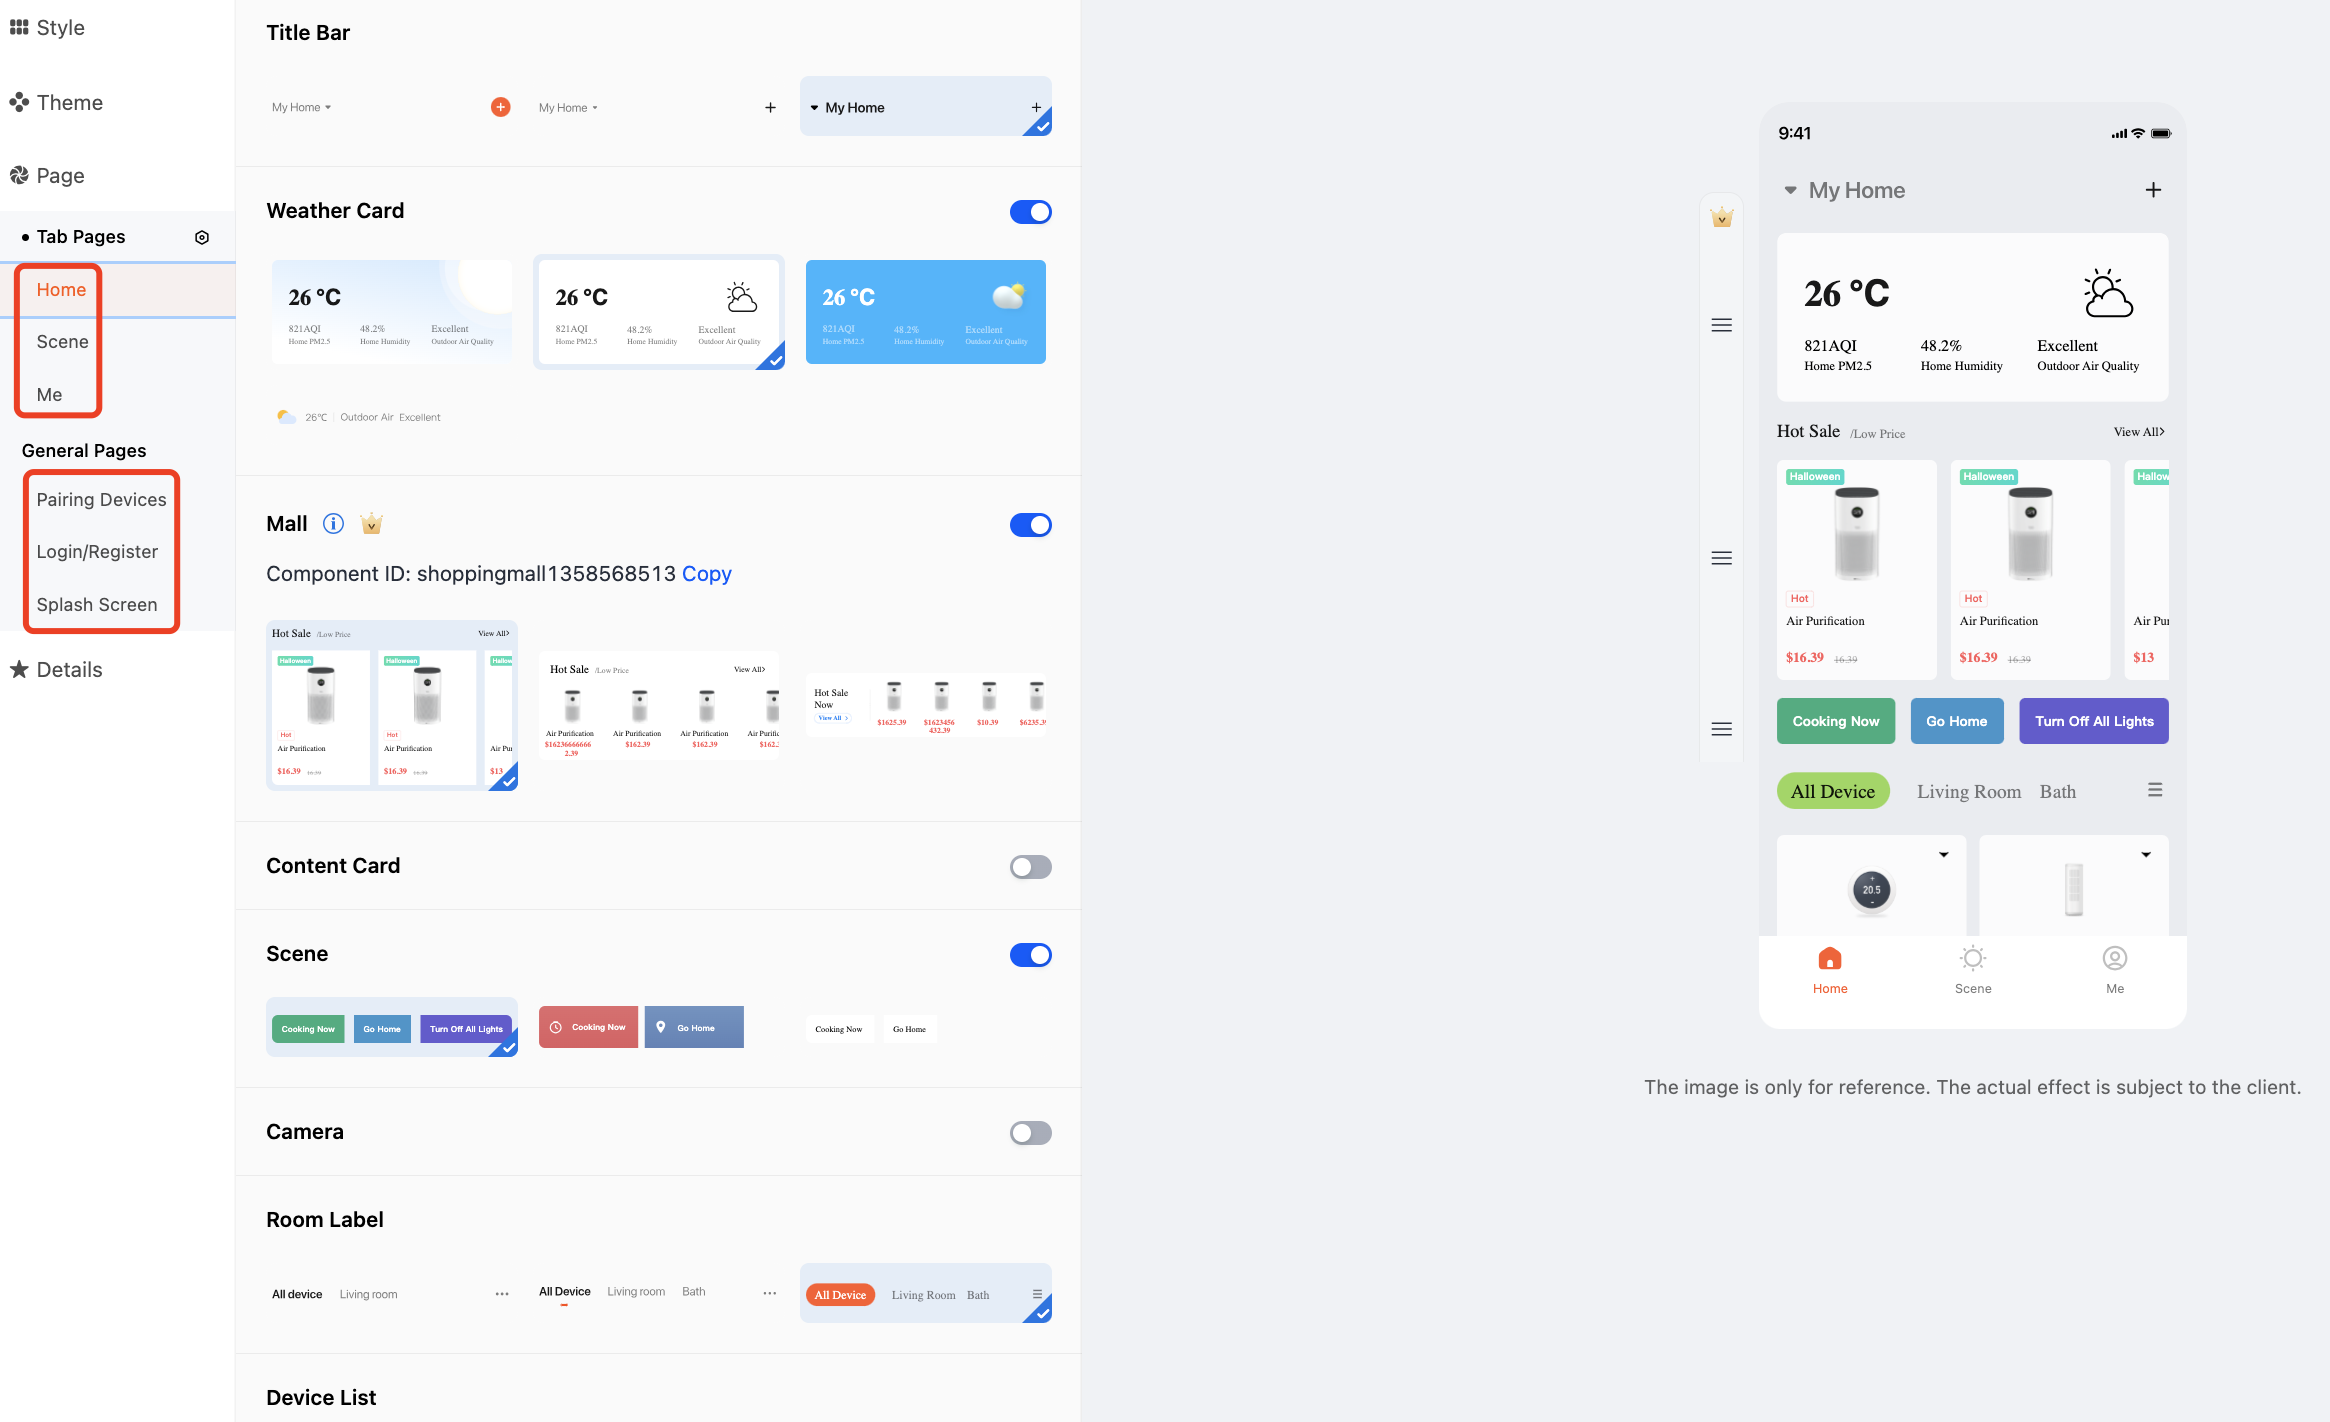
The system displays the settings available for the page. You can set the style of different components to be displayed on the page. For example, you can configure Home through the following steps:
- Set the switch next to a component to enable or disable the component.
- After the component is enabled, select a style for the component as needed.
- In the right-side pane, drag and drop the component on the previewed page to a specific location and arrange the layout of the components on this page.
-
-
Choose Pages > Tab pages and customize Icon Settings. You can upload your own icons in the
.pngformat. The dimensions must be 108 × 108 pixels.Tuya provides default icons. Also, you can upload the desired icon. Certain tab icons can be sorted.
As shown in the following figure, an icon in the Default state represents an inactive icon.
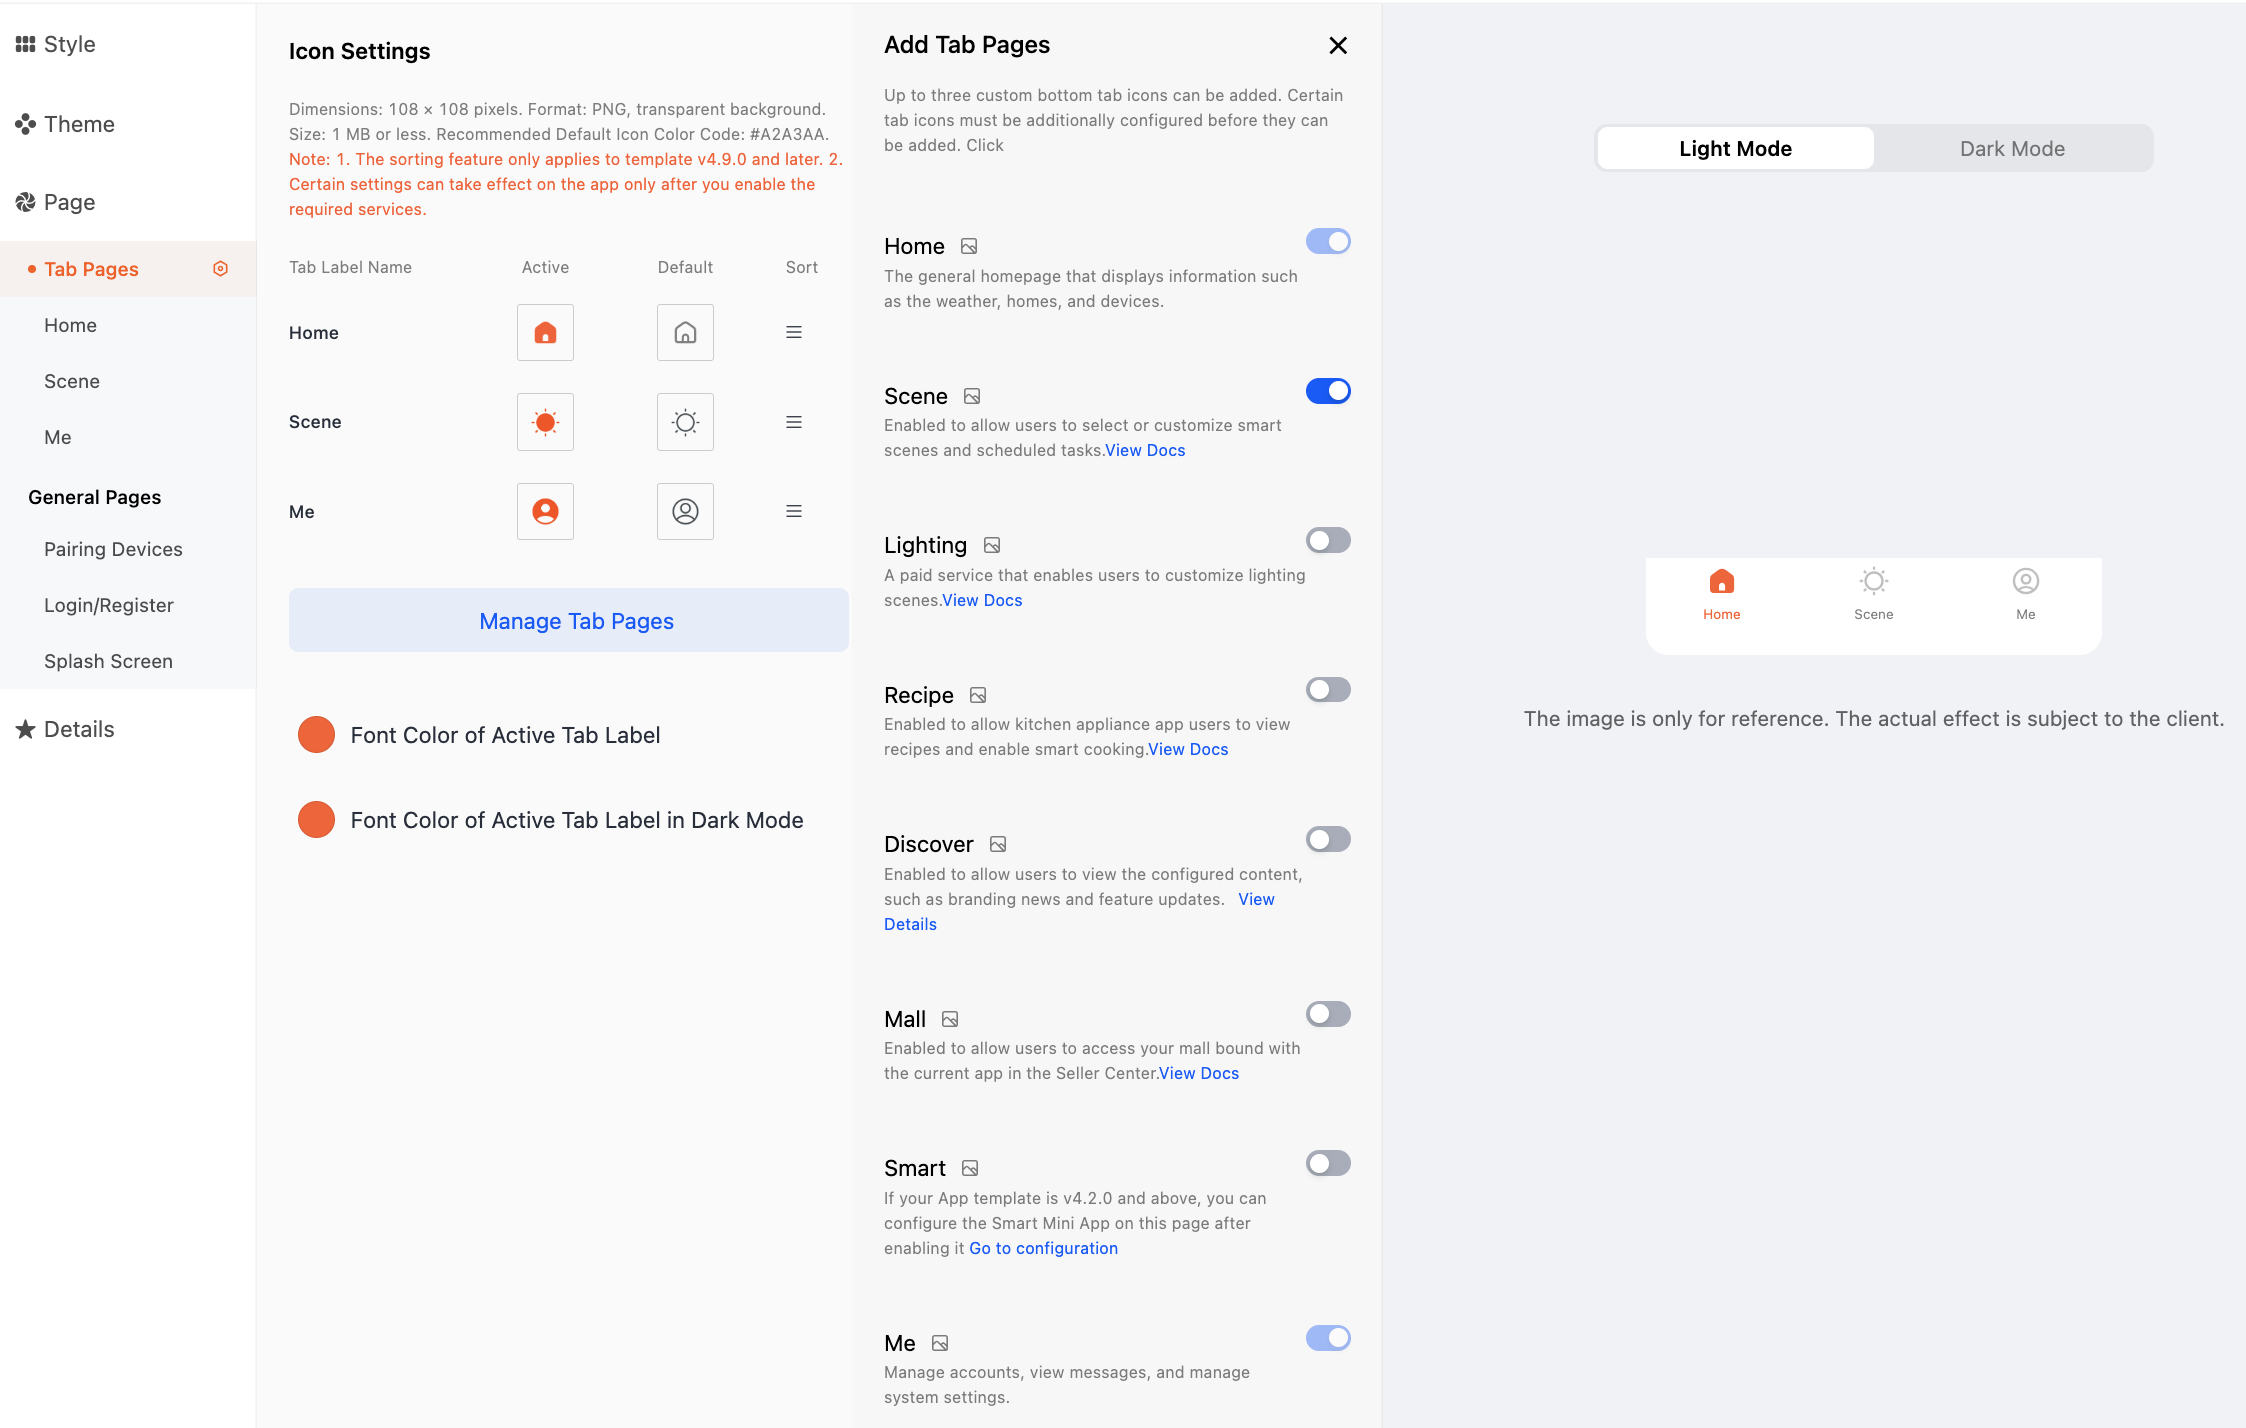
These settings do not make all the tab icons displayed on the app. To display desired tab icons, go to Step 2: Set Functions > Tab Icon Features and enable their features. In addition to these steps, the Mall tab icon is displayed only after the target mall is bound with the current app in the Seller Center.
-
Choose Pages > General pages and set Splash Screen.
A splash screen is automatically generated after you upload the app icon. You can also upload a preferred page to change the existing one. The background image of a splash screen must meet the following requirements:
Platform Image format Upper limit of image dimensions iPhone PNG 1284 × 2788 pixels iPad PNG 2732 × 2048 pixels Android PNG 1080 × 1920 pixels, 1080 × 2160 pixels 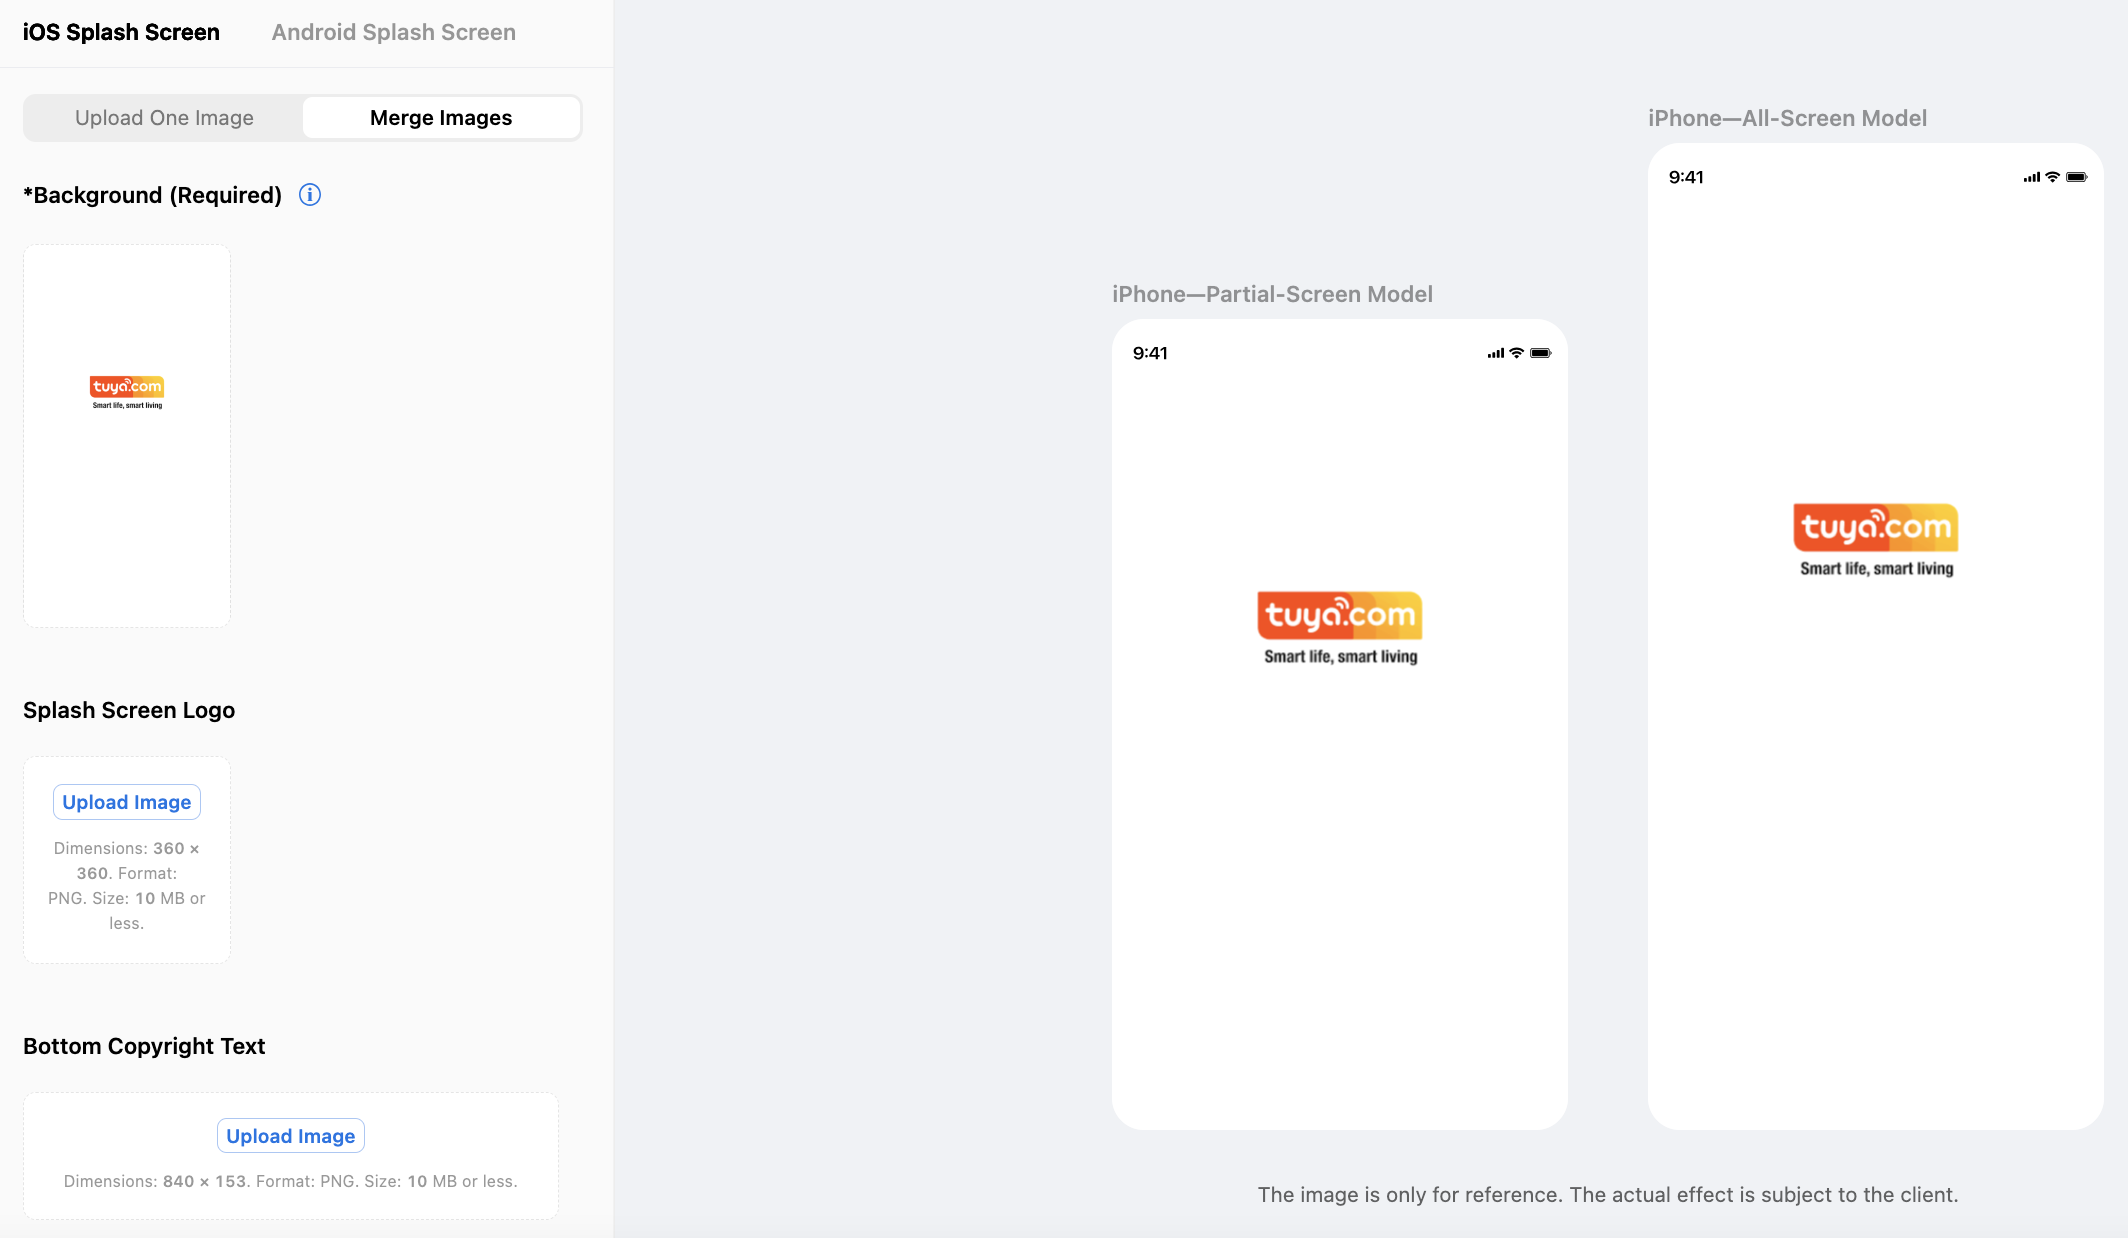
-
You can upload one image or merge images as the background image of a splash screen for iOS and Android. The app automatically merges the uploaded images as previewed into a splash screen for the current aspect ratio. This can avoid image distortion.
-
If the Adapt to Tablet feature has been enabled and the Merge Images mode is selected, you must upload a new background image of the splash screen for Android without a logo.
To preview the default effect, click Restore Default. Then, the system will display the default splash screen for tablets with a white background image that adapts to your app icon.
-
-
Set Details. You can configure the placeholder image, text color transparency, and right-angle or round corners of cards, buttons, and dialog boxes, customize the theme style, and personalize colors.

When the template version used by your app is v3.25.2 or later, the dark theme can be enabled. App users can choose Me > Settings > Dark Mode to select the mode or follow the system settings.
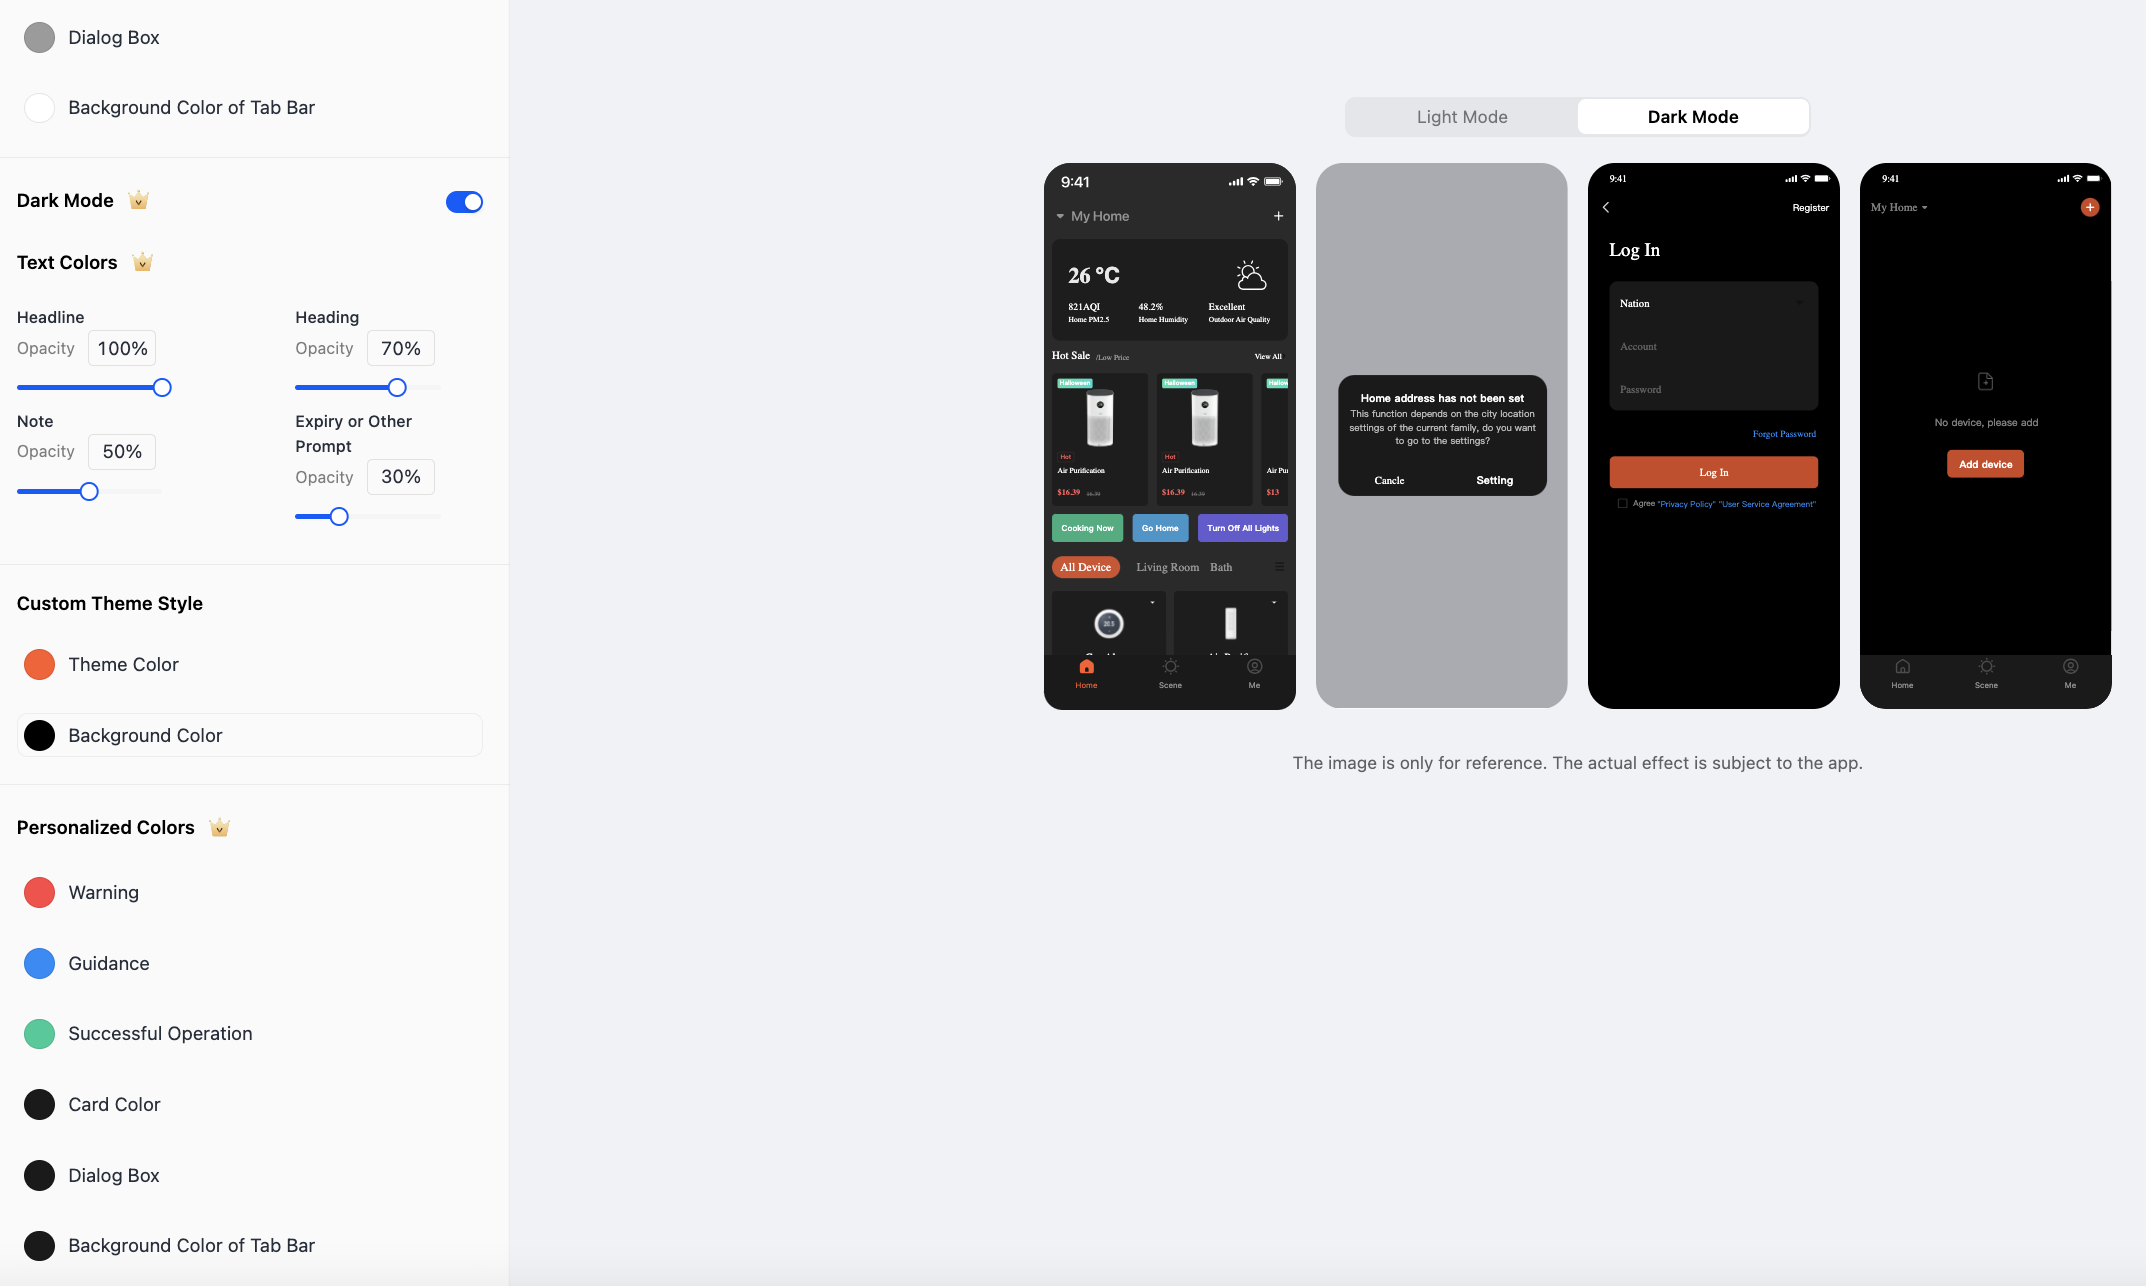
- The setting at Details > Personalized Colors cannot be the same as the setting at Theme > Background Color.
- The setting at Theme > Theme Color cannot be the same as the setting at Theme > Background Color.
- The setting at Details > Background Color of Tab Bar cannot be the same as the setting at Page > Tab Icon > Font Color of Active Tab Label.
The following table shows Previews A and B of each detailed setting for your reference.
The following settings do not apply to specific control panels and webpages.
Item Preview A Preview B Background color of cards 

Background color of dialog boxes 

Background color of tab bars 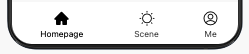
Text transparency of headlines 

Text transparency of headings 
Text transparency of notes 

Text transparency of expiration prompts 

Right-angle or round corner of cards 
Right-angle or round corner of buttons 

Right-angle or round corner of dialog boxes 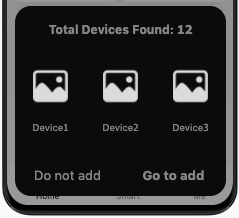
-
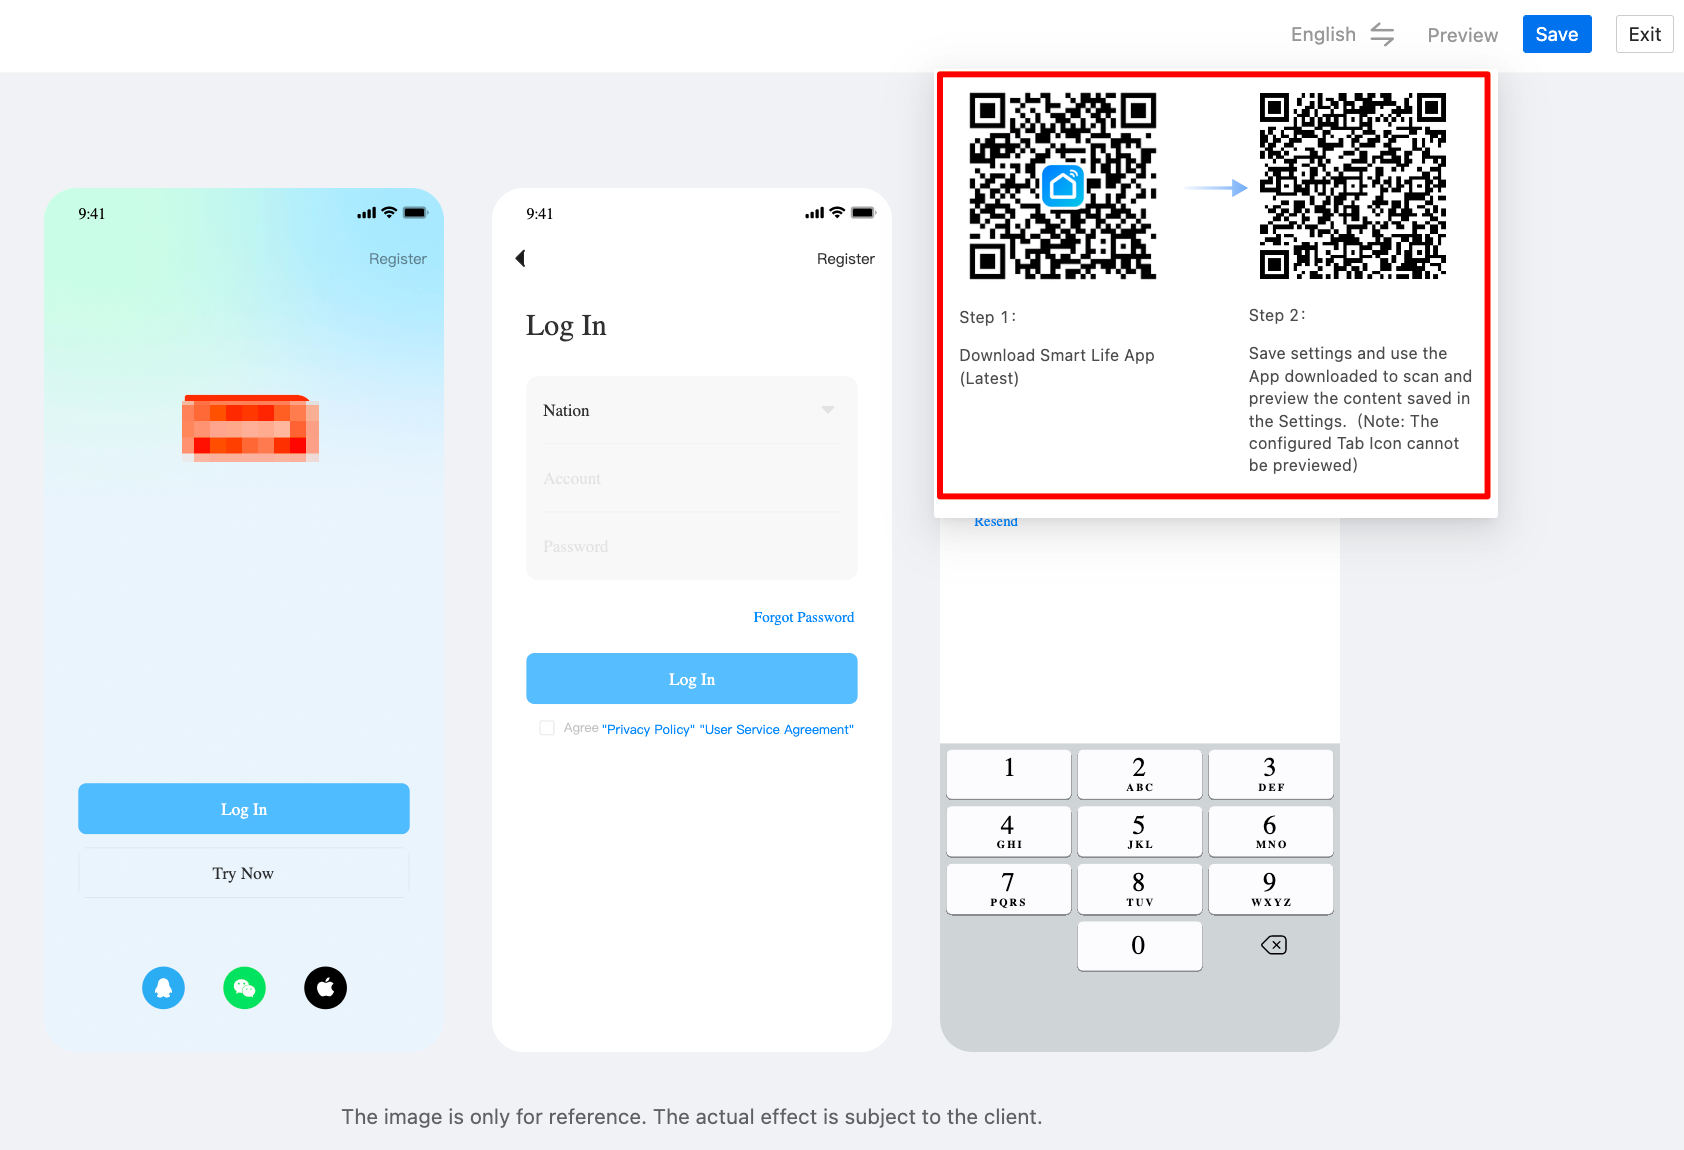
After UI customization, in the top right corner of the page, click Save > Preview, and follow the instructions that appear to scan a QR code and download the app. Then, the app with the latest UI settings can be previewed.
- To try an OEM app with a few simple clicks, after the preceding settings, return to the build process and click Next: Set Functions.
- You can use the default settings of the basic functions or modify the settings. Then, click Next: Build App > Build, wait until the app is built, and then test the app. Each version can be built up to 10 times a day and up to 30 times a month.
Set functions
-
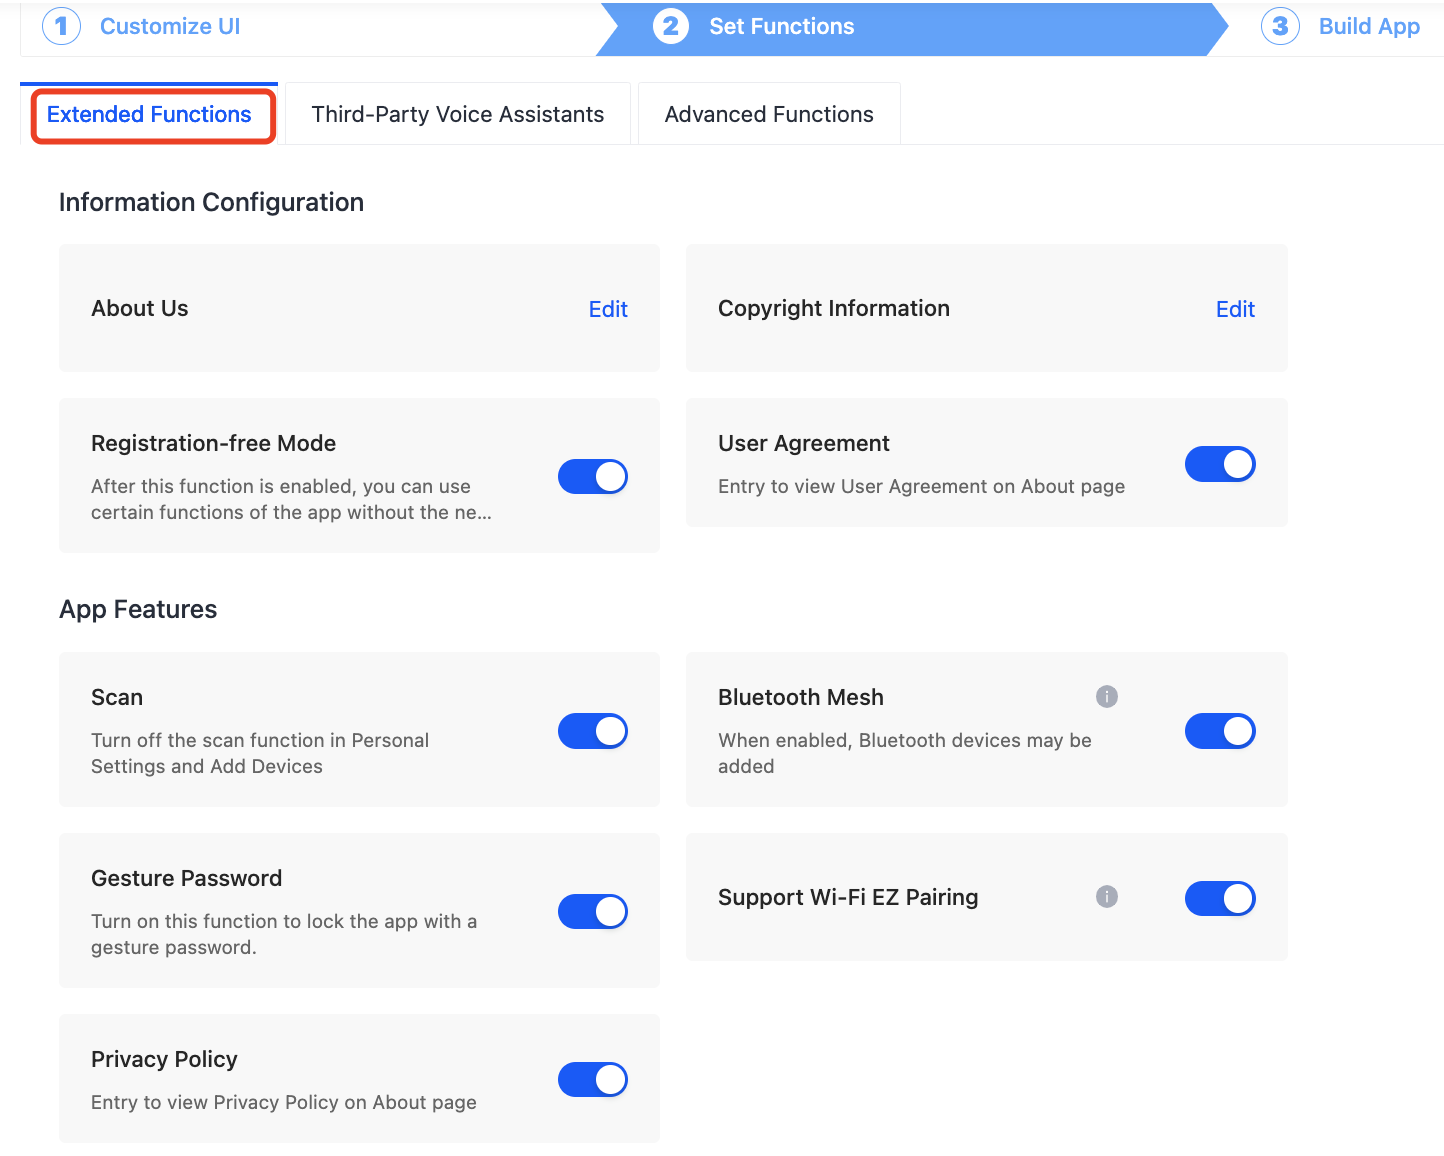
Extended Functions: You can choose whether to enable or set the functions.
-
About Us: You can enter your official website URL in the format of
https://. If the URL does not start withhttps://, this page cannot be opened on the app. Currently, only the pages in Chinese and English are supported. To navigate to a page in another language, enter the URL in the field for the English language. -
Copyright Information: Enter the copyright information. Only Chinese and English are supported. To view the copyright information on the app, tap Me at the bottom of the page, tap the setting icon in the top right corner of the page, and then tap About.
-
Registration-free Mode: After this function is enabled, users can access certain functions of the app without the need to register. After the account information is completed, the information such as the device bound in the unregistered state applies to the new account. Currently, the function is available for a free trial. However, a subscription will be required later before this function can be enabled. The apps that already have the function enabled will not be affected.
-
User Agreement: Due to the rules of the major app stores, it is enabled by default. After it is enabled, the logged-in user can also view the latest version of the user agreement.
-
Scan: You can choose whether to enable this function.
-
Bluetooth Mesh: You can choose whether to enable device pairing over Bluetooth. If you disable the Bluetooth mesh service, make sure that the devices to be paired do not include Bluetooth devices.
-
Gesture Password: You can choose whether to enable this function for the app. If it is enabled, a gesture password can be used to lock and unlock the app and enhance security.
-
Wi-Fi EZ Pairing: You can choose whether to enable this function.
-
Privacy Policy: Due to the rules of the major app stores, it is enabled by default. After it is enabled, the logged-in user can also view the latest version of the user agreement.
-
OTA Update: Set the default on/off status of auto update and allow users to modify this setting on the app.
-
-
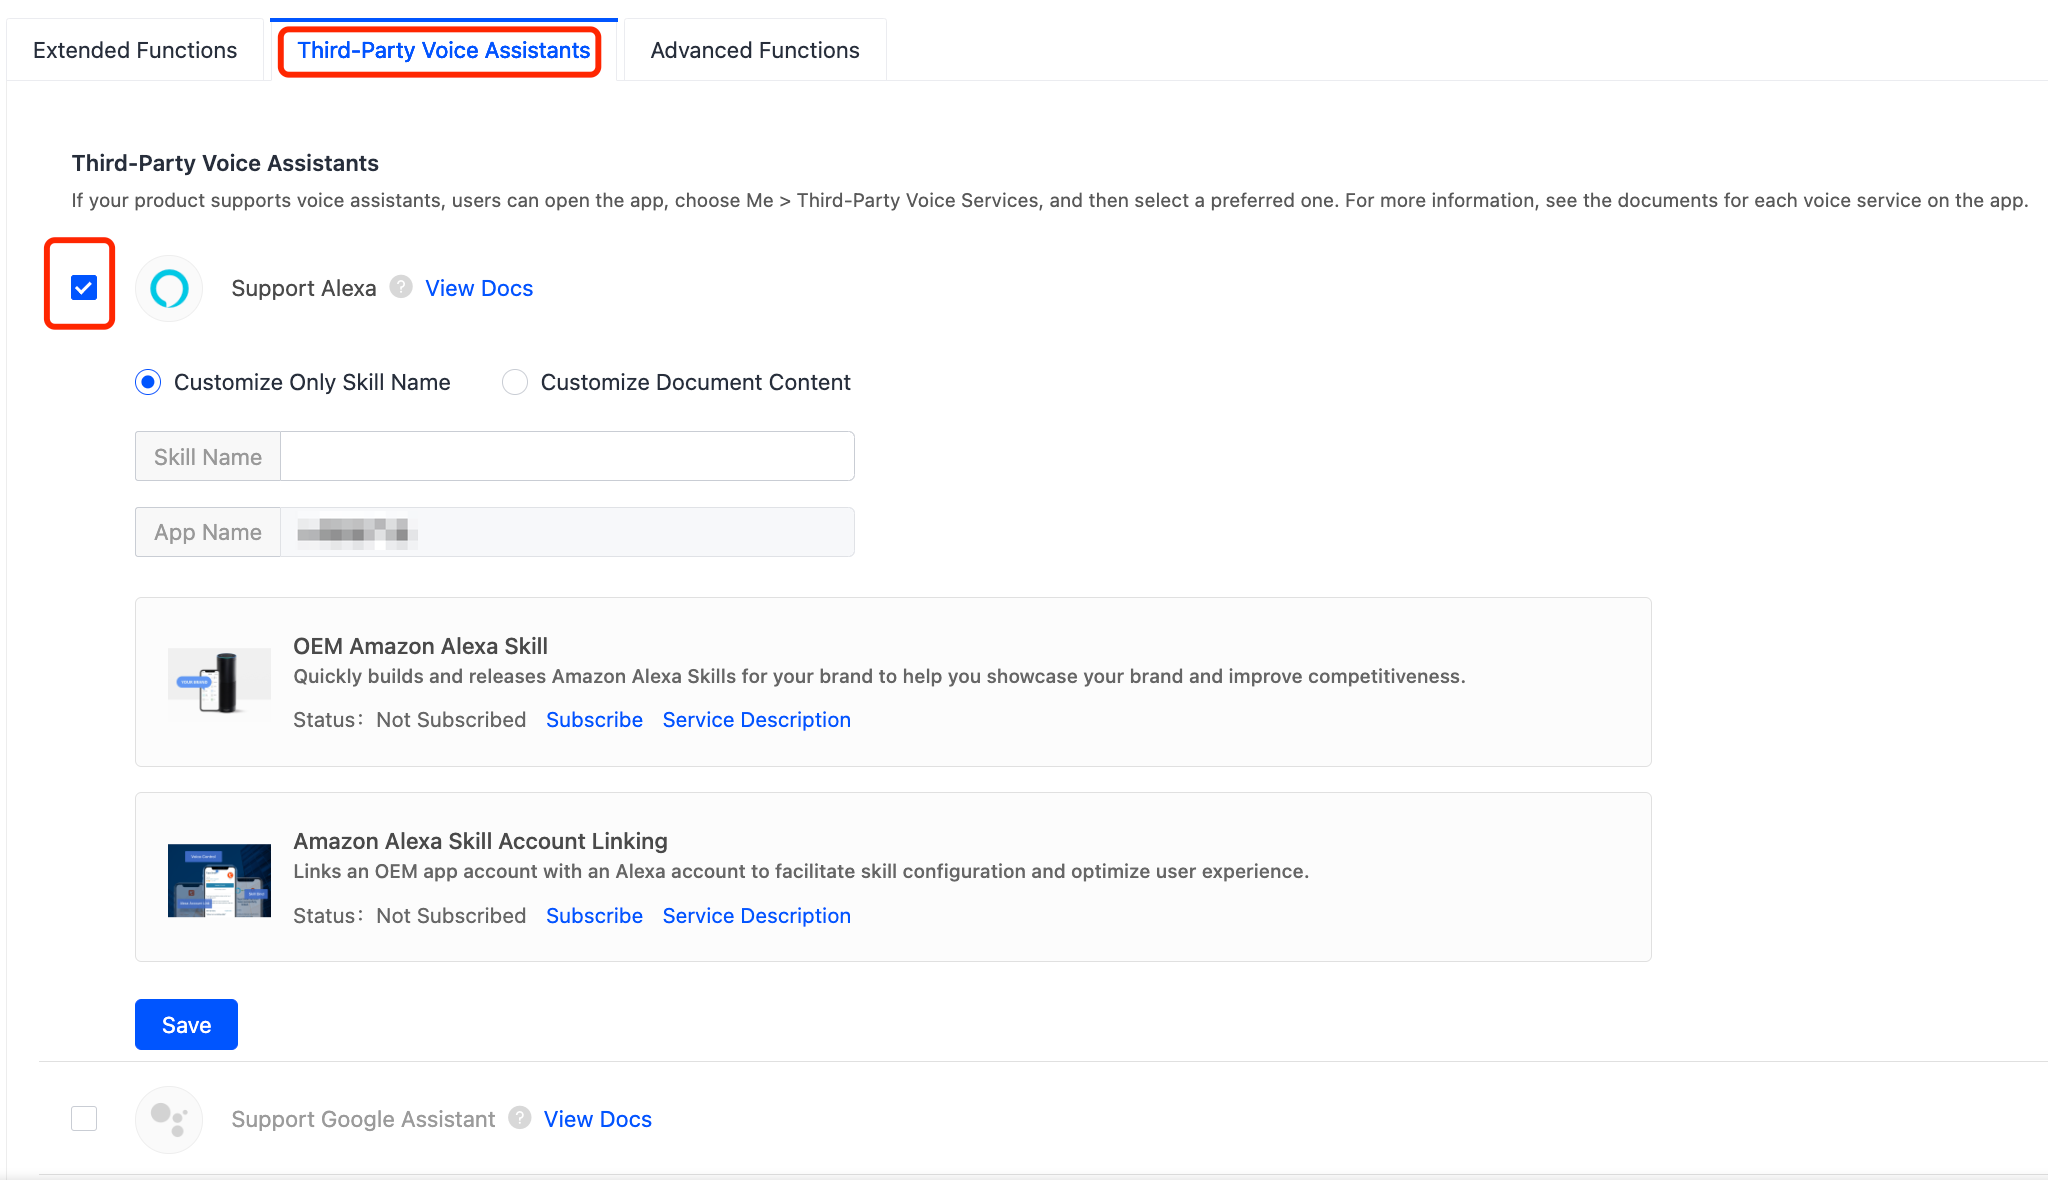
If your product supports a smart speaker, you can select the required voice assistant, and add the name of the supported skill in the input box next to the name of the voice assistant. Then, users can choose Me > Third-Party Voice Services on the app to see the icon for navigation to the documents.
-
If you select Customize Document Content, you can click Edit File to edit the document in a preferred language in the dialog box. You can modify and save this template. This way, users can view the latest version of the text.
-
To create a document in languages other than Chinese and English, you must first create the version in English and click the language drop-down list, select the required language, and then edit the content.
- If you enable Alexa and Google Assistant for your app, you must subscribe to the OEM skills for each of the voice assistants. Otherwise, the voice control might fail.
- The Alexa app-to-app account linking is available. In the Support Alexa section, click the hyperlink Service Description for the desired capability to view the description or click Subscribe to purchase the service.
- You can enable or disable a voice-enabled service, or modify the document for the service, without the need to rebuild the app.
-
-
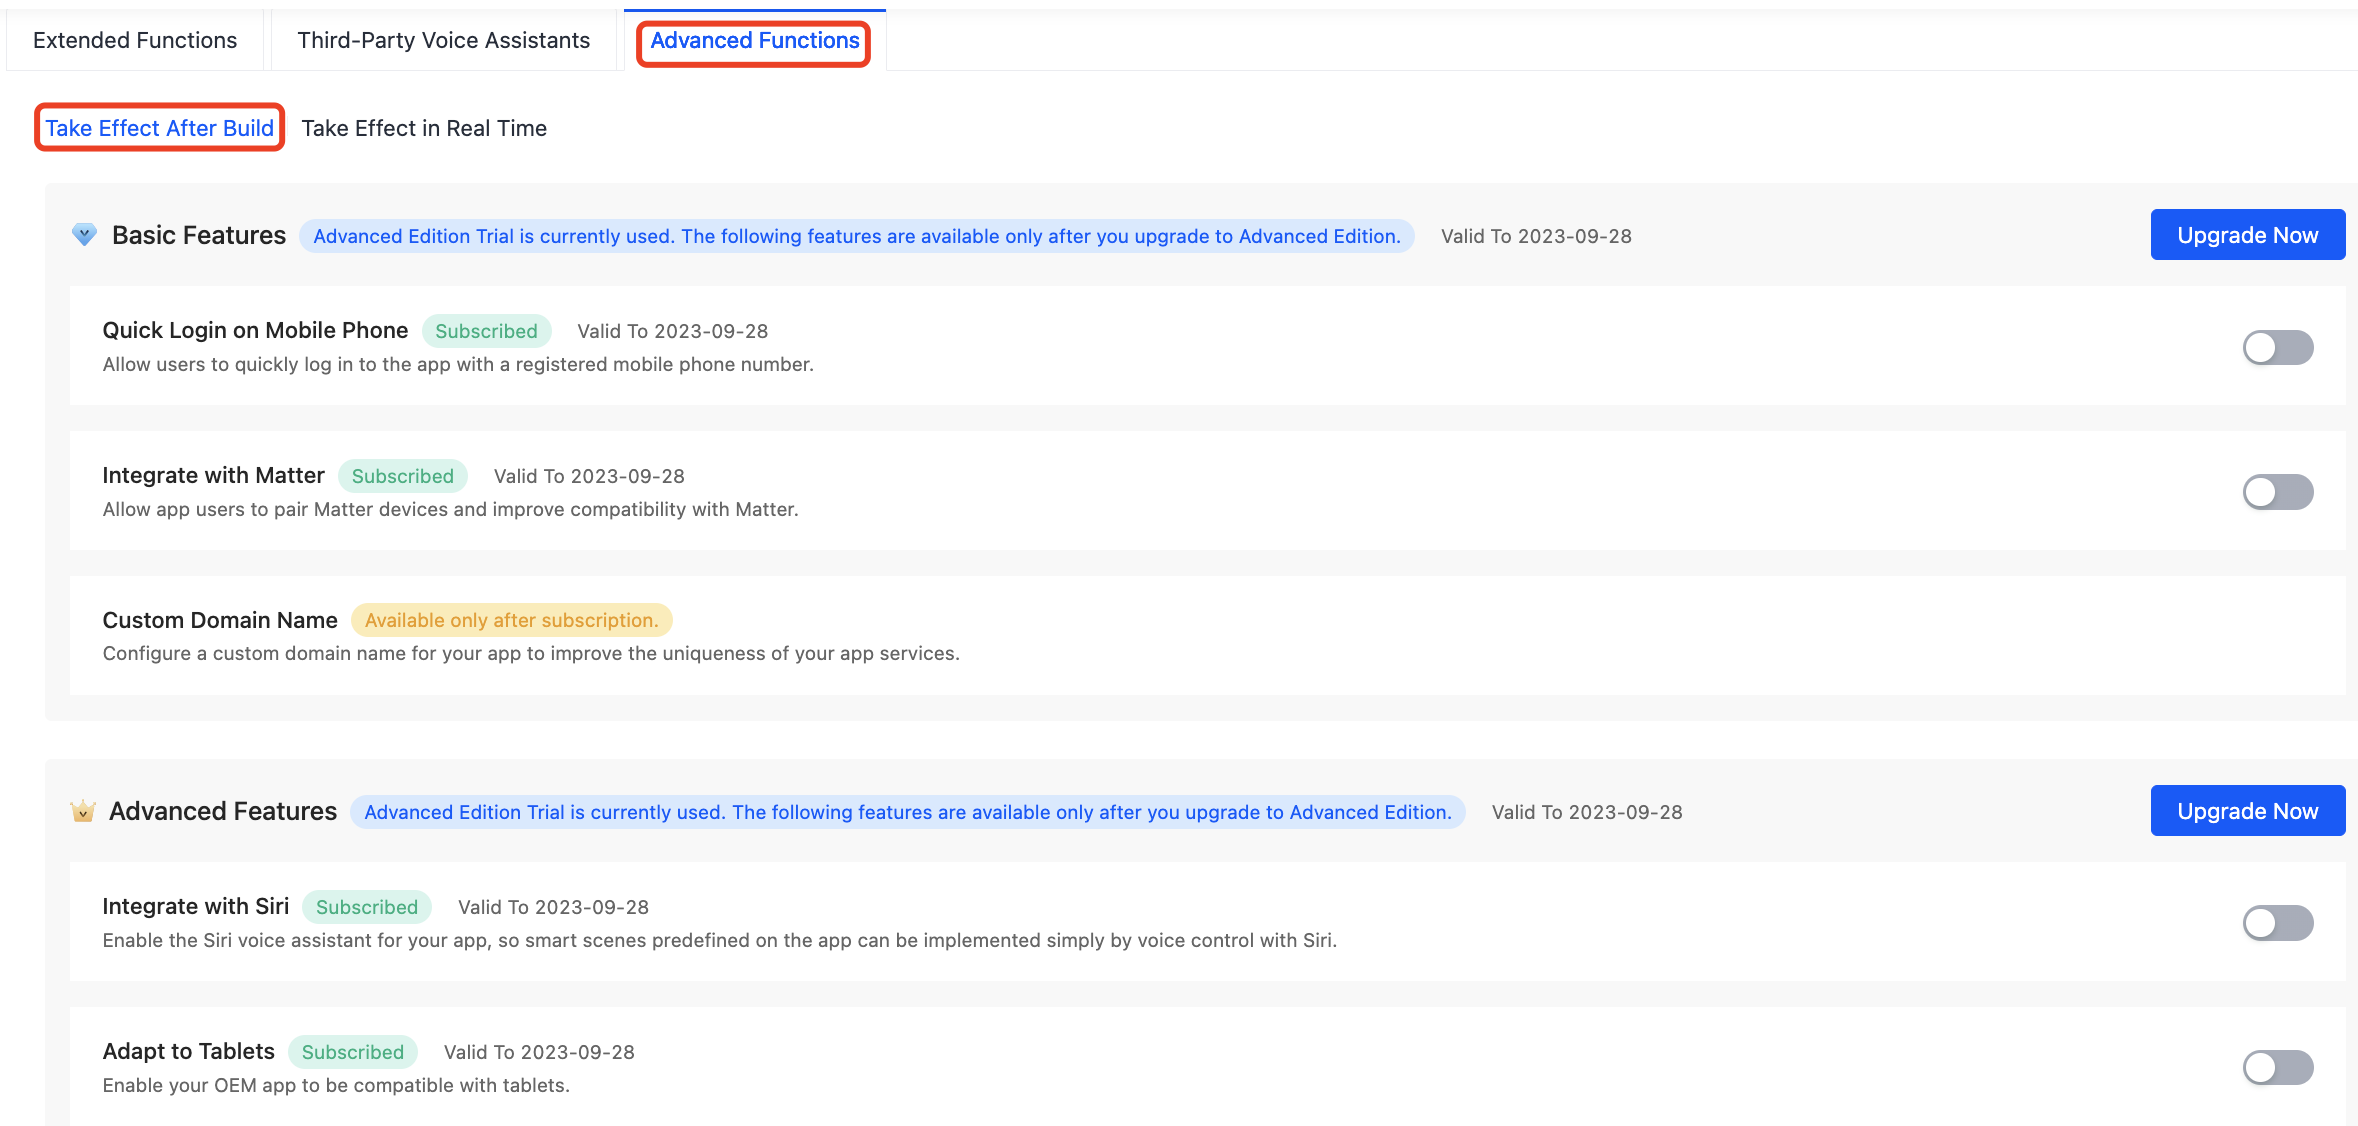
Go to the Advanced Functions tab to configure the features that are required for launching on app stores and subscribe to and configure the recommended services. You can complete the configurations as needed. You can also simply click Next: Build App to build and test the app and complete the required configurations later.
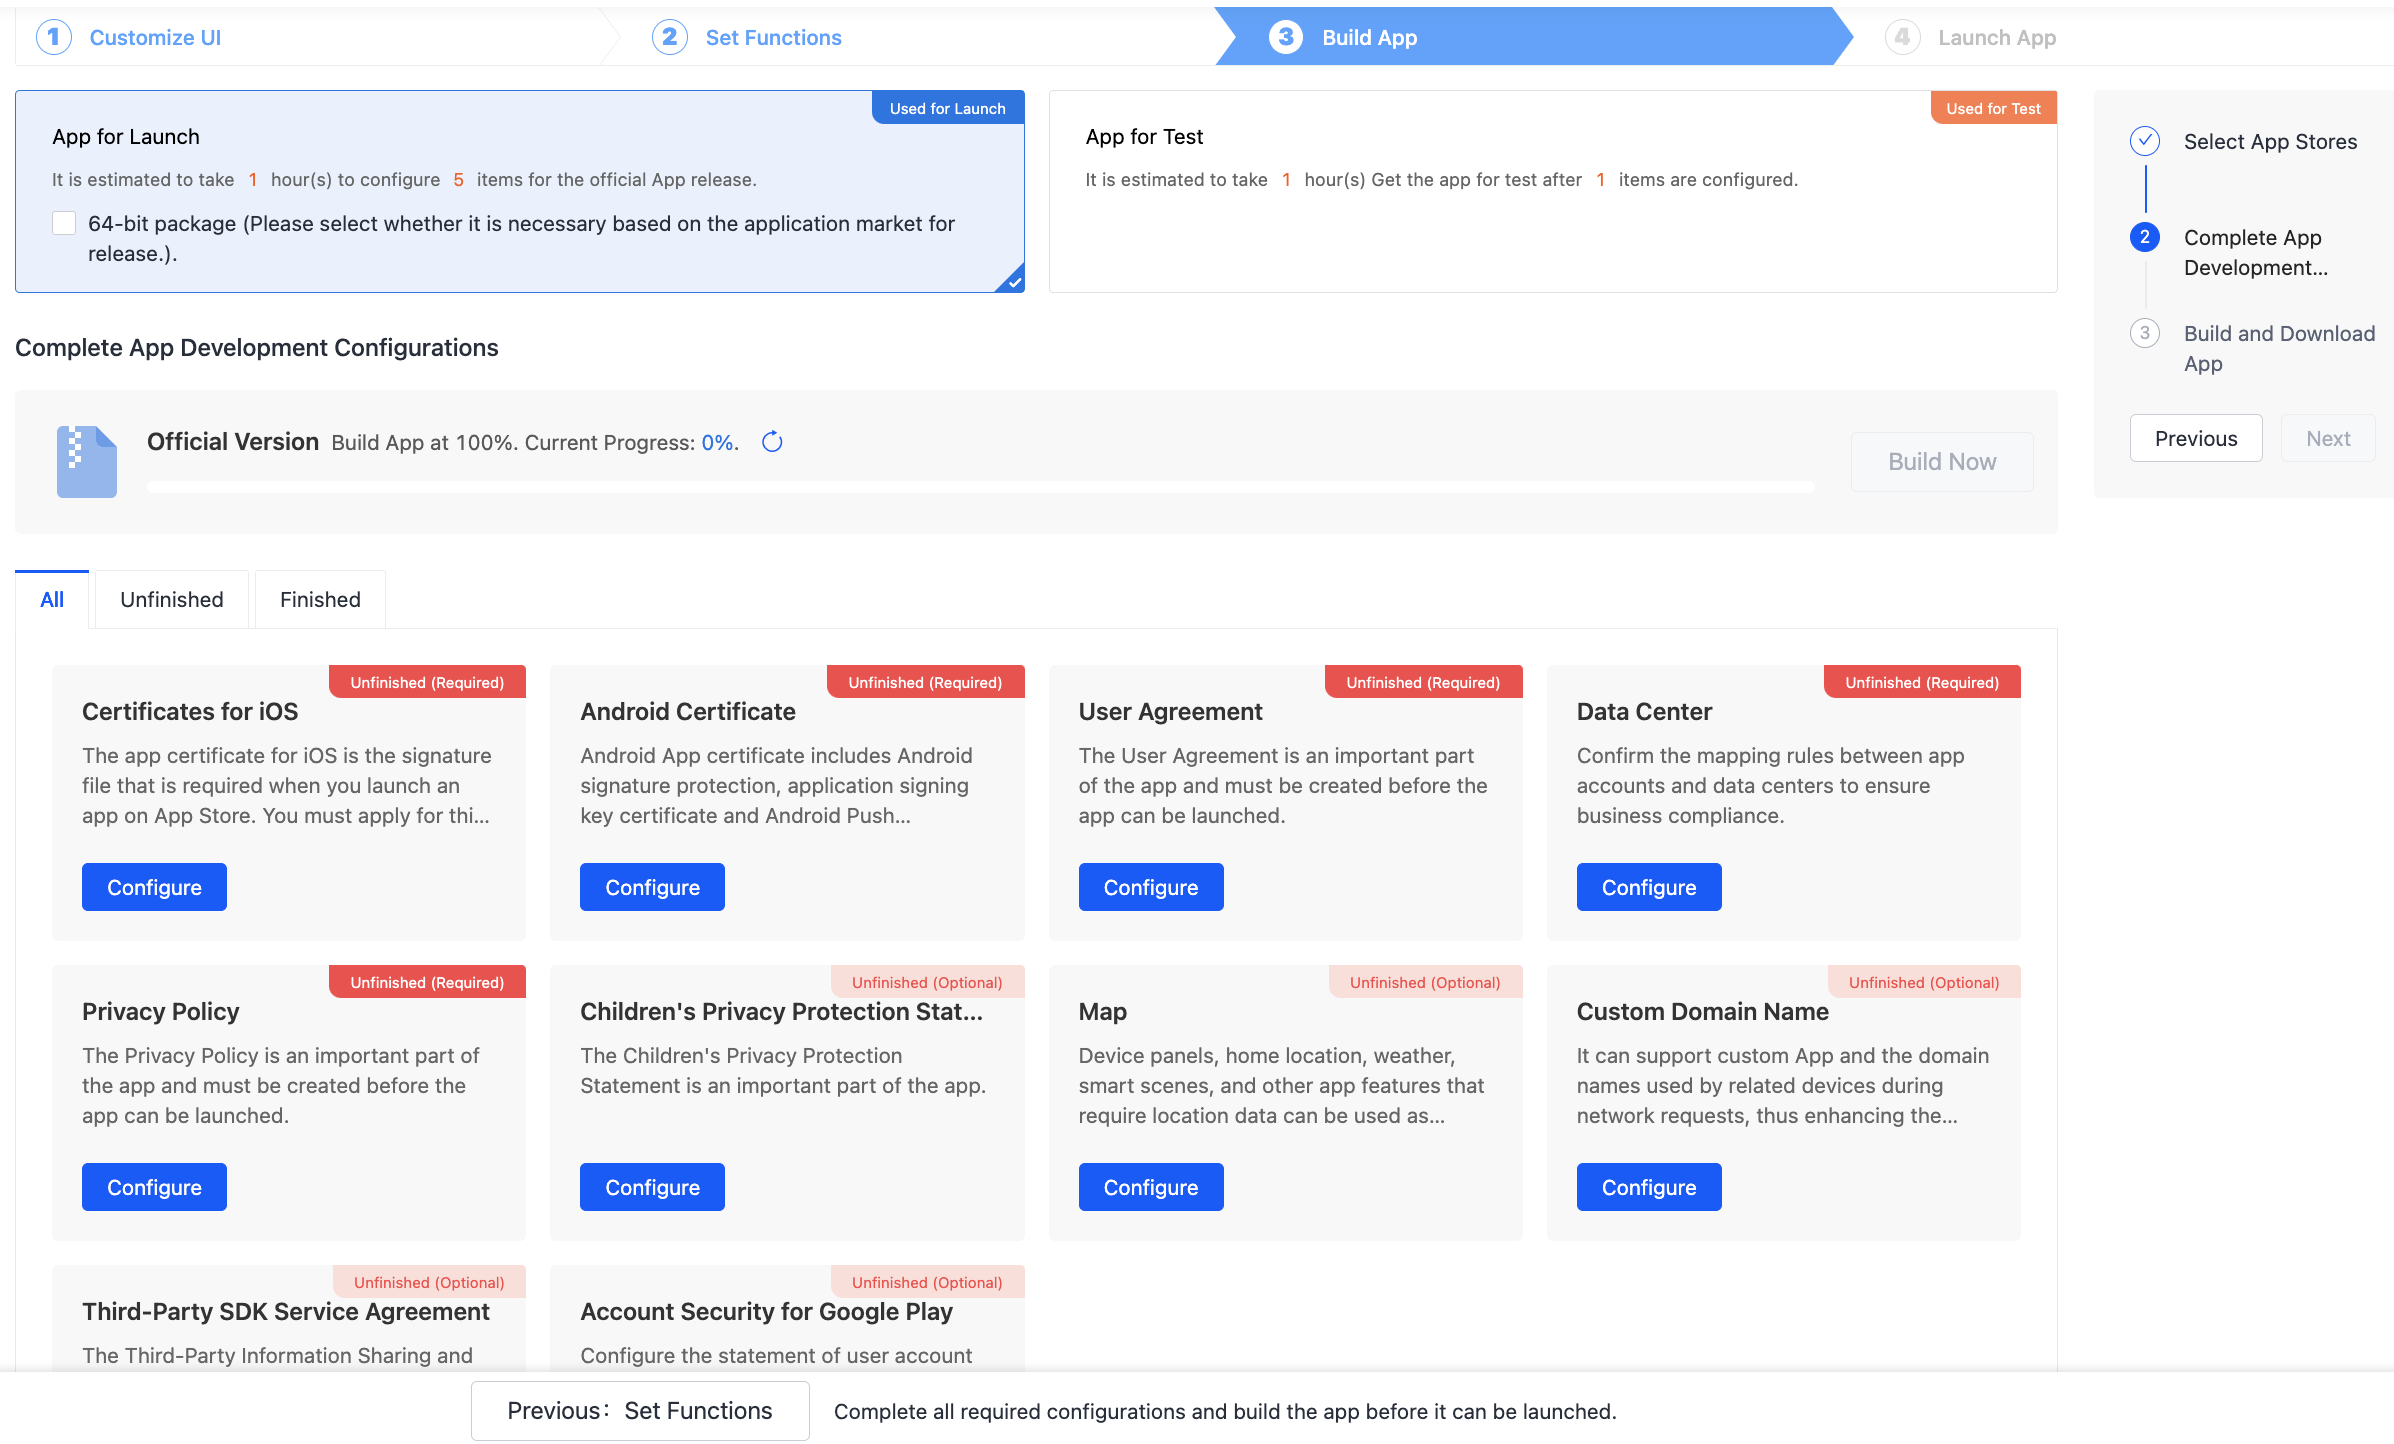
Build app
-
In the step of Build App, click Build.
-
Select App Stores: For the first time you open this page, select the types of app stores on which the app will be launched.
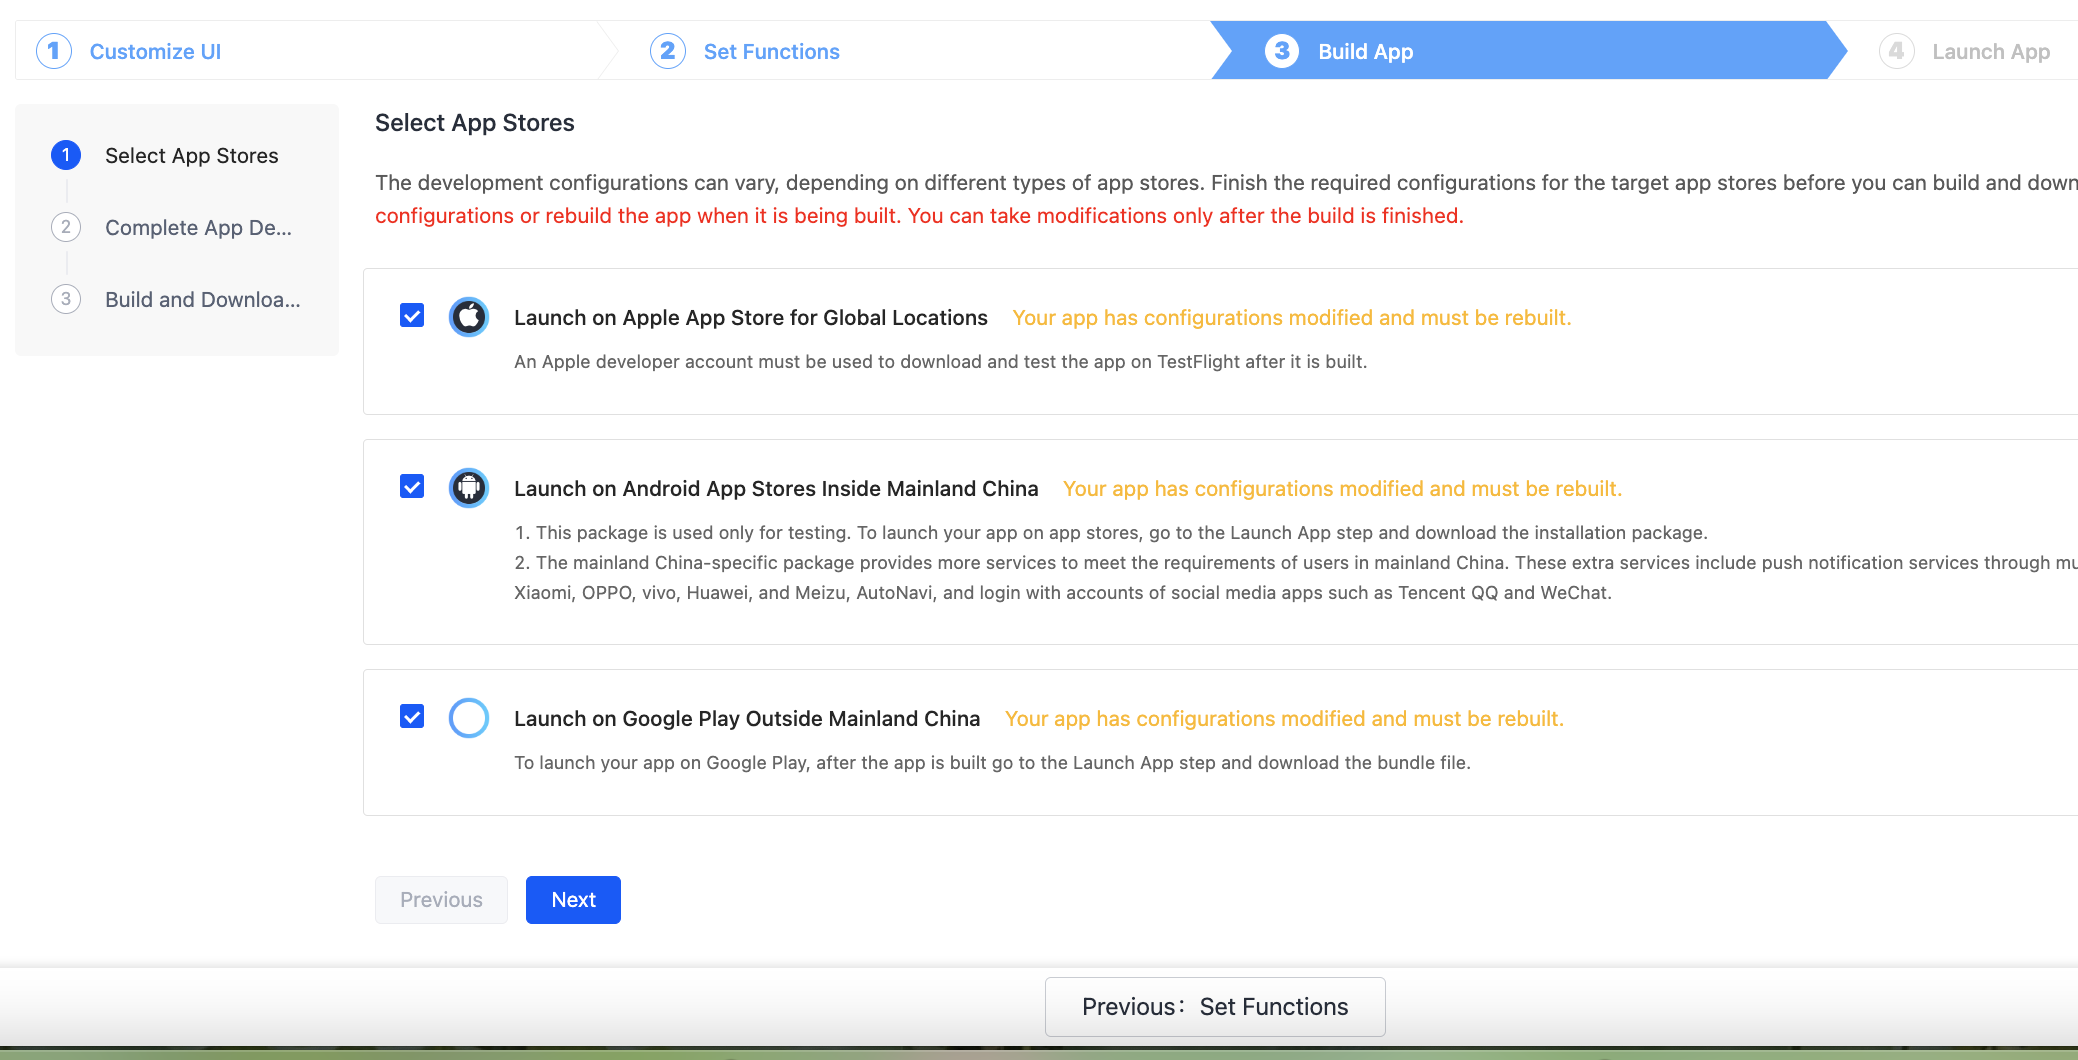
After you select one or more types of app stores, the platform shows the required configurations to have your app launched on the respective app stores. The all-around pre-launch checklist and personalized guidance are tailored for a specific app. The development process is classified into two types:
-
App for Launch: For this type of development process, the platform evaluates the actual conditions of your app, for example, the target app stores and purchased value-added services. Then, if necessary, the platform guides you to complete unfinished required configurations.
-
App for Test: You can start building the app soon after one or two required configurations are completed for tests.
-
-
If the app is built, you can use a mobile phone to scan the QR code to download and install the app for tests. The QR code automatically identifies the mobile phone operating system and supports both Android and iOS.
Click Get QR Code to download and share the QR code of the test package with other internal users for tests. The QR code is available only within a validity period and only used for testing within your organization.
-
In the very rare case that the build fails, an error message is returned to help you troubleshoot the error. You can also submit a ticket to request technical support.
Trial app
The trial app is created and configured on the Tuya Developer Platform through the above process. After the app is built, you can scan the QR code for the trial version to download and install the app on your mobile phone.
- The trial app is valid for 30 days from the date of creation. After expiration, the trial app cannot be edited or built and the installed app on the mobile phone cannot be used as expected.
- The installation package of the trial app cannot be used to launch the app on app stores. You must purchase the OEM App service and complete the required configurations before the app can be launched.
Official app
If you have already purchased the OEM App service, ignore this step and launch the app on app stores.
Purchase OEM App service
If your app passes the test, you can launch the app on app stores. If the OEM App service is not purchased, you cannot get the installation package for launching. After the trial app expires, you cannot continue to use the app.
-
Click Purchase OEM App and go to Value-Added Services to place an order and complete the payment.

-
Check and confirm the order information. If all the information is correct, you can click Buy Now.
- Confirm Order: If your OEM app has been paid offline, provide your order number and contact Tuya’s account manager to bind the payment.
- Invoice Information: You can choose whether to request an invoice. If you want an invoice, after the service is completed, contact Tuya’s account manager and provide the invoice information to get an invoice.
-
After you select the payment method and complete the payment, you can return to the Tuya Developer Platform and continue to configure your app.
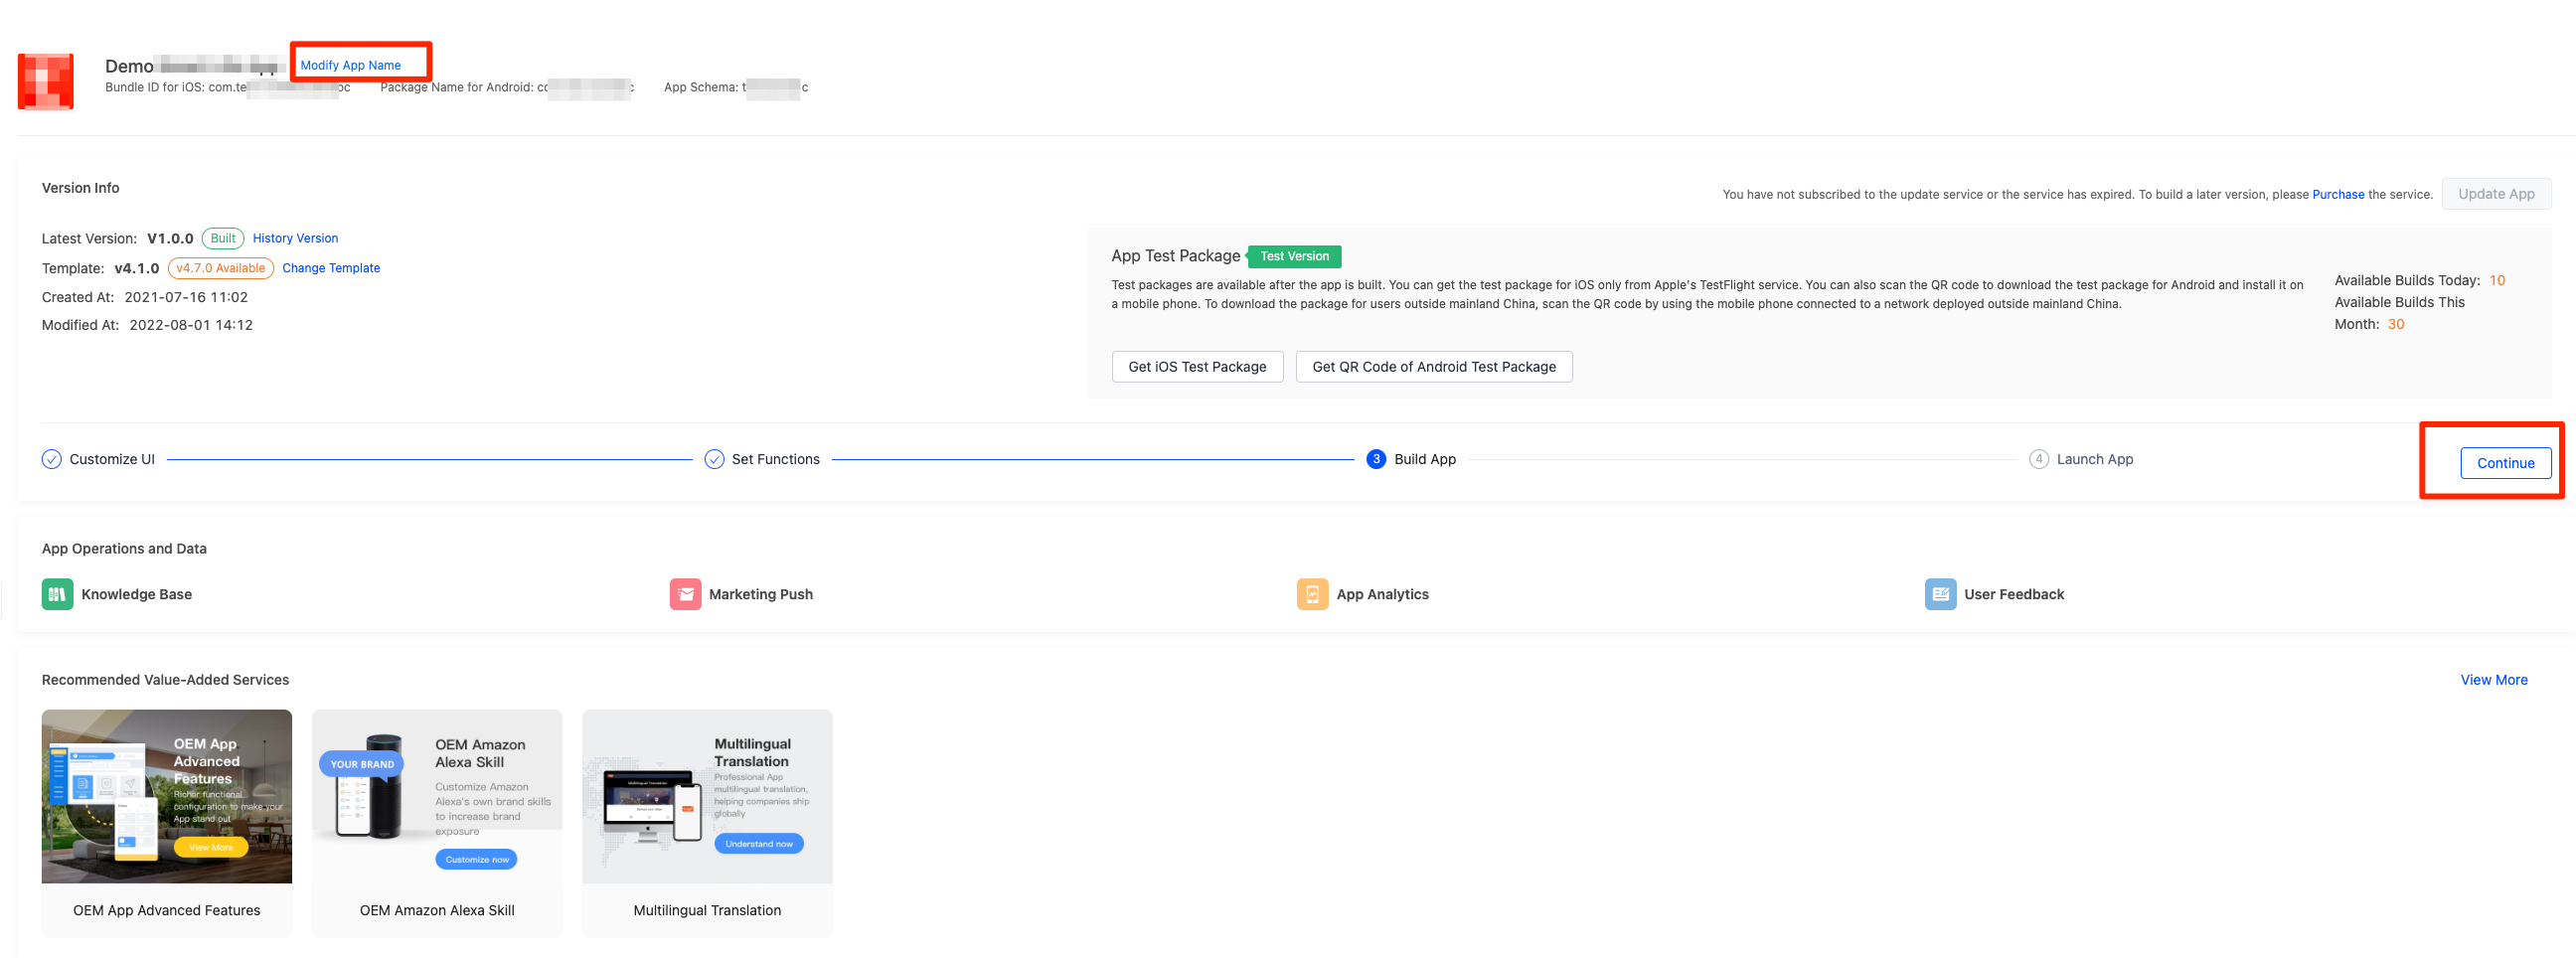
App overview
After you subscribe to the OEM App service, enter the app overview page from the OEM app list and update the following information as needed.
-
Modify App Name: Currently, the name can be set only in Chinese and English. If the name in Simplified Chinese is not specified, the name in English is displayed.
-
History Version: If you have created two or more versions of your app, click History Version to view the configuration information of the historical versions.
-
Change Template: If the template version of your app is earlier than the latest template on the Tuya Developer Platform, you can choose Change Template > Update to select the latest template. The updates take effect only after you rebuild the app. Click View Release Notes to view the functions of the latest template.
If you want to get notified of the latest template, you can subscribe to App Update notifications from the Subscriptions service.
-
Continue: Click here to enter the last configuration page of the latest version.
-
App Operations and Data: You can view the app analytics and feedback from the users, and check information about the marketing tools for the app.
-
Recommended Value-Added Services: If you want to subscribe to more functions of the app, you can view and subscribe to desired services.
Launch app
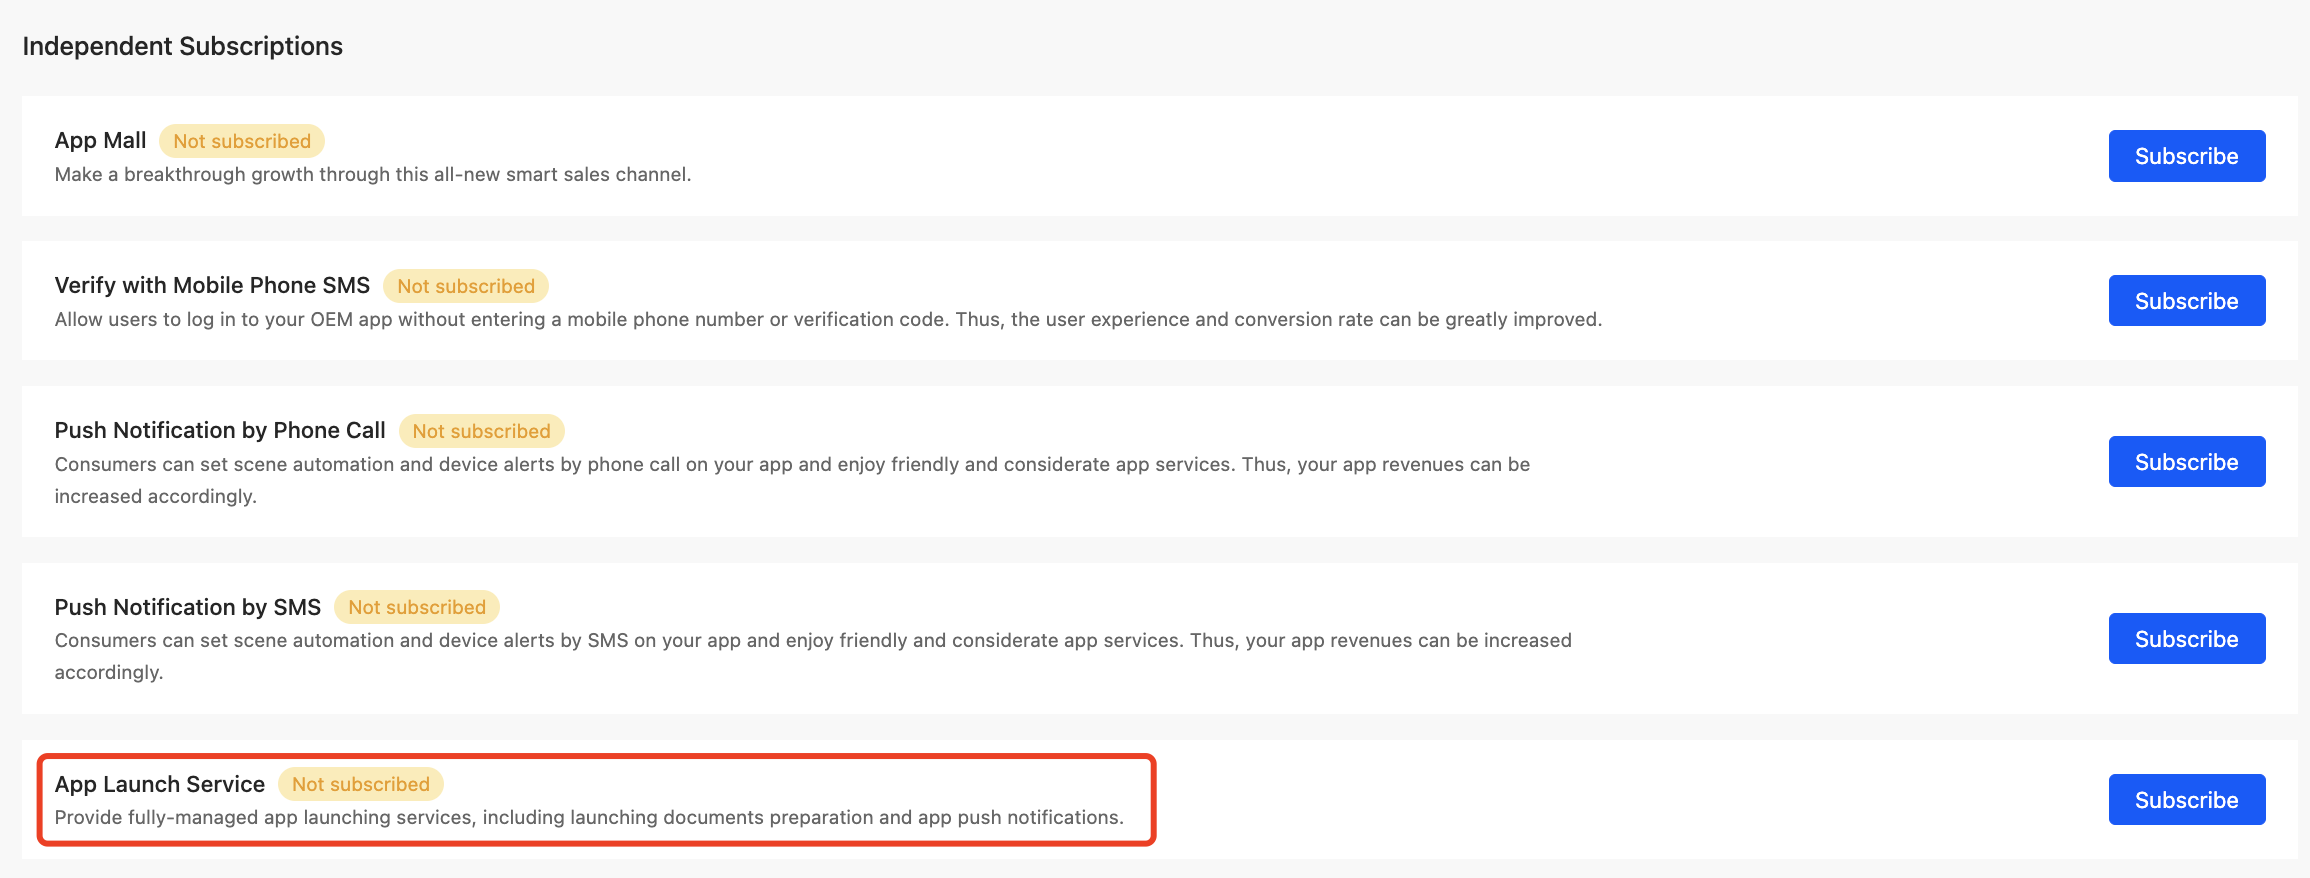
Method 1: Purchase App Launch Service
-
Find and subscribe to App Launch Service at Advanced Functions > Take Effect in Real Time > Independent Subscriptions.
After you modify the content in the development step, such as UI and extended functions, you must rebuild the app.
-
If you have not purchased the App Launch Service, we recommend that you purchase this service in advance. Because certain required functions of the app depend on third-party platforms, Tuya provides related configuration services for Location, App Certificate, and Push Certificate.
-
If you have already purchased the App Launch Service, the system will display a prompt, and Tuya’s staff will contact you. You can ignore the steps for launching and Tuya’s staff will complete the follow-up operations.
Method 2: Launch app by yourself
-
If the app is not fully configured, you will be prompted to configure it. You can click Configure for each item to complete the required configurations.
As long as any configuration is modified, the app must be rebuilt to make the modification take effect. After the configuration is completed, you can rebuild the app. To accelerate the build process, we recommend that you complete all the configurations at once before building.
-
After the app is built, uninstall the previous app version and install the latest version for testing. Check whether the push notifications and map function for Android take effect, and continue to launch the app. Push notifications for iOS can be tested only after the app is launched.
-
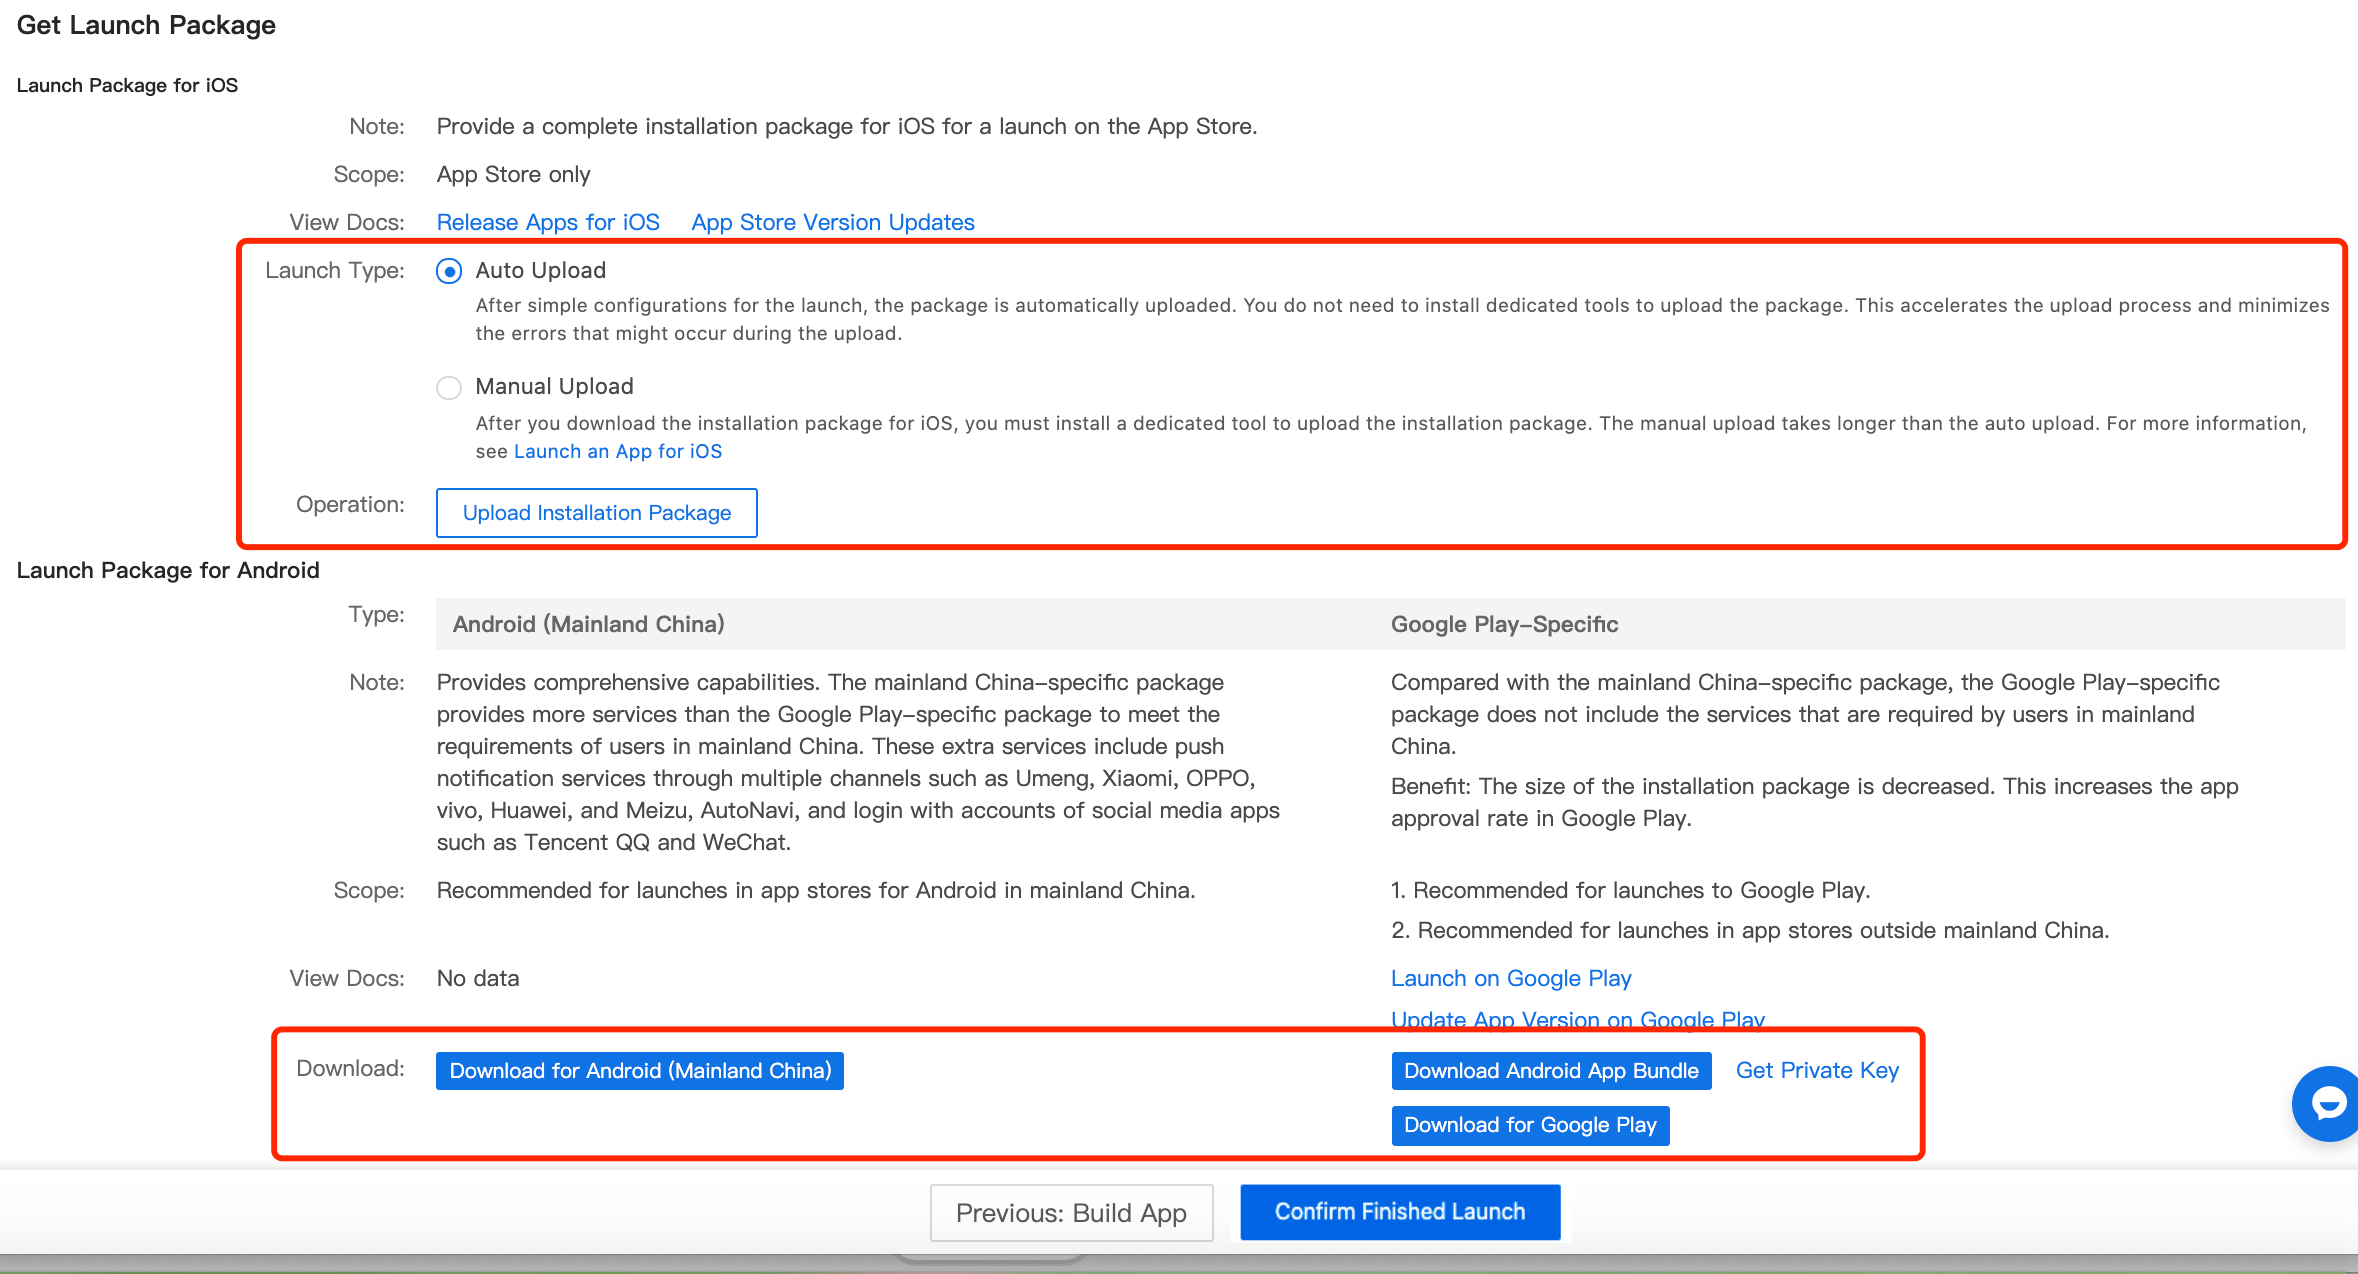
You can upload and download the bundle for iOS on the Tuya Developer Platform. To pass the strict review of apps for iOS, carefully read the operation manual and launch your app with respect to the specifications.
-
The installation package for Android supports Android (mainland China) and Google Play-specific packages. Starting in August 2021, new apps will be required to launch with the Android App Bundle on Google Play.
- By default, the Android (mainland China) package includes the AutoNavi map service. It allows login with WeChat and Tencent QQ accounts and supports push notifications for multiple mobile phone brands.
- The Google Play-specific package includes Google Maps and Google Push services.
-
-
(Optional) You can submit a ticket to consult and troubleshoot problems when you launch the app.
-
After your app has passed the review, click Confirm Finished Launch at the bottom of the page to confirm that the app has been launched on the app stores.
Required setting
To launch your app, the following functions on the Required Setting page must be finished.
User agreement and privacy policy
-
(Optional) Tuya provides Template Reference in multiple languages, including Chinese and English. You can download and customize your content. To launch your app, versions in English are required.

-
Click Add Version. You need to provide the custom content of the privacy policy and service terms.
-
To launch your app, versions in English are required.
Tuya’s privacy policy and user agreement templates are for reference only. Upload your versions of the privacy policy and user agreement with accurate and legal content. If you follow the entire content of the template, Tuya shall not make any representations or warranties as to the applicability and application results of the specified template. To meet the mandatory regulatory requirements and improve privacy protection, Tuya will modify and publish the template content from time to time. You must check and update your privacy policy and user agreement if you follow the template content.
Certificate for iOS
If you want to launch your app on Apple’s App Store, you must upload the required certificates. To create a certificate, you must register a developer account first. For more information, see Enroll in Apple Developer Program. If the certificate is not uploaded, the system will not be able to build an installation package or bundle, and the app cannot be launched.
Manually Create and Upload Certificates: For more information, see Create Certificates and Provisioning Profiles for iOS.
Certificate for Android
To launch your app on Android app stores, upload the required certificates. To create a certificate, you must register an Android developer account first and configure the app as required by the app stores. For more information, see the documentation of the app stores. If the certificates are not uploaded, the system will not be able to build an installation package, and the app cannot be launched.
-
App certificate
-
Signature Protection for Android: App security can be improved after setting. For more information, see Enable Signature Protection for Android.
-
App Signing Certificate: You can apply the certificate to specific services. For example, you must provide the certificate to get the token that enables Login with Amazon (LWA).
-
-
Set the push certificate according to the location of the app user:
-
Google FCM: the certificate information that must be set when you use the Google Push service. For more information, see Register FCM.
-
To send push notifications to users in mainland China, you can use the Tuya push channel or Umeng push channel.
To allow users to receive push notifications without the need to open the app, you must set up the branded system-level channel to push certificate information.
-
Map for Android
Click Get SHA-1 to get the related values, follow the instructions in Apply for Google Map Android API Key and Request AutoNavi Map Key to get the Google Map key or AutoNavi key, and then enter each key in the respective field.
Optional setting
The following sections describe how to configure the list of devices to be paired, integrate with third-party platforms, and access the mall service, and set other features on the Optional Setting page.
Devices
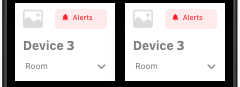
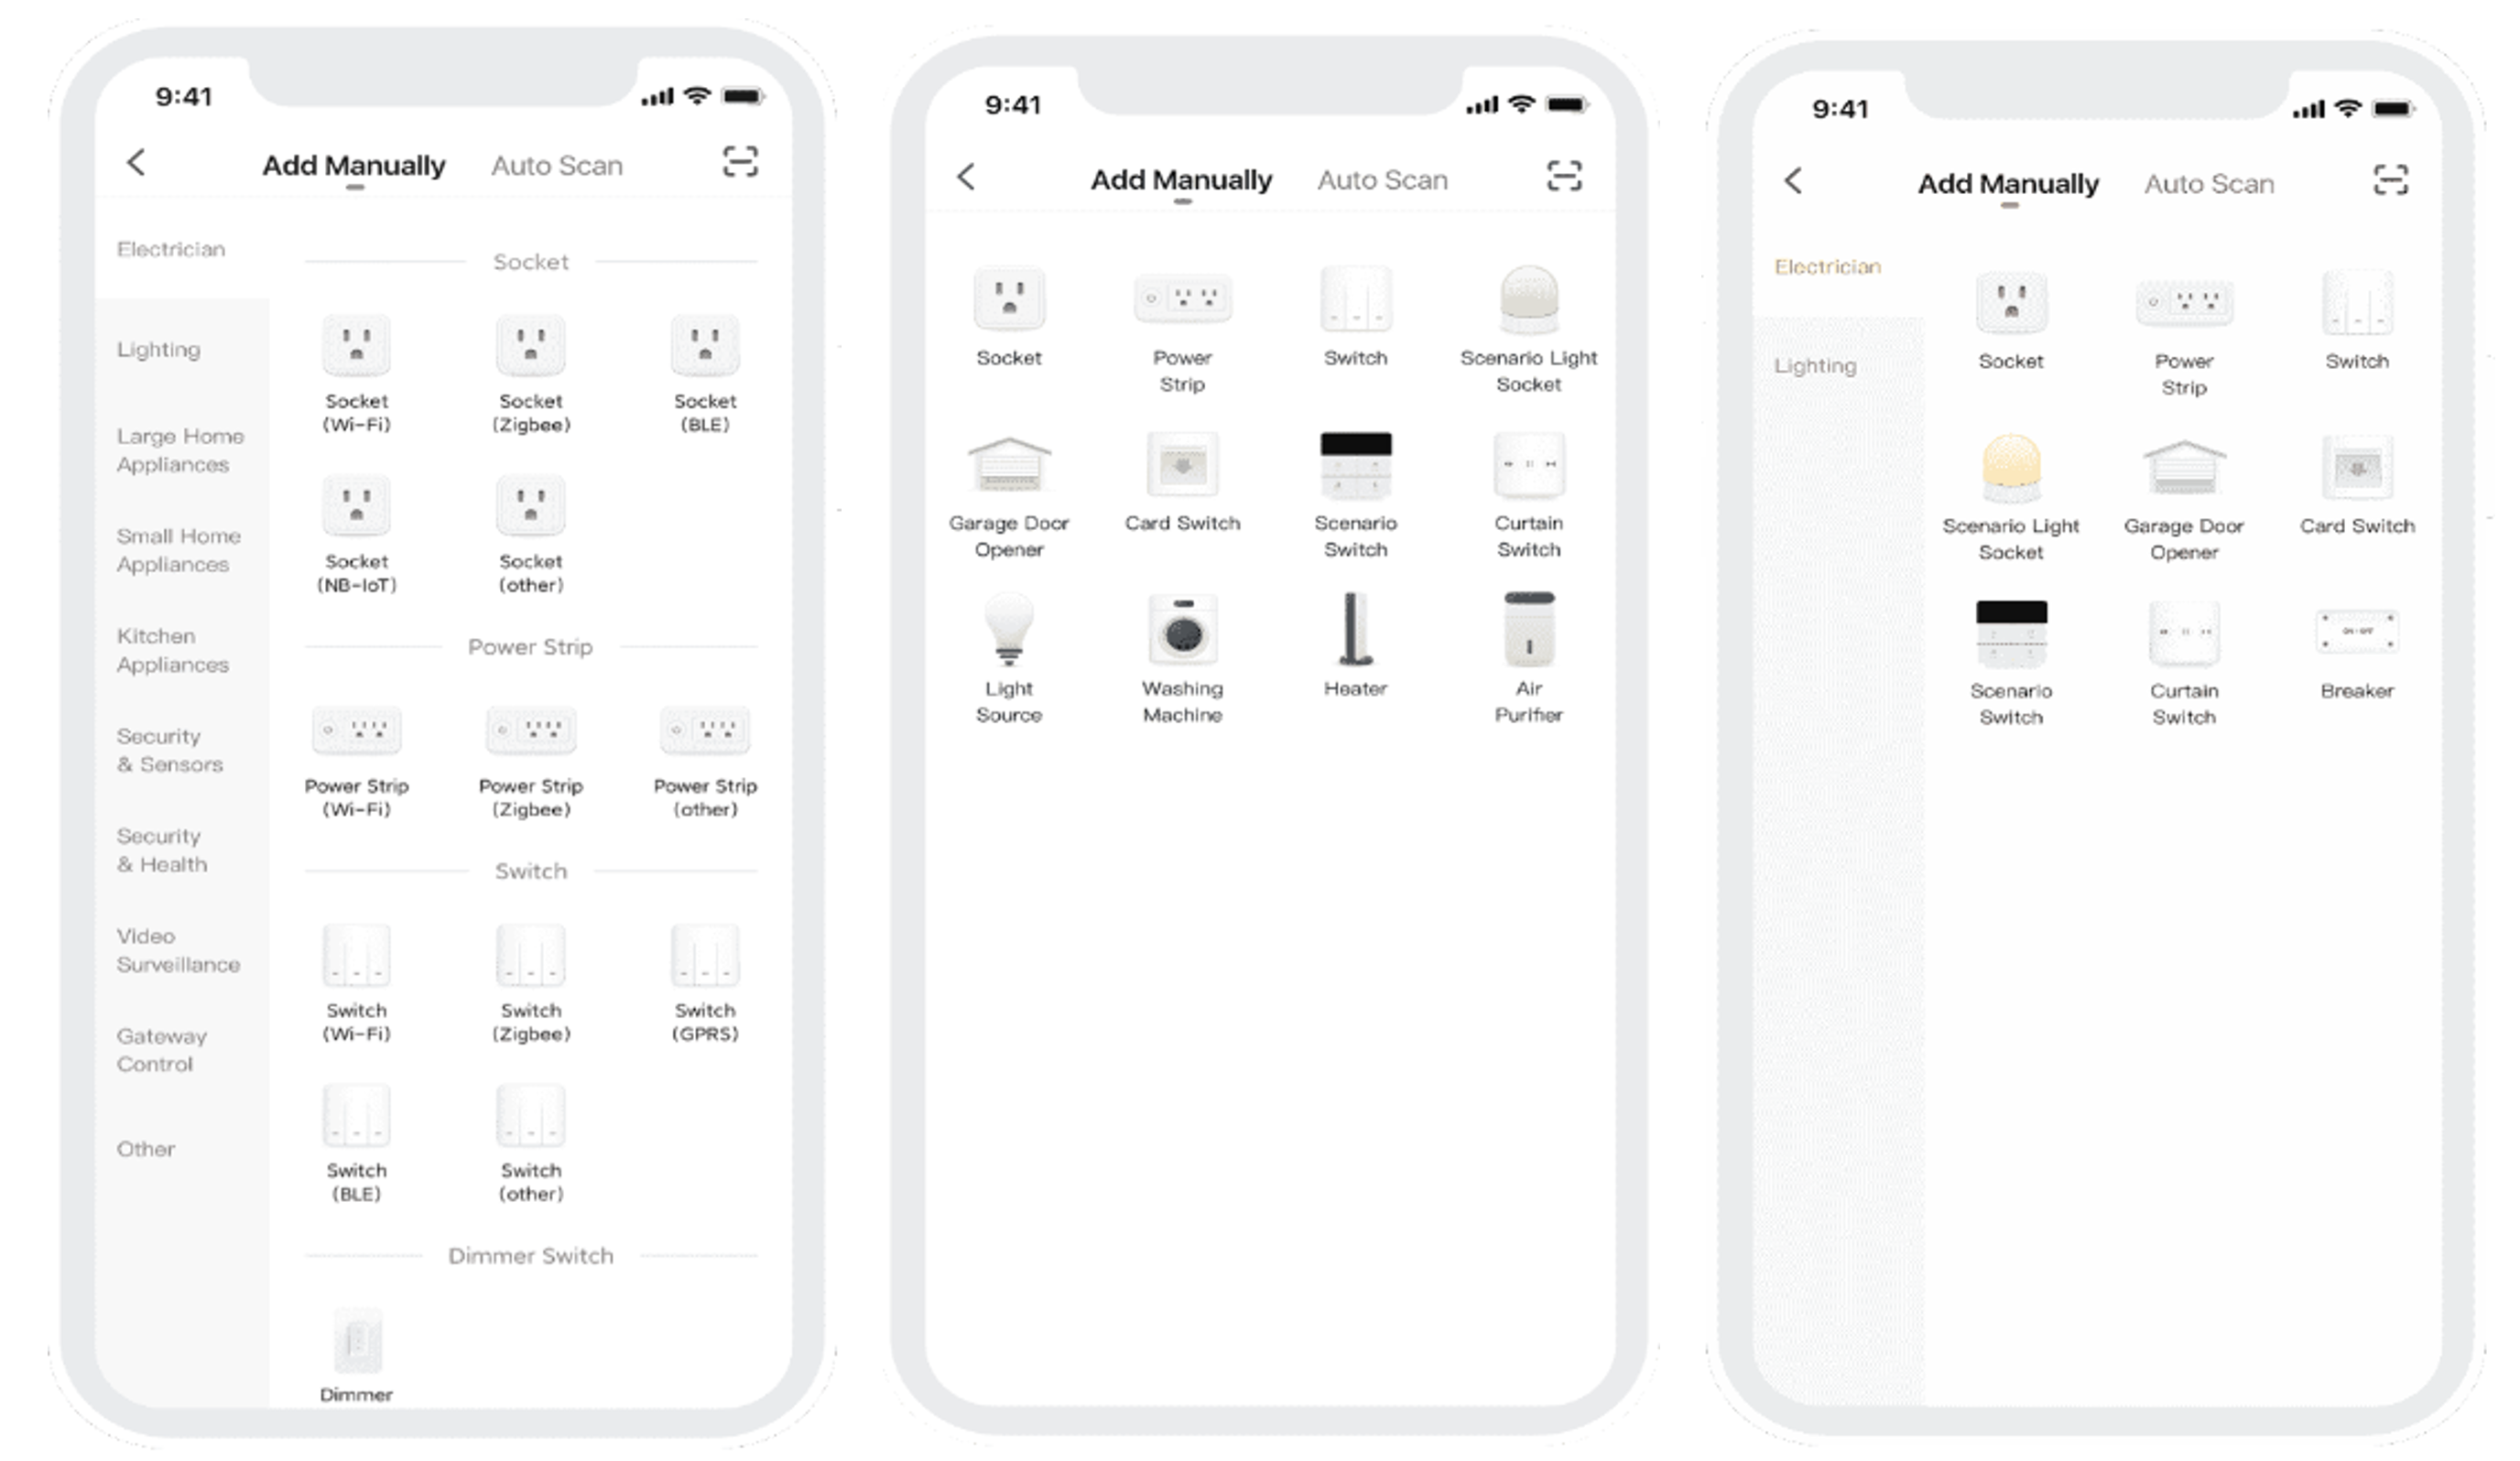
The list of pairing devices provides the category of devices for users to choose and pair with the app. The layout of the list supports the standard view, tiled view, and list view.
-
Standard View: Standard View is selected by default. For this category, the same pairing list and guide content as the SmartLife app are used. In the standard view, you cannot modify the pairing list and guide content.
-
Tiled View: If you have less than 10 categories, you can choose Tiled View. Users do not need to switch between categories. All available product categories are easily visualized.
-
List View: If you have multiple product categories, you can choose List View. In the list view, devices are classified into level-1 categories based on the tiled view. Users can quickly find the entry to pairing the target product by classification, and pair the device under the guidance.
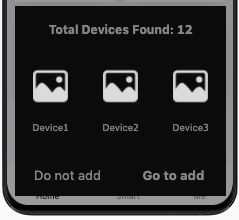
The following figure shows the previews of these views.
To customize the tiled view and list view, perform the following steps:
-
If no product has been created for the current space account, the product cannot be associated. You must create a product first or click Add Standard Category.
For more information about how to create a product, see Create Products.
-
Click Create Custom Category. In the Custom Category for Pairing dialog box, select the product to be associated with the category, and customize the icon and category name.
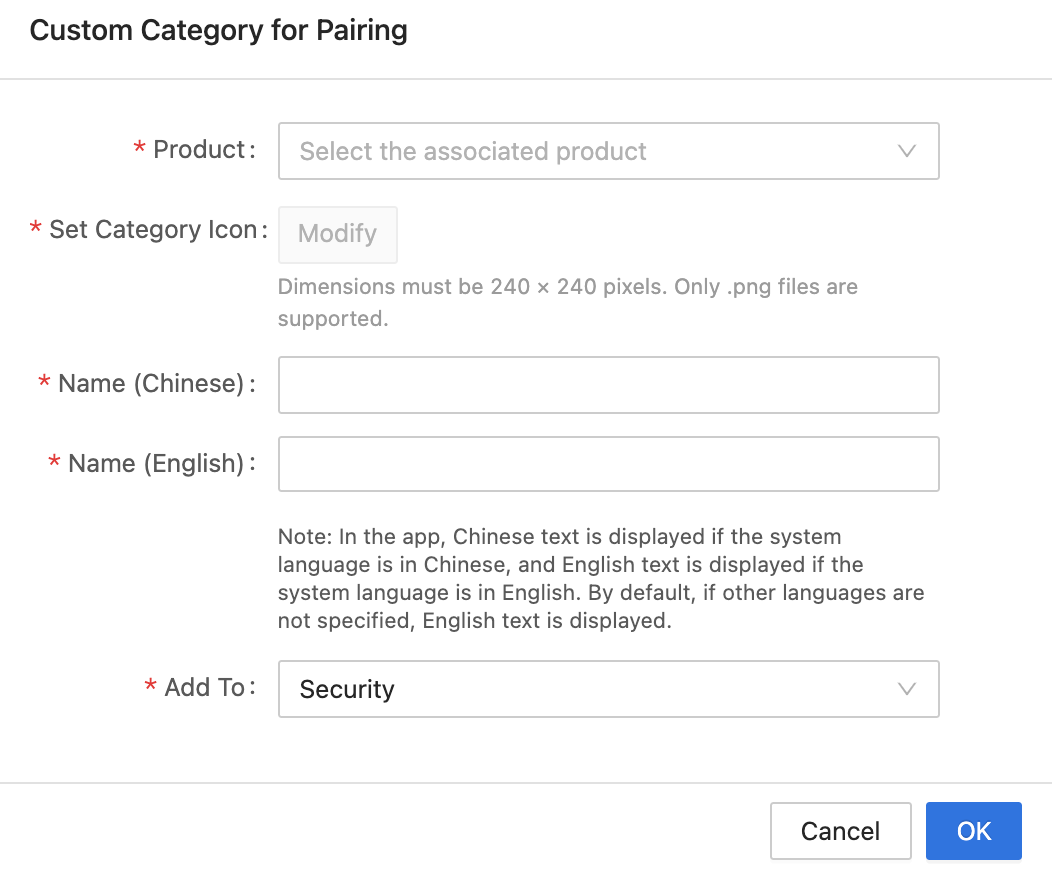
After the association, during pairing with the specified category, the app user can see pairing guidance. Accurate pairing guidance can improve the success rate of pairing.
-
After the creation is successful, you can set the category name in other languages in the dialog box that appears.
-
Click a category to see the hamburger menu icon on the left side of the category. Click and hold the icon to sort the specified category.

-
Click Setup Instructions in the Operation column to navigate to the pairing wizard of the product. You can improve pairing wizard content by following actual pairing steps and things to note. For more information, see Configure Pairing Information.
-
Click the meatballs menu (…) in the Operation column to view more operation items:
- Click Multilingual to navigate to the multilingual configuration page for the pairing list.
- Click Modify to modify the specified information in the dialog box.
- Click Delete. In the dialog box that appears, click OK to delete the category. The deletion operation immediately takes effect. Proceed with caution.
To add a standard category, perform the following steps:
- Click Add Standard Category. In the dialog box, add the required standard categories to the Selected column.
- You cannot modify the icon, name, and pairing guidance of a standard category. You can only sort the list of devices to be paired, or delete the category.
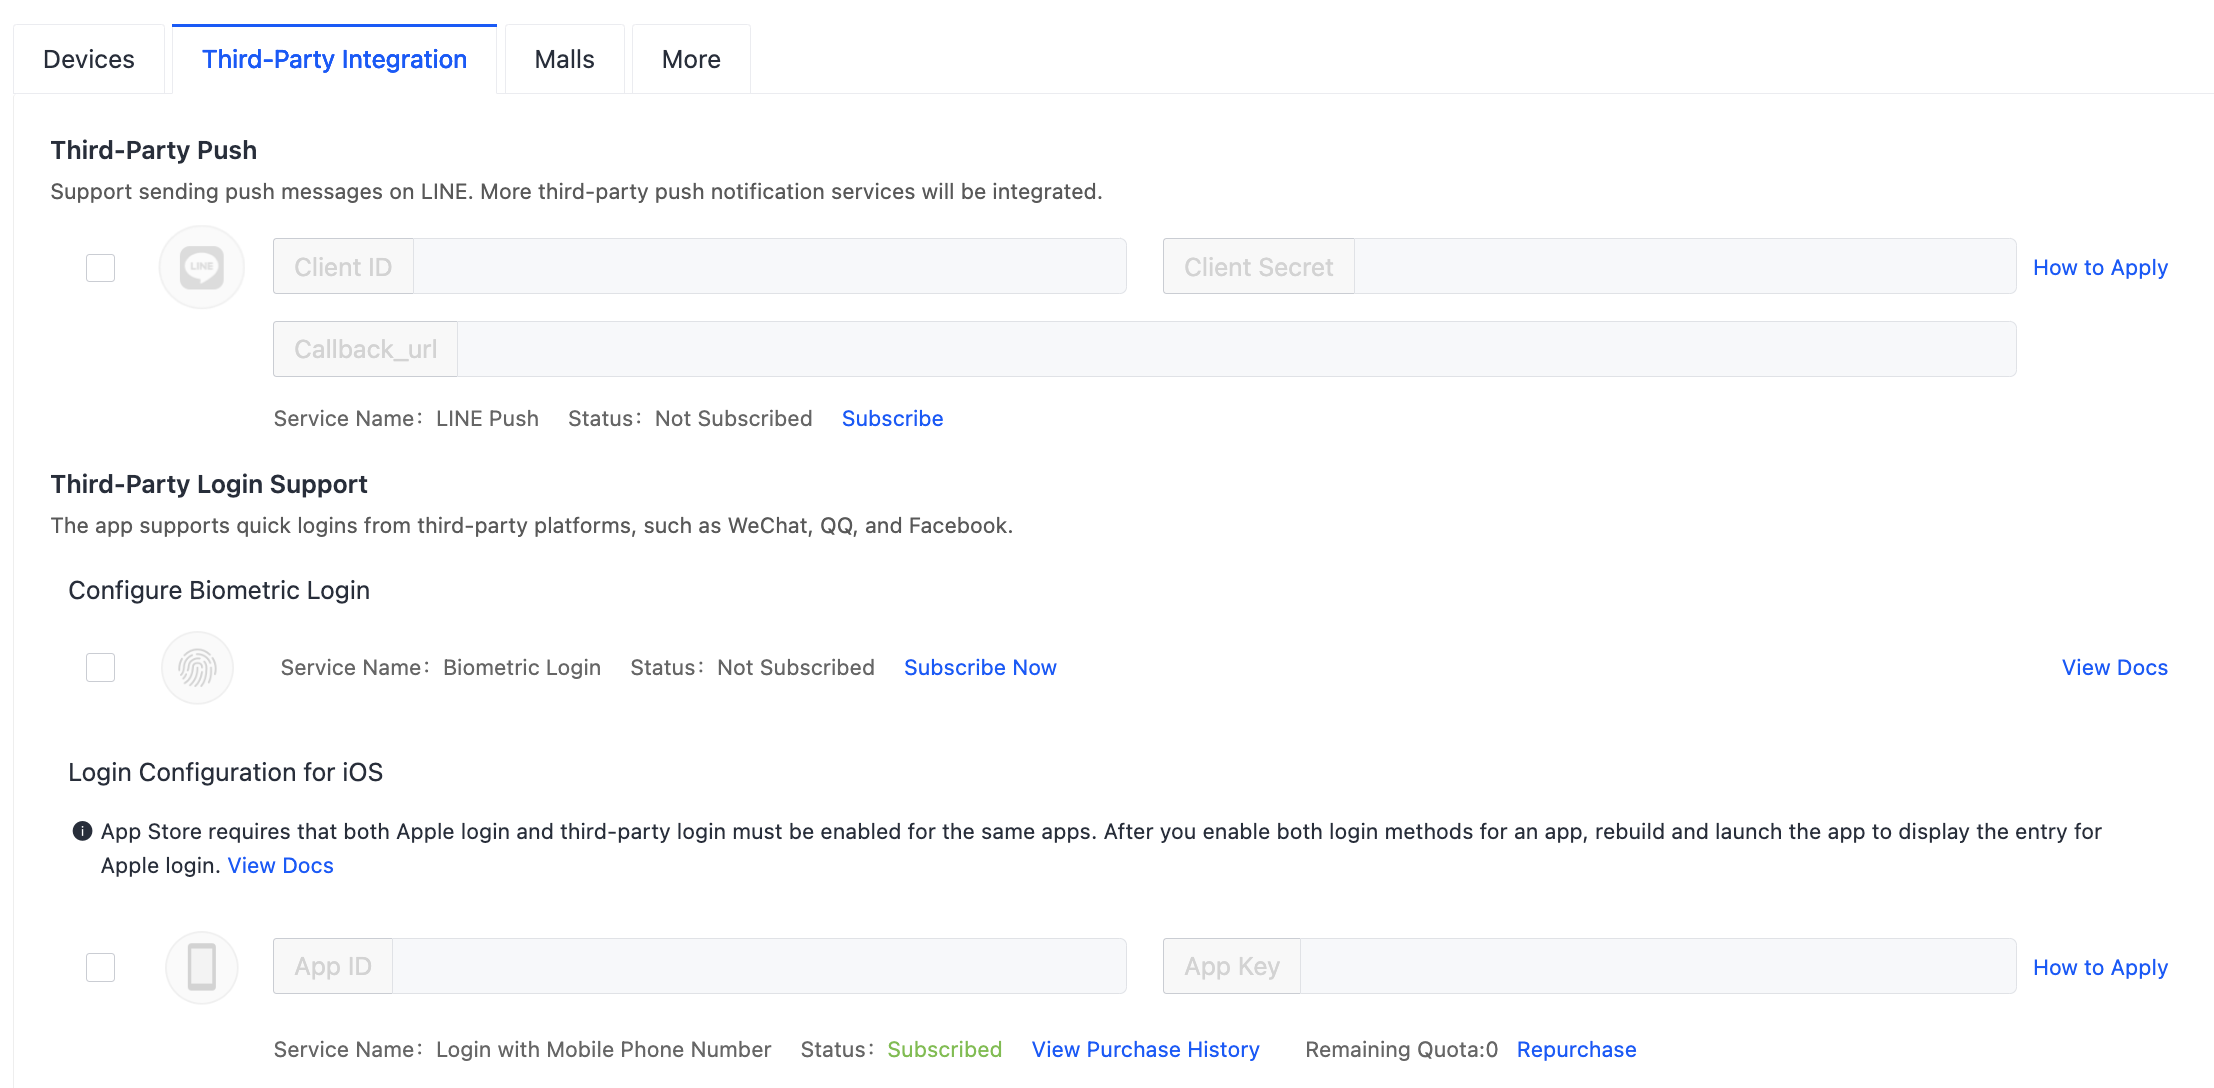
Third-party service integration
The following sections describe how to preset third-party push notifications triggered by smart devices and enable login with third-party accounts. For more information, see Third-Party Service Integration.
Malls
On this tab page, you can navigate to the App Mall and check the mall that is associated with your app. You can also check the Mall tab label and Mall Center name and set the multilingual options that appear on the app
More
-
Simultaneous Login on Devices: You can choose whether to enable simultaneous login on multiple mobile phones with the same account.
-
Support Tuya’s Generic Skills: You can choose whether to enable Tuya’s generic skills and allow smart speakers to control devices.
-
Verify with Mobile Phone SMS: After this feature is enabled, users can register and log in with an app account or reset the password using their mobile phone number. They can also bind their mobile number with the app.
Common tools
The following sections describe how to configure the app download URL, add update notifications, and manage the debugging allowlist at Common Tools.
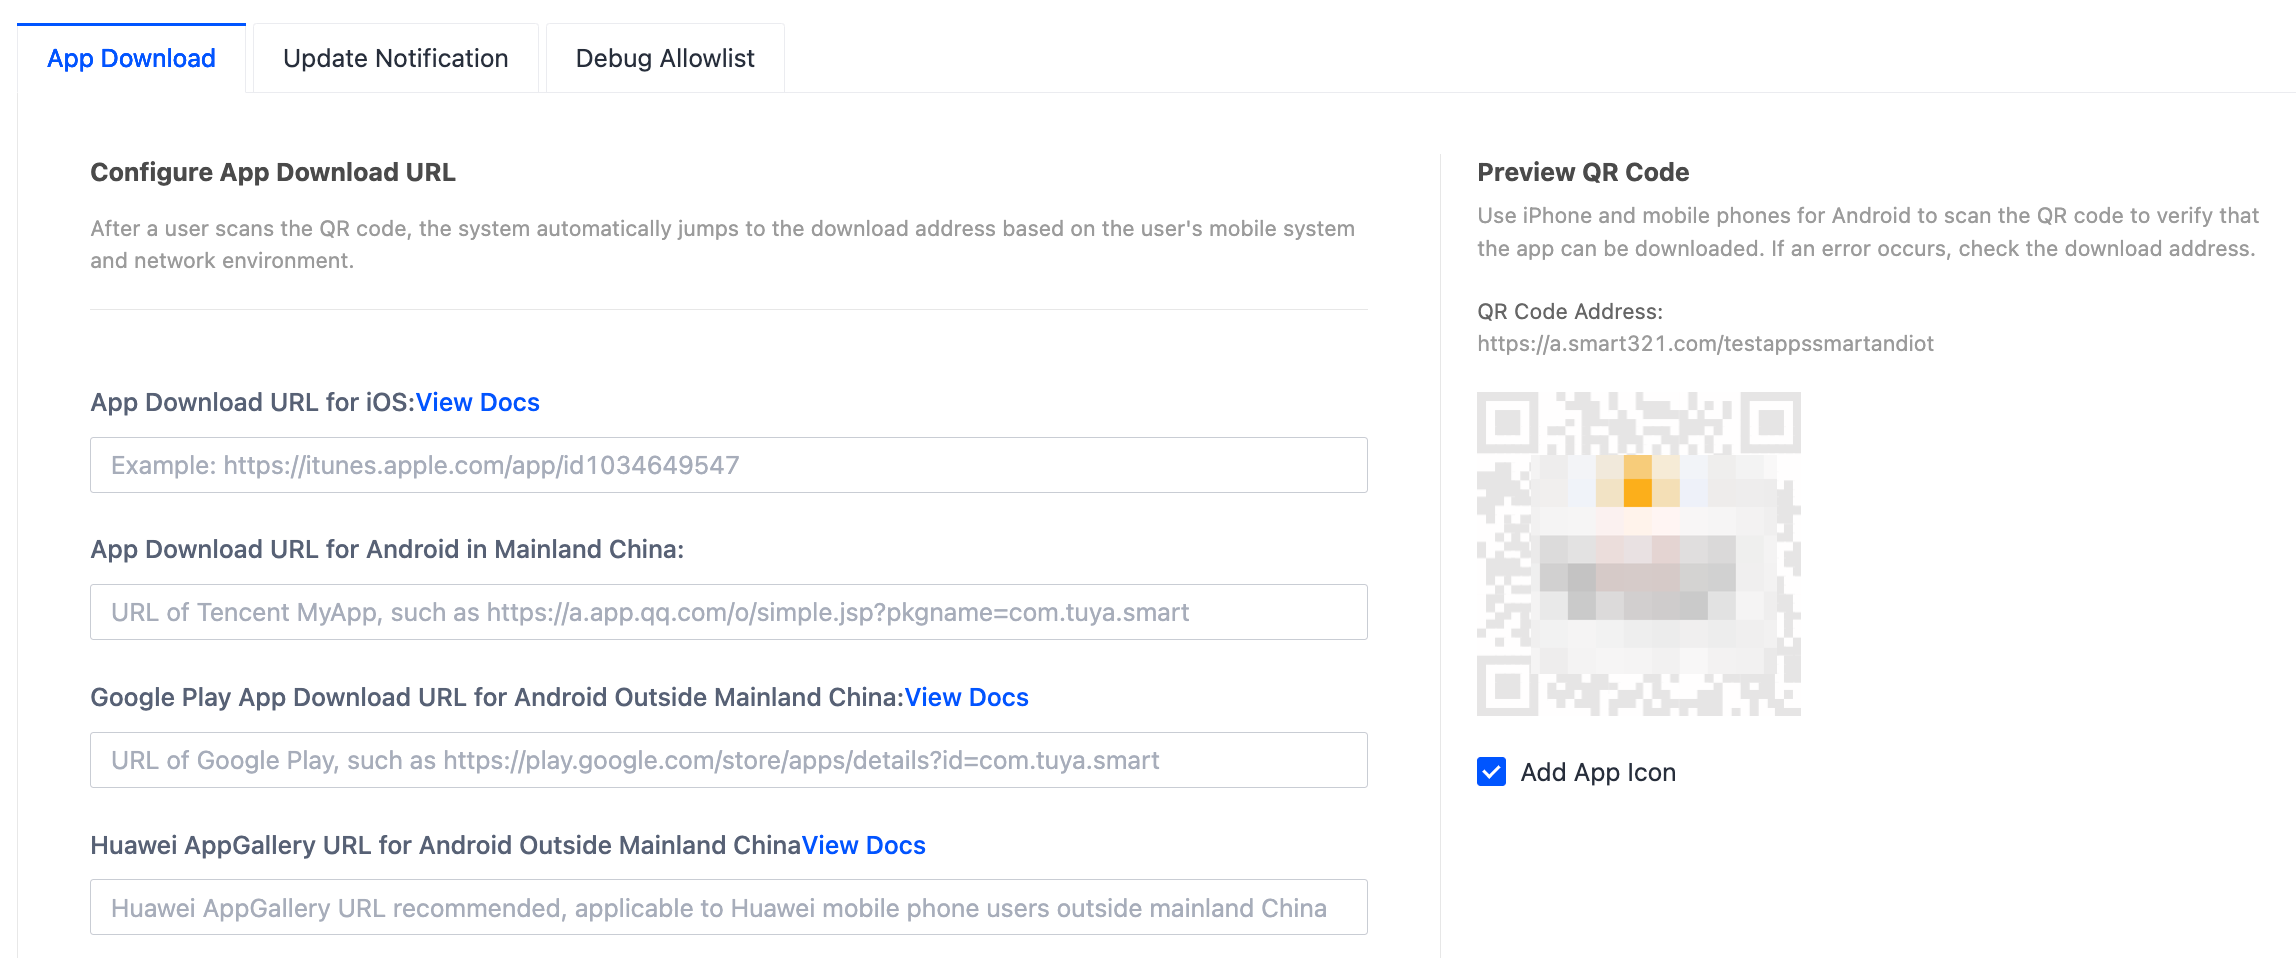
QR code
A QR code can be printed on the outer packaging of the product and can be used properly even if the app is updated later. Make sure that the specified download URL is available. It must be the URL of the app details page that appears on each app store.
The QR code of one download URL must be configured before the QR code can be displayed. You can get the download URLs from the app stores. Only after the download URL of each operating system is set, users can scan the QR code and visit the download URL to download the app.
Update notification
You can configure the update notification feature. This way, when your app updates are released, update notifications are sent to app users. The users can determine whether to update the app. For more information, see Configure Update Notification Push.

Manage allowlist for debugging
You can add an app account registered in mainland China to the debugging allowlist. Then, the app user can choose Me > Settings > Multilingual Debug Mode on the app, and check the latest updates of UI text.
Smart settings
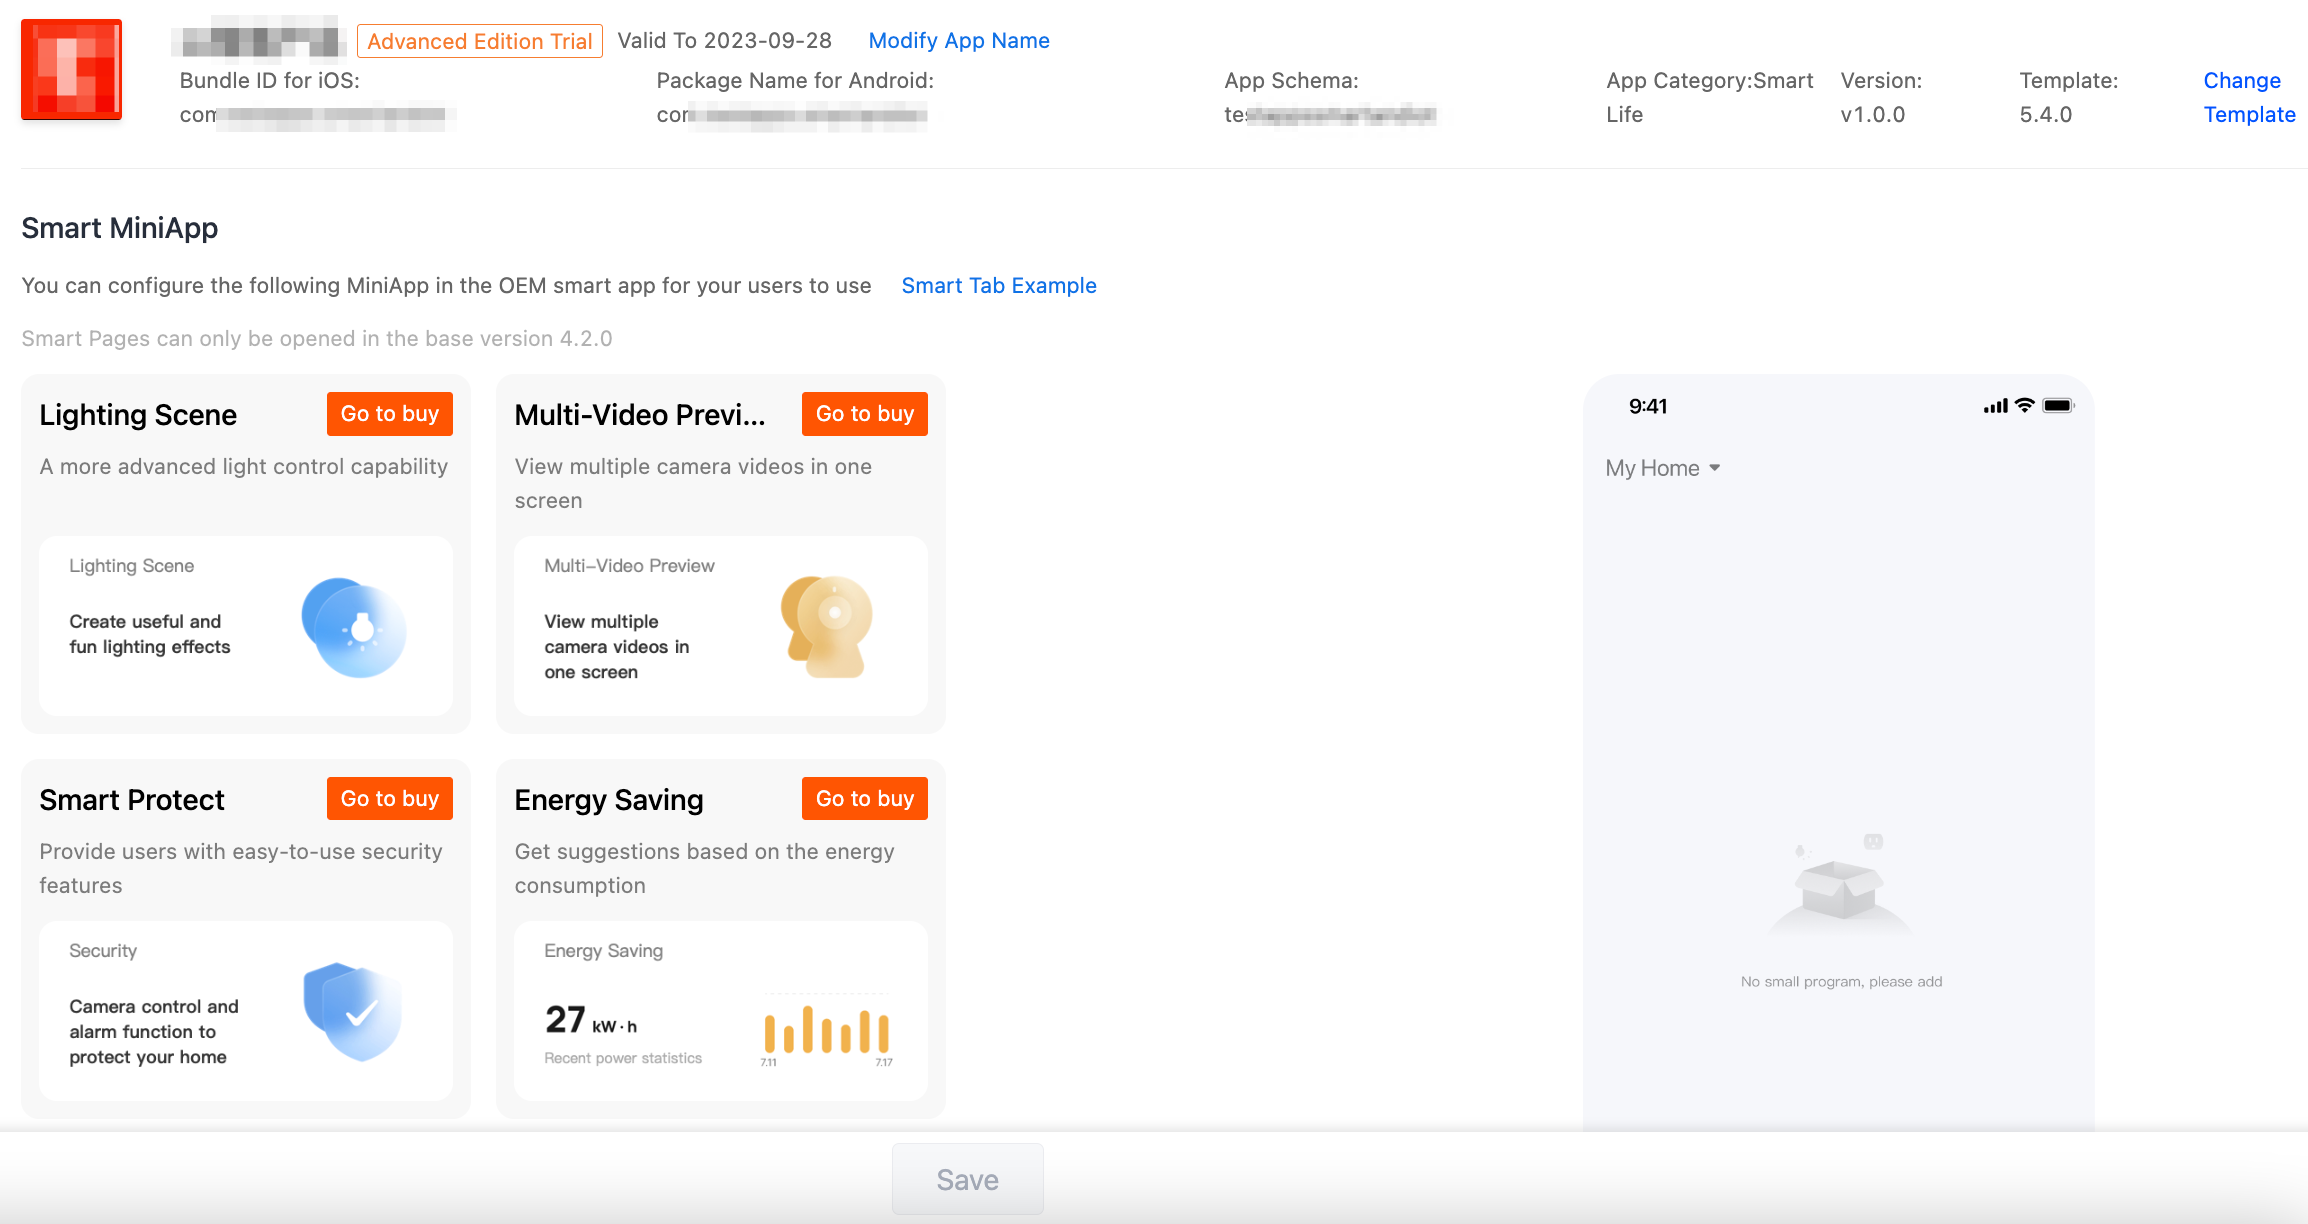
Choose OEM App > Smart settings and configure smart miniapps for the app. For more information, see Configure Smart Miniapps.
Multilingual settings
Currently, you can modify all entries in the same task and modify specified entries online.
-
Method 1 (batch modification): You can export the spreadsheet of the app UI entries, modify the content in this file, and then upload the edited file.
-
Method 2 (individual modification): You can search for the specified entry with UI text and modify it.
For more information, see App Multilingual Introduction.
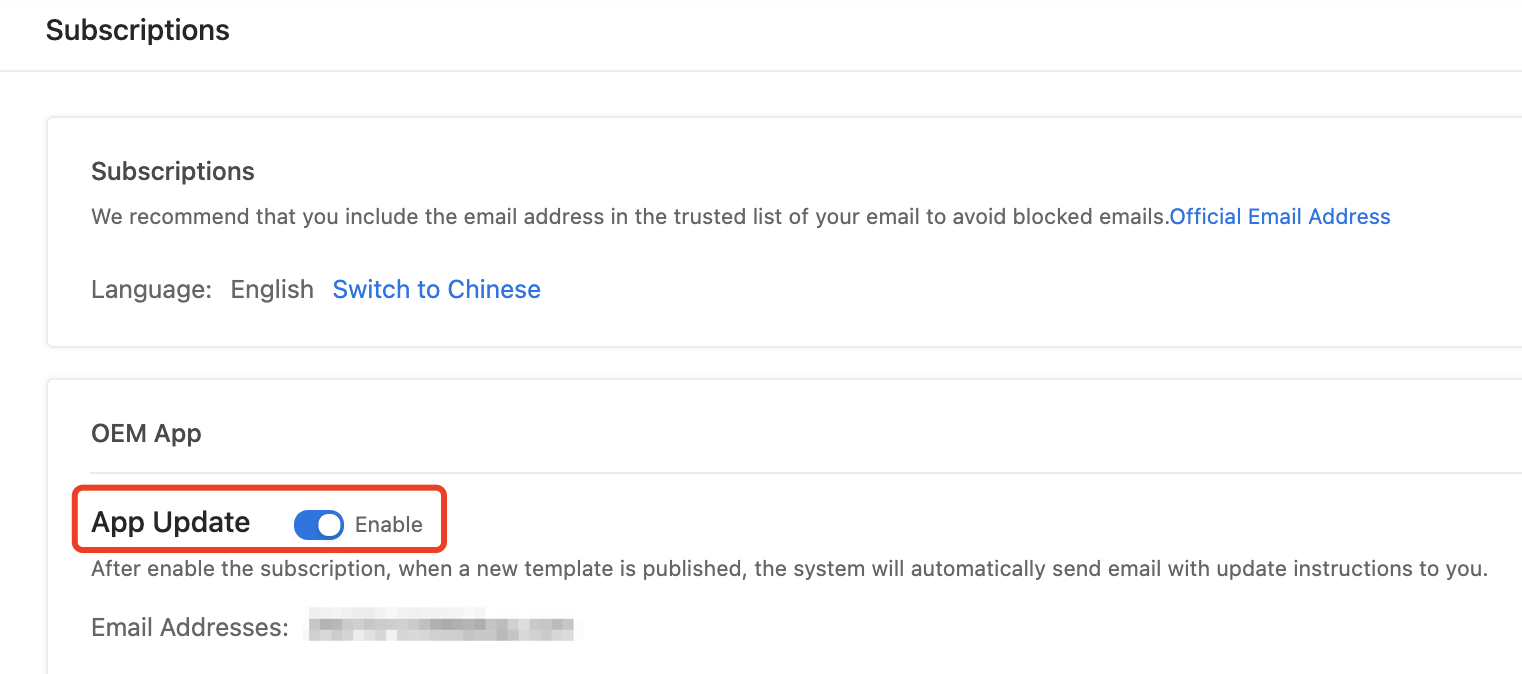
Subscribe to template updates
The OEM app can be iterated and updated. After you enable App Update in the OEM App section of Subscriptions, your specified email address will receive notifications of the template updates.
Currently, up to 30 email addresses can be set in the same subscription.
Is this page helpful?
YesFeedbackIs this page helpful?
YesFeedback


