Develop Smart Heater
To develop a product on the Tuya Developer Platform, you need to define product functions, select and customize device panels, develop embedded firmware, and perform a production test.
Step 1: Define product functions
You can set functions for a product, including standard functions, custom functions, and cloud functions.
A product function is the abstraction of a feature that is provided by a smart device. You can use product functions to describe the features and parameters of smart devices. Based on the product functions, the Tuya Developer Platform generates things data models in the cloud to connect to and control the smart devices. This makes product functions and data interactions easy to understand.
Data point (DP) data type
Tuya Developer Platform allows you to define functions with six data types, including Boolean, value, enum, fault, string, and raw. For more information, see Data type.
Standard data point
| DP name | Identifier | Data transfer type | DP type | Required | Remarks |
|---|---|---|---|---|---|
| Switch | switch | Report and send | bool | No | / |
| Target temperature | temp_set | Report and send | value | No | The value range depends on the functional design of the heater. |
| Actual temperature | temp_current | Report only | value | No | Report the detected temperature changes, and sync the heater display with the value on the app panel. |
| Working mode | mode | Report and send | enum | No | Customize the value based on the standard enumeration values. |
| Level | level | Report and send | enum | No | / |
| ECO mode | eco | Report and send | bool | No | / |
| Child lock | child_lock | Report and send | bool | No | / |
| Swing | shake | Report and send | bool | No | / |
| Anion | anion | Report and send | bool | No | / |
| Lighting | light | Report and send | bool | No | / |
| Countdown | countdown | Report and send | enum | No | 1. After the countdown on/off is set, the remaining time of the countdown must be updated every minute (n=n-1) during execution. 2. When the remaining time of the countdown is 0, the heater executes the specified logic and reports the countdown as 0. 3. If the heater is manually turned on or off in advance, the countdown must end automatically, and report the countdown and the remaining time as 0. 4. The countdown can be configured to only shut down the device. |
| Remaining time of countdown | countdown_left | Report only | value | No | / |
| Fault warning | fault | Report only | bitmap | No | / |
| Working status | work_state | Report only | enum | No | / |
| Actual power | work_power | Report only | enum | No | / |
| Weekly schedule (six daily periods) | week_program_5 | Report and send | raw | No | Set up six periods every day. The MCU-based development is required. It consists of 168 bytes. Note 1: Submit a service ticket or use the Tuya Developer app to contact Tuya’s project manager. Note 2: For more information, see Weekly Schedule. |
| Weekly schedule (mode) | week_program_6 | Report and send | raw | No | Select the mode of device timing. The MCU-based development is required. It consists of 168 bytes. |
| Weekly schedule (custom) | week_program_7 | Report and send | raw | No | Select the temperature. It can be set to a switch, mode, or mode and switch combo. This is a cloud timing feature. Note: You can choose either this feature or the timing of cloud functions. |
| Weekly schedule (switch) | week_program_8 | Report and send | raw | No | Select the switch. The MCU-based development is required. It consists of 21 bytes. |
| Weekly schedule (temperature) | week_program_9 | Report and send | raw | No | Select the temperature. The MCU-based development is required. It consists of 168 bytes. |
| Temperature unit conversion | temp_unit_convert | Report and send | enum | No | Specifies the default temperature unit. |
| Target temperature in °F | temp_set_f | Report and send | value | No | It is used with temperature unit conversion. |
| Current temperature in °F | temp_current_f | Report and send | value | No | It is used with temperature unit conversion. |
| Timer | Cloud functions | / | / | No | 1. It can be used as a weekly schedule with up to 30 timers. After configuration, the logic will be stored on the module, and the module timing of the device will be controlled by the module clock. After successful configuration, the feature is available in case of network disconnection. 2. The timer only has a switch by default. You can add the mode and temperature. 3. It can be configured as timing in the cloud only. You can choose either this feature or the weekly schedule (custom) week_program7. |
Custom function
You can add custom functions that are not supported by standard functions. For more information, see Custom Function.
Advanced function
Advanced functions support cloud timing and jumping page. For more information, see Advanced Function.
- Cloud timing: allows you to implement the schedule feature without embedded development.
- Offline notification: shows a notification on the app when the device is offline.
- Jumping page: enables navigating to another web page, such as an online store and user guide.
Step 2: Configure a panel
After the function definition step, you can configure a favorite app control panel for the product. A panel is a GUI-based program that runs on top of a mobile app to control smart products. For more information about panel configurations and development tutorials, see Design App UI and Panel Development.
Step 3: Design hardware
Hardware development consists of hardware design and embedded development. The MCU SDK is often used to develop a heater product.
Hardware design reference
Generic design
| No. | Design type |
|---|---|
| 1 | Hardware Design Reference |
Module selection
| No. | Protocol type | Supported module | Hardware design reference |
|---|---|---|---|
| 1 | Wi-Fi and Bluetooth combo | WBR3 recommended | WBR3 Module |
| 2 | Bluetooth Low Energy (LE) | BT7L recommended | BT7L Module |
| 3 | Zigbee | TYZS7 recommended | TYZS7 Module |
| 4 | LTE | LZ201-CN recommended | LZ2x1 Series Hardware Design Guidelines |
Step 4: Perform embedded programming
Embedded programming is classified into MCU low-code development and TuyaOS development. In this step, you must implement device integration and business programming.
MCU SDK
As one of the most popular methods, the MCU integration solution enables products with built-in microcontrollers to connect to the cloud and become connected. Tuya provides one-stop IoT development services including the three essentials for typical IoT products, namely network modules, mobile apps, and cloud services. With Tuya’s MCU SDK, all-in-one mobile apps, and control panels, you can focus on application development simply, connect your product to the Tuya Developer Platform easily, and benefit from the cloud services quickly.
For more information, see MCU Low-Code Development.
Smart heaters can be developed based on multiple protocols, including Zigbee, Wi-Fi and Bluetooth combo, and Bluetooth mesh. For more information, see:
- Wi-Fi Common Solution
- Bluetooth Common Solution
- Bluetooth Mesh Common Solution
- Zigbee Common Solution
TuyaOS
Built on top of the RTOS, Linux, and Non-OS, TuyaOS is a distributed and platform-agnostic IoT operating system.
With a standard kernel at the core, TuyaOS is designed to tackle the heterogeneity of platforms, systems, and protocols in order to enable quick and reliable integration, interconnection, and interoperability.
The tiered and plug-and-play architecture design allows you to quickly tailor a solution based on your hardware resources hence reducing the cost of development with high cost performance. The efficient remote procedure call (RPC) mechanism and proprietary data point (DP) protocols make communication across protocols possible and easy.
Specifically, the following types of devices can be connected:
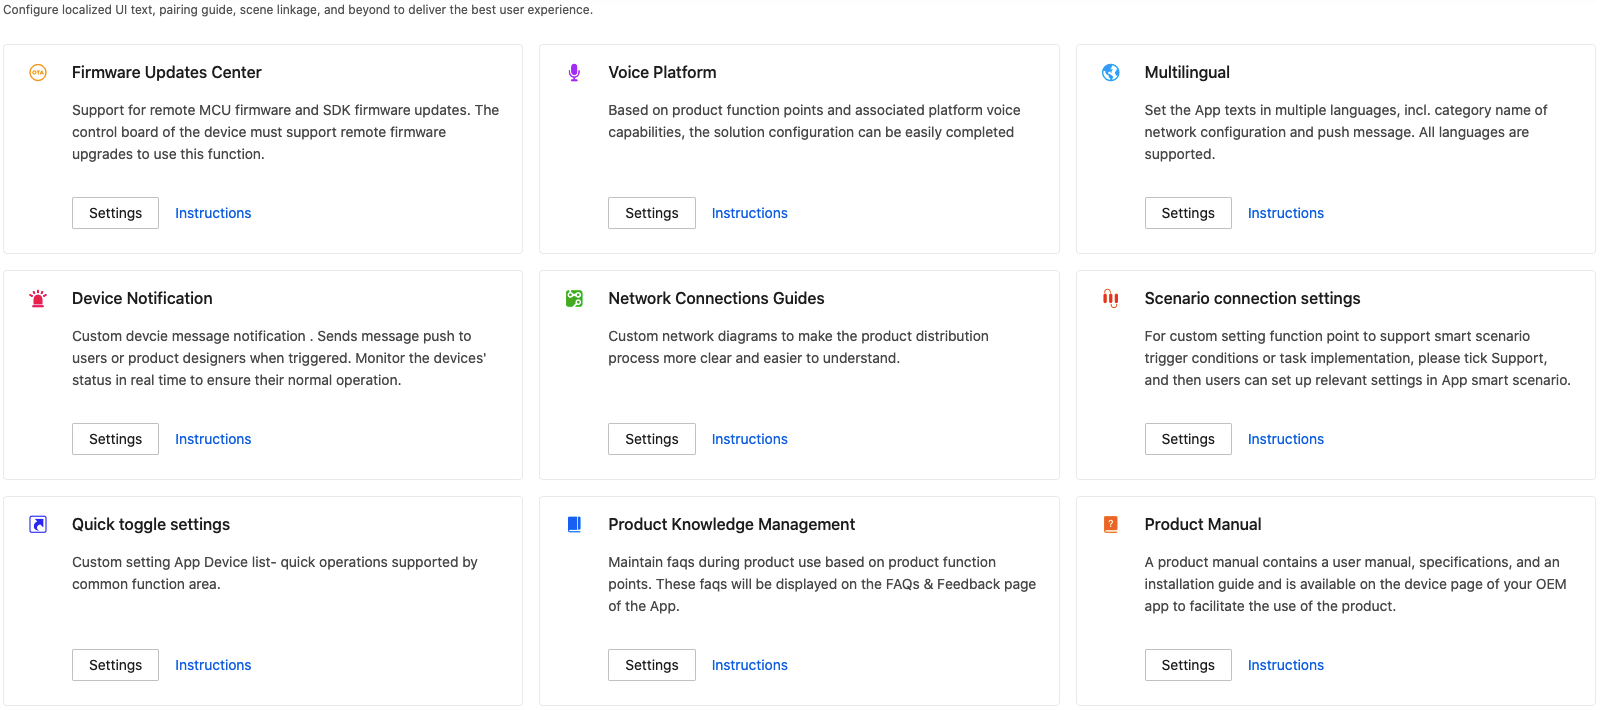
Step 5: Configure the product
In this step, the following settings are involved: firmware updates, voice capabilities, multilingual settings, device notifications, device pairing, smart scenes, quick toggle settings, product knowledge, and product manuals. Based on these settings, global cloud services are employed to promote a personalized user experience. You can update these settings and make them effective immediately without the need to deliver the devices again.
Particularly, multilingual settings, device pairing, voice capabilities, and smart scenes require precision and localized management based on the target user locations and the specific pairing methods and device features.
For more information, see:
Step 6: Flash firmware and authorize chip
Flash the device with the firmware and Tuya’s license to connect the device to the cloud. Tuya provides a variety of flashing and authorization methods for you to choose from according to different development stages.
Step 7: Test the product
Before your product can be released on the Tuya Developer Platform, you must submit a product test report. To test the product, you can download and run use cases, use Tuya’s Cloud Test app, or subscribe to Tuya Test Service.
Download and run use cases
For certain product categories, you can download use cases from the Tuya Test Service page, run the use cases, and then submit test reports.
Cloud Test app
Tuya’s Cloud Test app is provided with multiple test modes for you to accelerate troubleshooting based on functional modules. This enables all-in-one tests for the device status and interaction link.
For more information, see Cloud Test App.
Tuya Test Service
For more information, see Tuya Test Service.
Step 8: Release the product
In this step, you can release your product.
Next steps
Pass product certifications
A product must pass certain certifications before it is permitted to be sold. By virtue of its rich experience in the implementation of smart product solutions, Tuya provides multiple hardware product certification support services. You can select the required service based on your product type and certification requirements. For more information, see Product Certificate.
Is this page helpful?
YesFeedbackIs this page helpful?
YesFeedback


